NEXiiO · new app design
NEXiiO App Guide
How to use the new NEXiiO app on iPhone and Android: your home, rooms and devices, scenes, cameras and calls, and, for installers, how to add and set up devices. Every step shows the real app screen.
Edition November 2026 · NEXiiO app 2.0
Part 1 · Home owners
Getting started and your account
First start
The first time you open NEXiiO you create an account, or log in with one you already have.
The new look
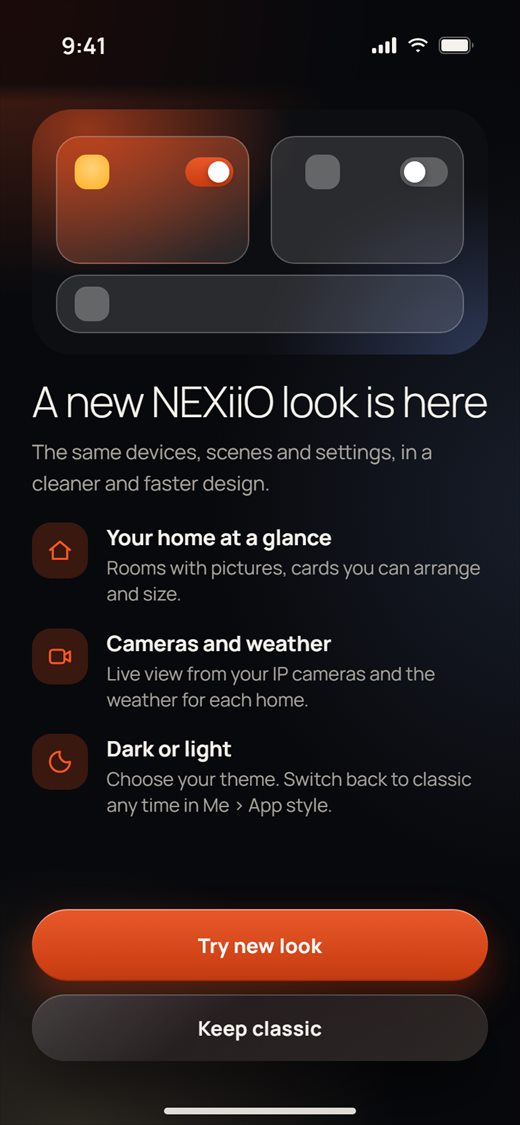
If you already used NEXiiO and update the app, you may see A new NEXiiO look is here once.
- Tap Try new look to switch to the new design. Your devices, scenes and settings stay the same.
- Or tap Keep classic to stay with the old design. This screen does not come back. You can switch any time later in Me › App style.
Welcome
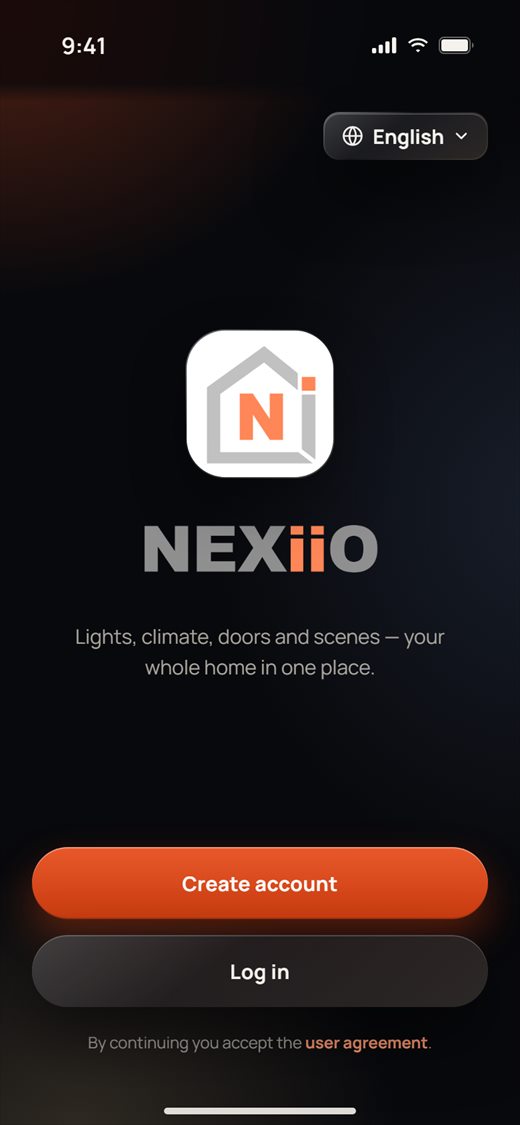
- On the Welcome screen, tap Create account if you are new to NEXiiO, or Log in if you already have an account.
- To read the user agreement first, tap user agreement at the bottom.
Create an account
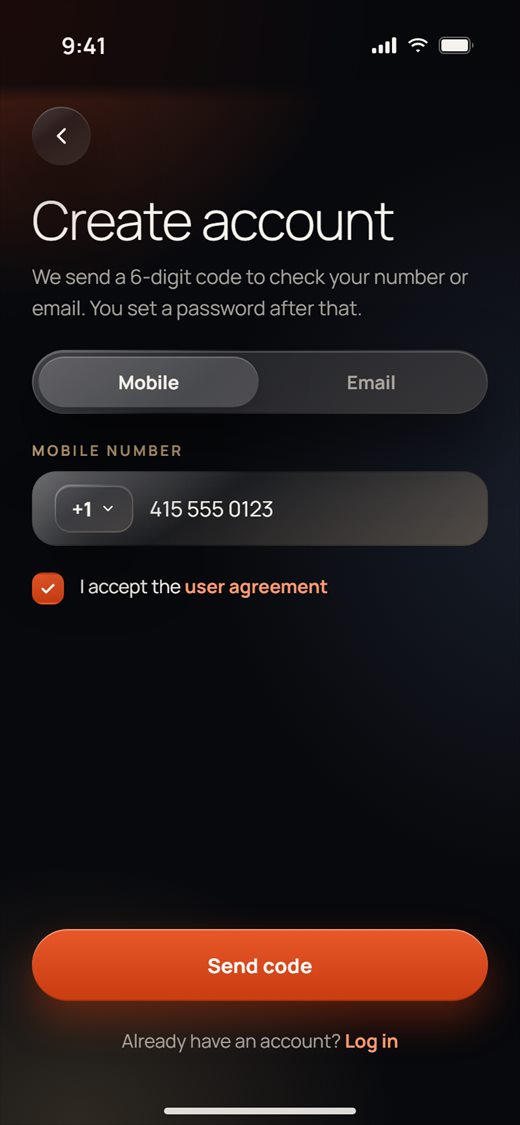
You can sign up with a mobile number (we text you a code) or with an email address (we email you a code).
- Tap Create account.
- Choose Mobile or Email at the top.
- For Mobile: check the country code (it starts at +1) and type your number, e.g. 415 555 0123. For Email: type your email address.
- Tick I accept the user agreement.
- Tap Send code.
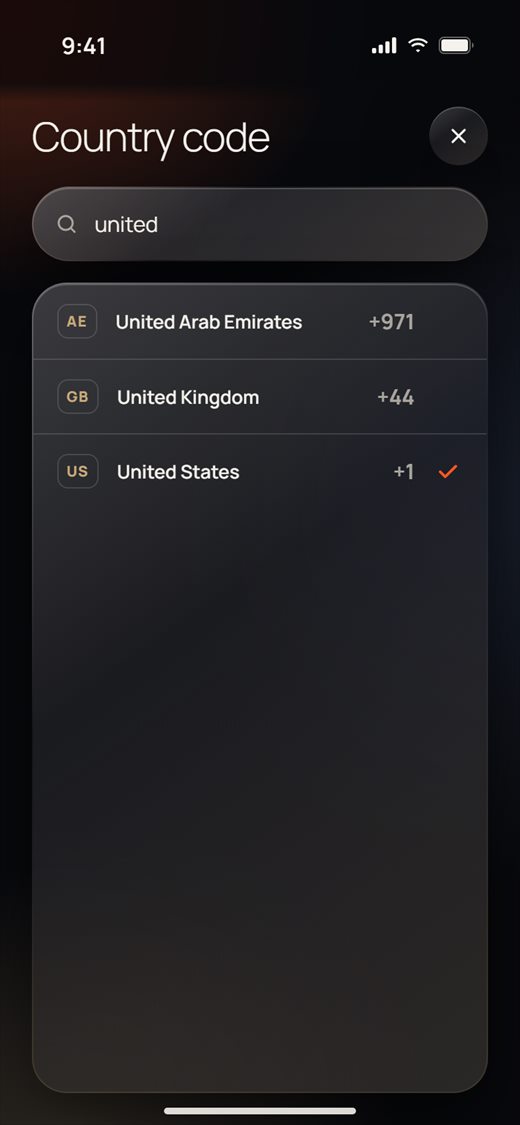
To change the country code, tap +1, search by country name or code, and tap your country.
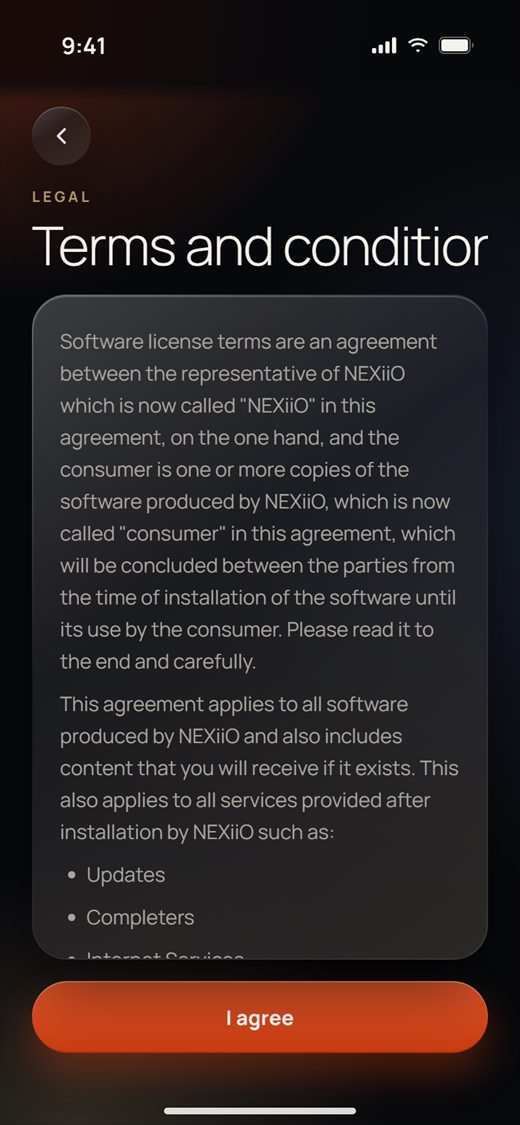
To read the agreement, tap user agreement, then tap I agree at the bottom. This also ticks the box for you.
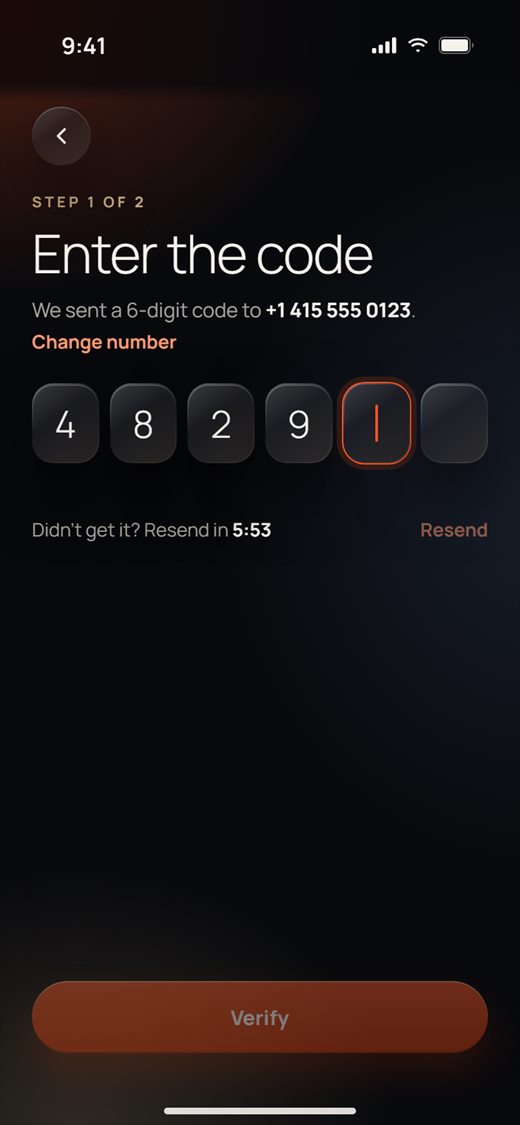
Verification code (step 1 of 2)
- Type the 6-digit code we sent you. The app checks it as soon as all 6 digits are in. You can also tap Verify.
- No code? Wait for the countdown, then tap Resend.
- Typed the wrong number or email? Tap Change number (or Change email) to go back.
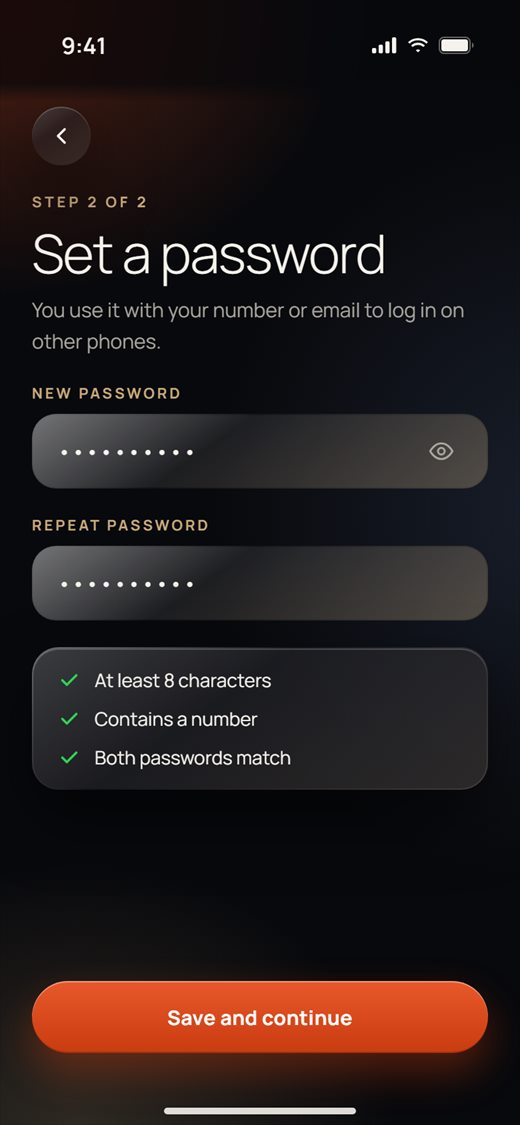
Set a password (step 2 of 2)
- Type a new password, then type it again under Repeat password.
- The password needs at least 8 characters and a number. Each rule gets a green tick when it's met.
- Tap Save and continue. You are signed in and your home opens.
Signing in
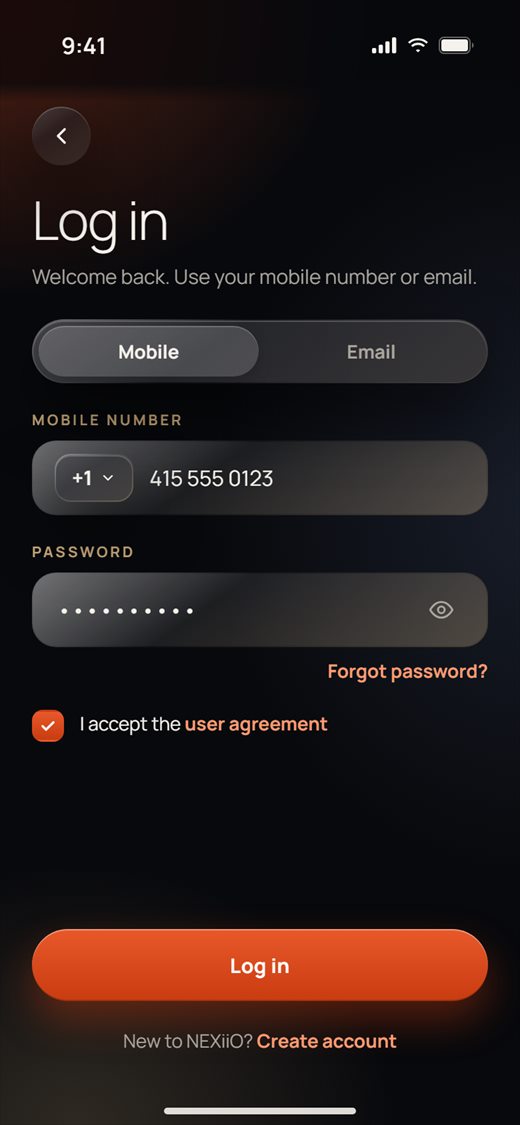
- On Welcome, tap Log in.
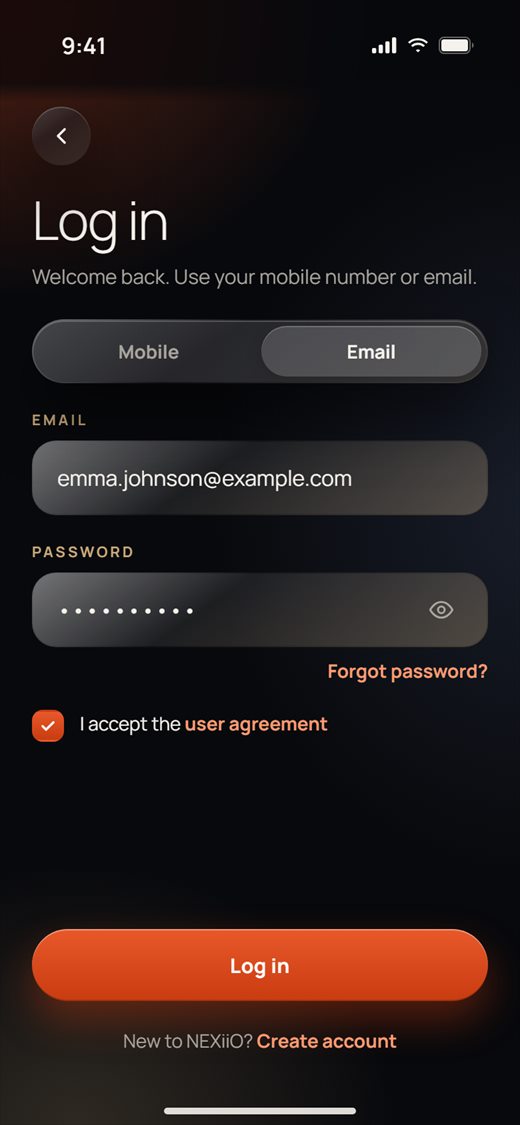
- Choose Mobile or Email and enter your number or email.
- Type your Password.
- Tick I accept the user agreement and tap Log in.
Forgot password
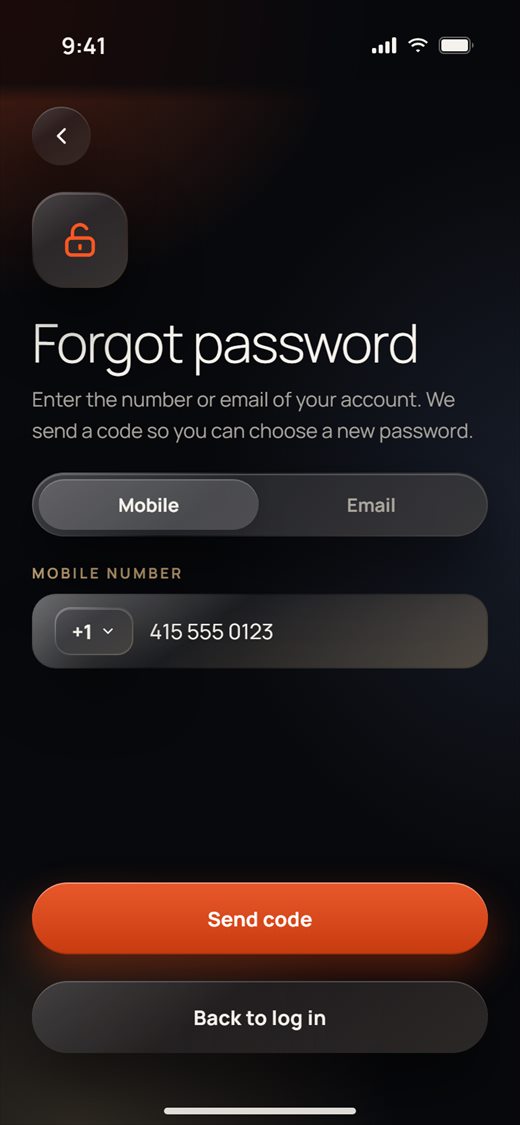
- On the Log in screen, tap Forgot password?.
- Enter the mobile number or email of your account and tap Send code.
- Type the code you get, then choose a new password (same rules as above). You are signed in.
Language
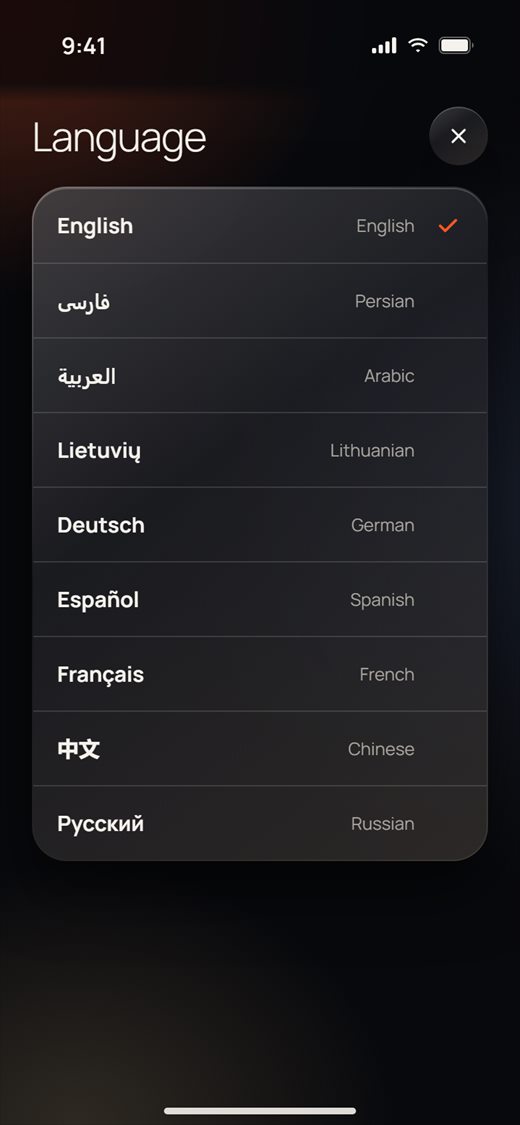
The app comes in nine languages, including English, Lietuvių, Deutsch, Español, Français, 中文 and Русский. Right-to-left (RTL) languages are included too.
- Before you sign in: on Welcome, tap the language button at the top right and choose a language. The account screens start again in that language.
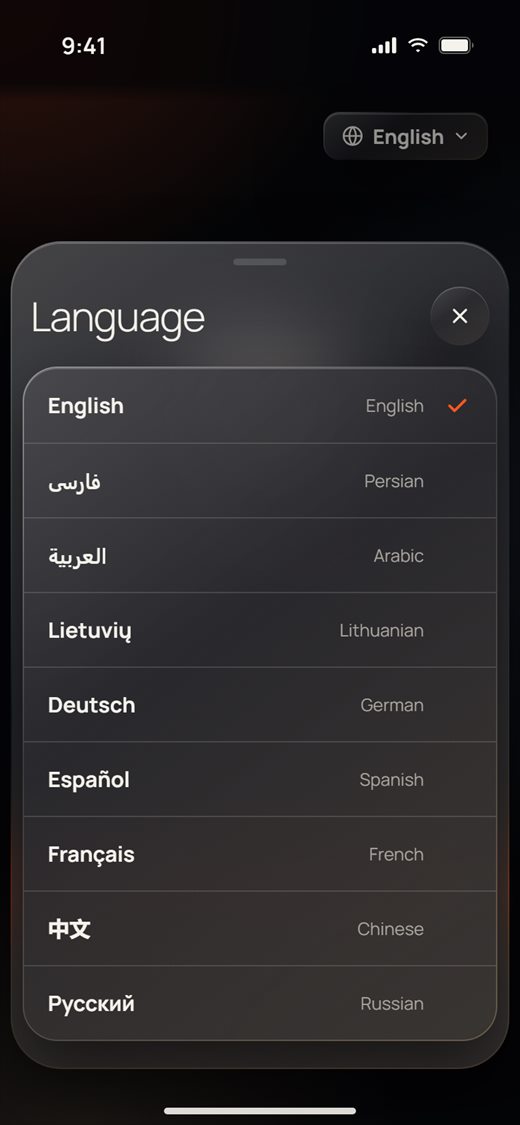
- After you sign in: go to Me › Language and tap a language. The app starts again in that language.
The Me tab
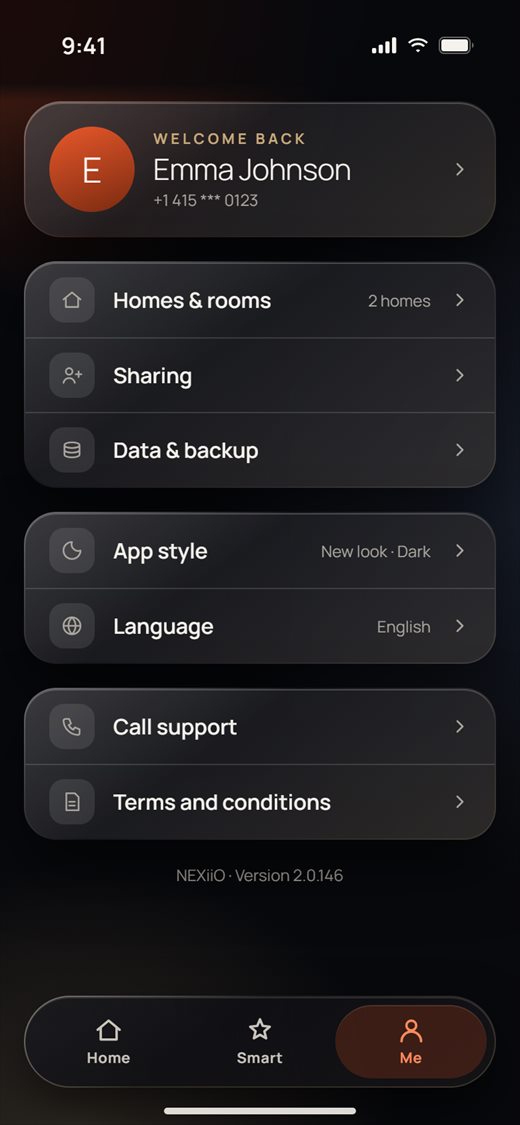
Tap Me in the tab bar at the bottom. From here you reach your account and the app settings:
- your name at the top opens Personal info
- Homes & rooms, Sharing, Data & backup
- App style (shows the current look and theme) and Language
- Call support and Terms and conditions
- the app version at the bottom
Personal info
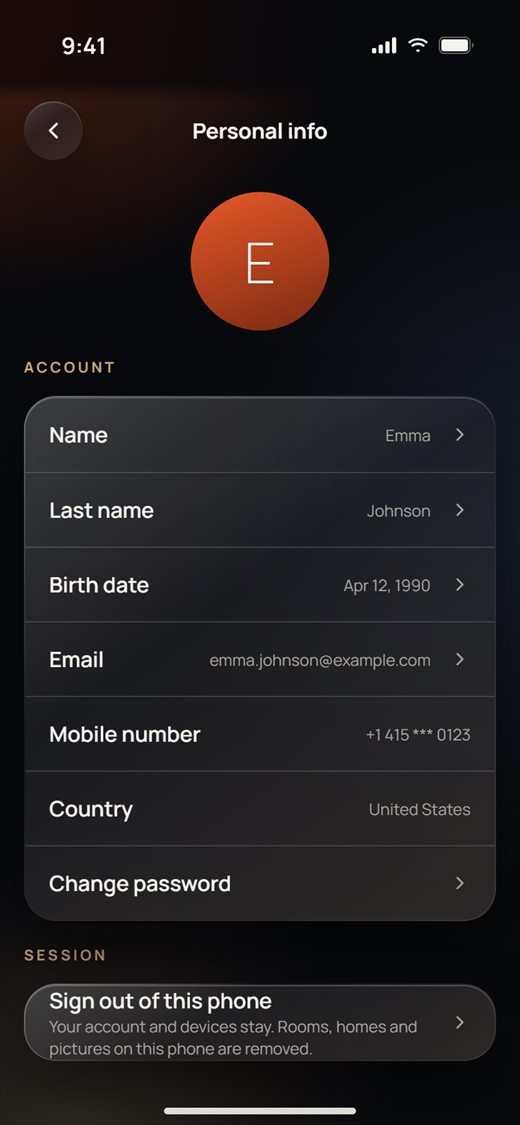
- Go to Me and tap your name at the top.
- Tap Name, Last name or Email, type the new value and tap Save. Tap Birth date to pick a date.
- Mobile number and Country come from your account and can't be changed here. The middle of the number is hidden.
- Tap Change password to get a code, then type a new password.
App style and Dark / Light
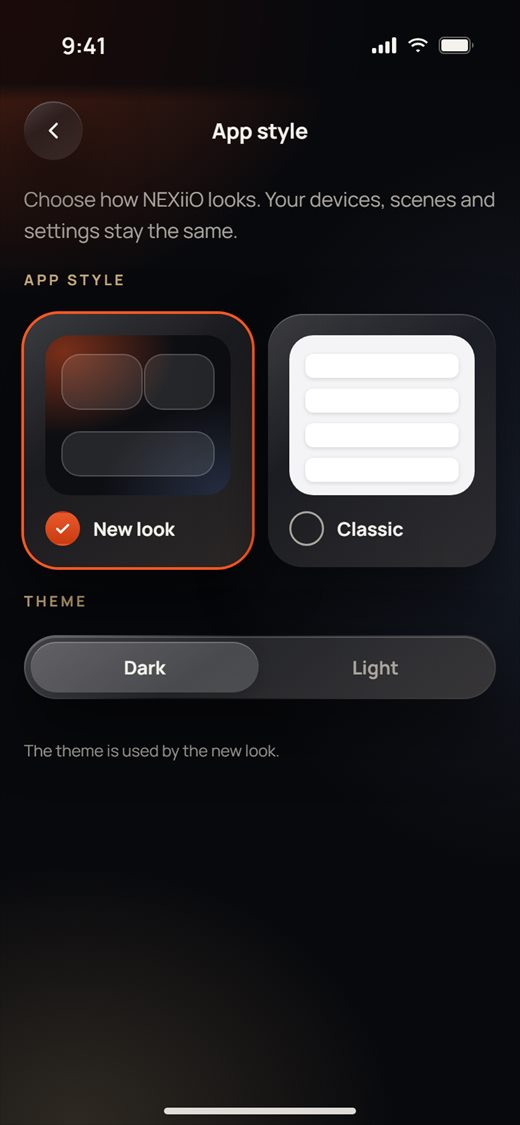
- Go to Me › App style.
- Under App style, tap New look or Classic. The app switches right away. Your devices, scenes and settings stay the same.
- Under Theme, tap Dark or Light. The theme is used by the new look. Dark is the default.
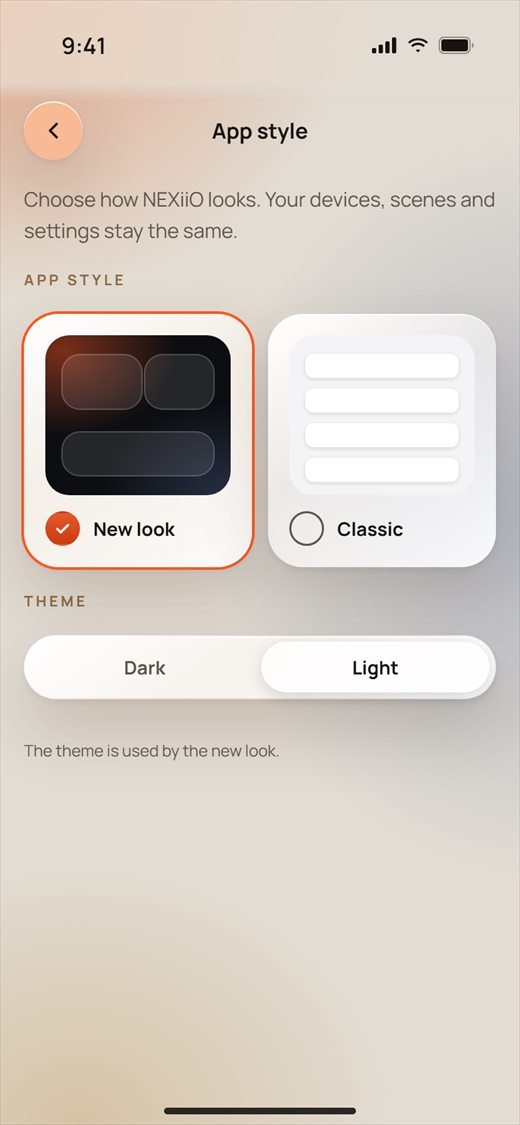
Homes and rooms
Your homes
- Go to Me › Homes & rooms.
- Each home shows its picture, how many devices and rooms it has, and these buttons:
- Change picture: choose a new picture for the home.
- Room overview: turn on to open this home on its room pictures. Tap a room there to see its devices.
- Rooms: manage the rooms of this home.
- Edit: rename the home.
- Delete: remove the home.
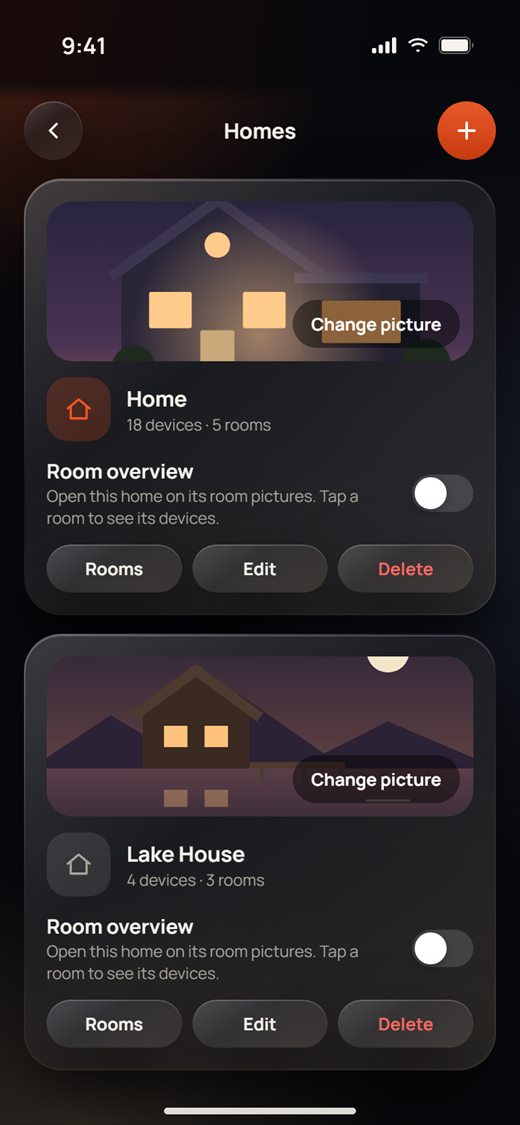
Add a home
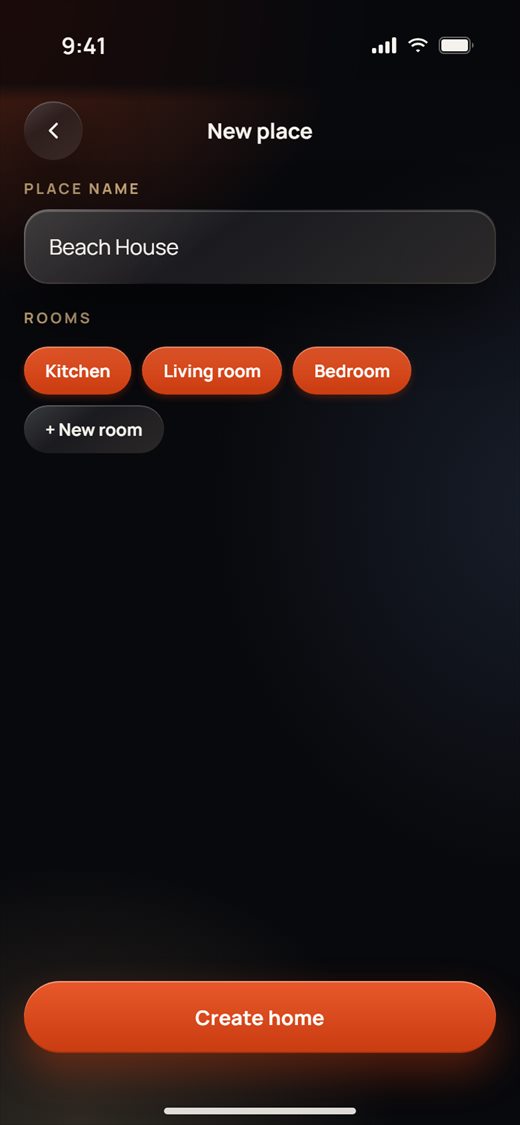
- On Homes, tap + at the top right.
- Type the Place name.
- Under Rooms, keep or untick the starter rooms (Kitchen, Living room, Bedroom), or tap + New room to add your own. A home needs at least one room.
- Tap Create home.
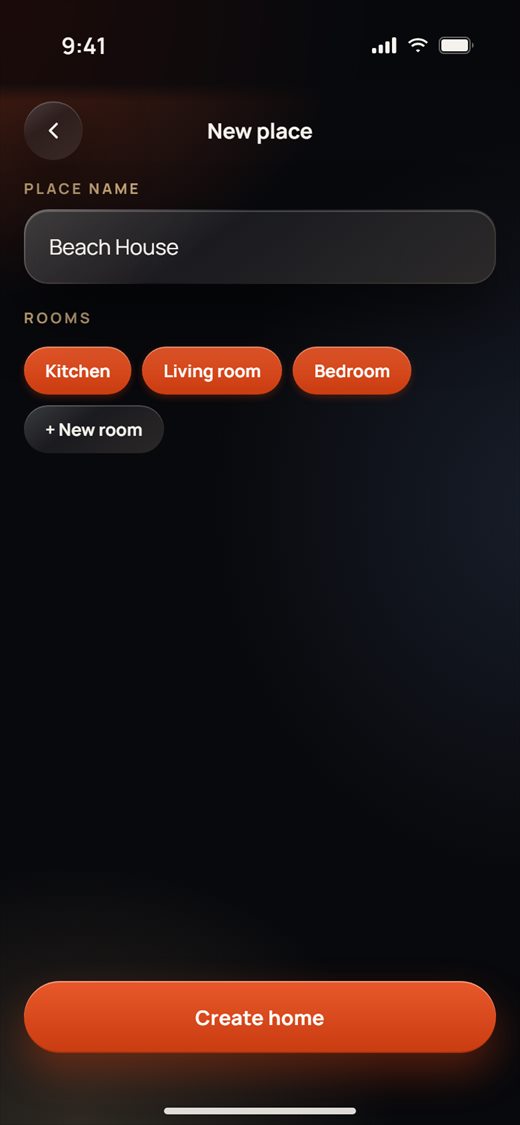
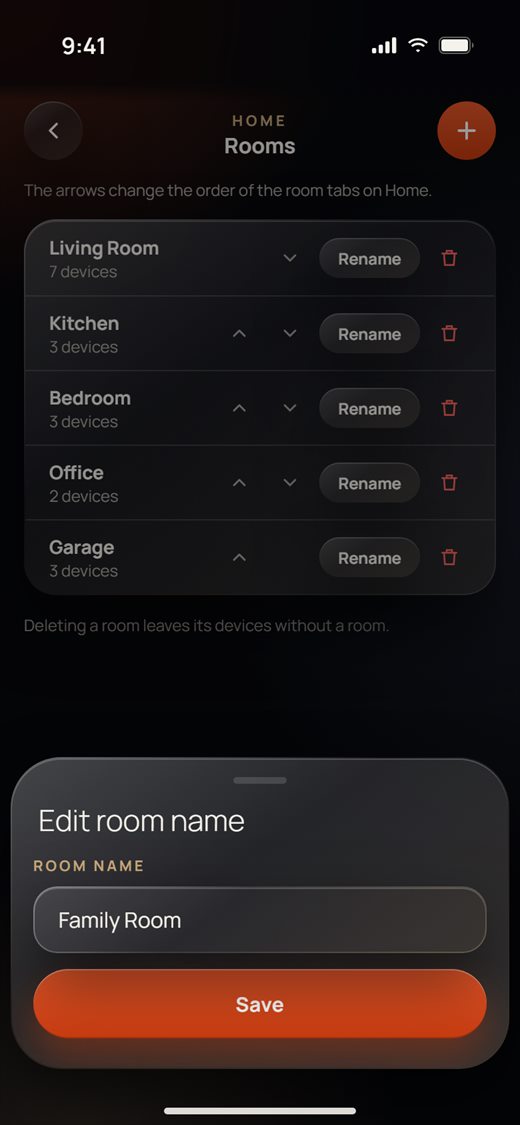
Rooms
- On Homes, tap Rooms on a home card.
- Use the arrows to change the order of the room tabs on Home.
- Tap + at the top right to add a room.
- Tap Rename to change a room's name, type it and tap Save.
- Tap the red trash icon to delete a room. Its devices stay, but they no longer have a room. Home asks you where they go.
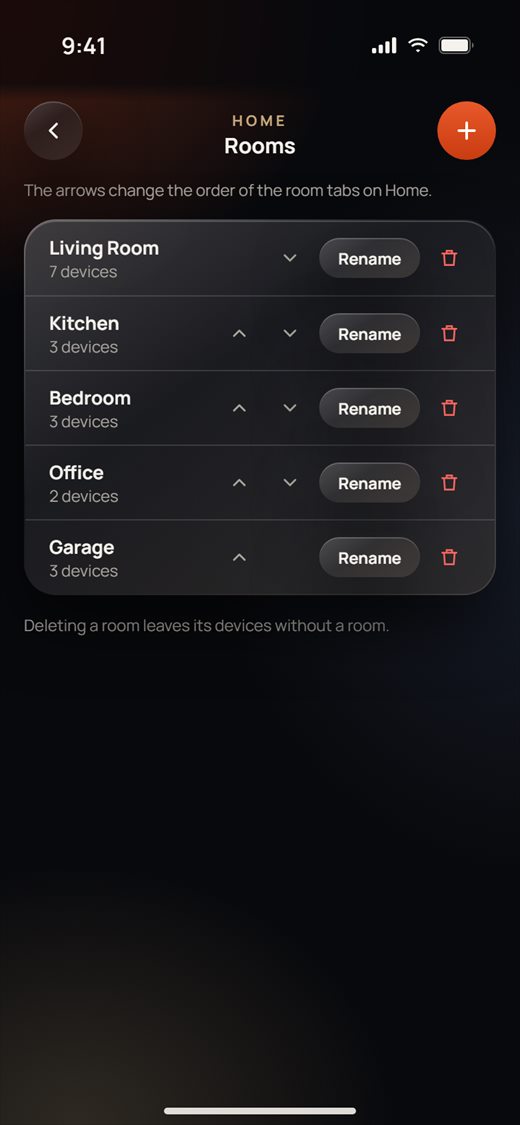
Backup and restore
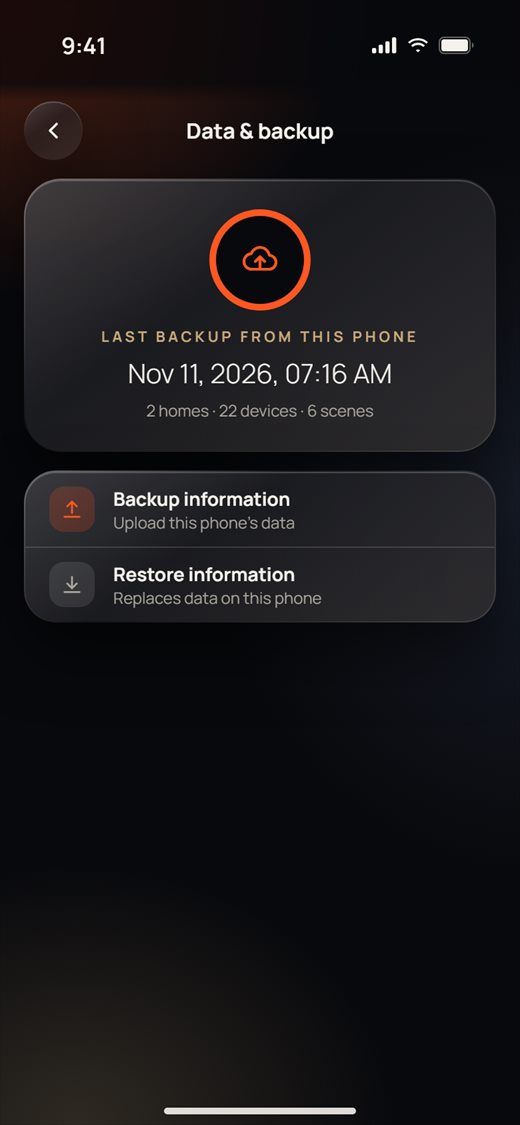
Save a copy of your homes, rooms, devices and scenes from this phone to the cloud, and bring it back later (for example on a new phone).
- Go to Me › Data & backup. The top card shows the Last backup from this phone and what is on the phone now.
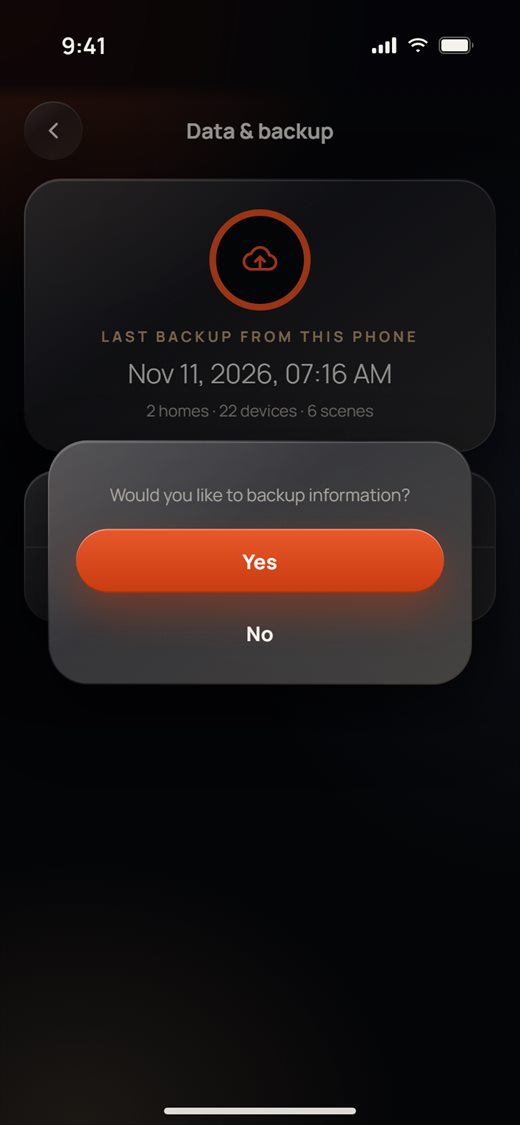
- Tap Backup information and then Yes to upload this phone's data.
- To bring a backup back, tap Restore information and then Yes. This replaces the data on this phone.
Signing out and deleting the account
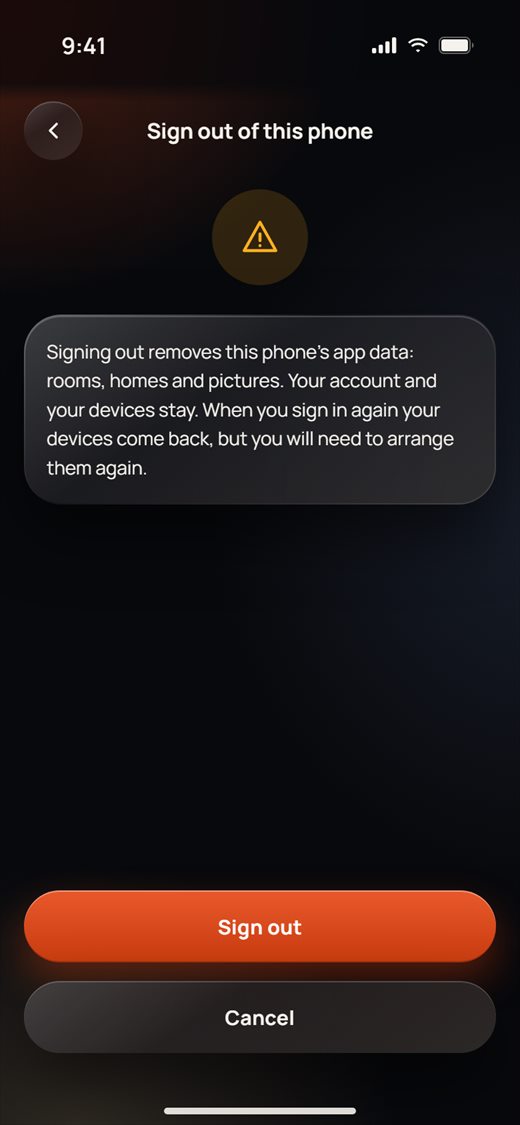
Sign out of this phone
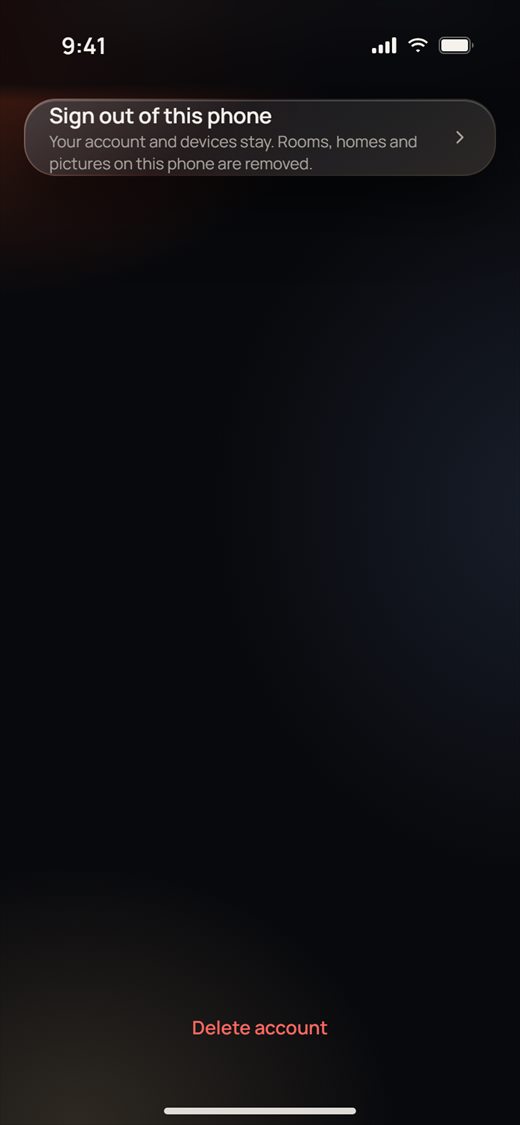
- Go to Me, tap your name, and tap Sign out of this phone.
- Read the note and tap Sign out. The app goes back to Welcome.
Delete your account
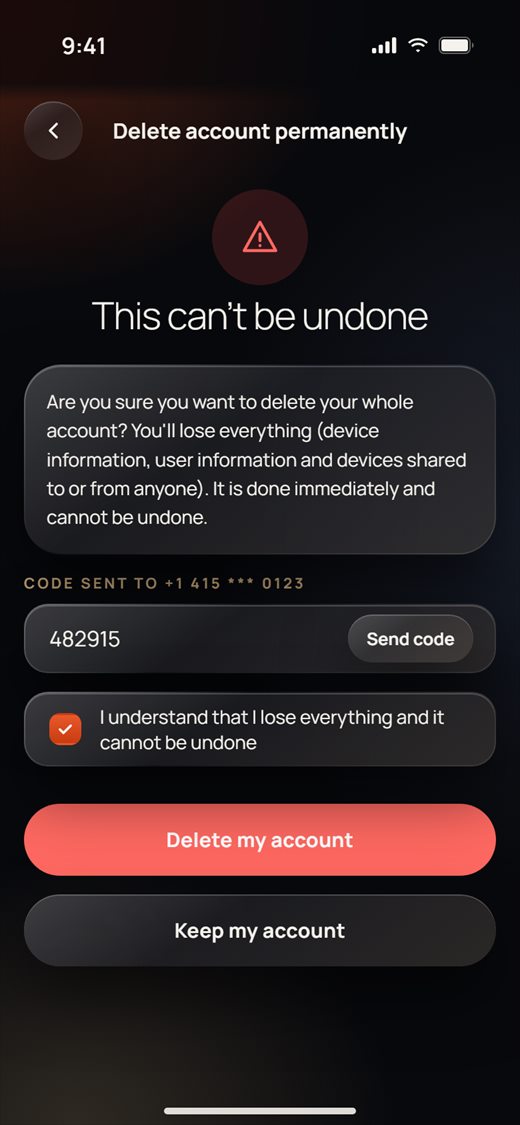
Deleting your account removes everything for good: device information, user information and devices shared to or from anyone.
- Go to Me, tap your name, and scroll to the very bottom of Personal info. Tap Delete account.
- Tap Send code and type the 6-digit code you get.
- Tick I understand that I lose everything and it cannot be undone.
- Tap Delete my account and confirm. To stop, tap Keep my account.
Part 1 · Home owners
Home, rooms and weather
The Home tab
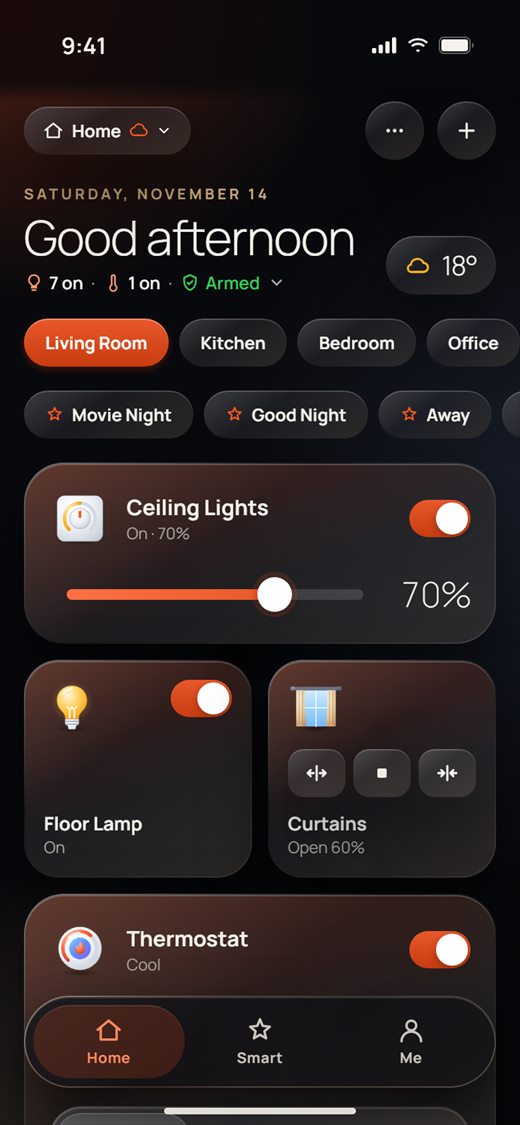
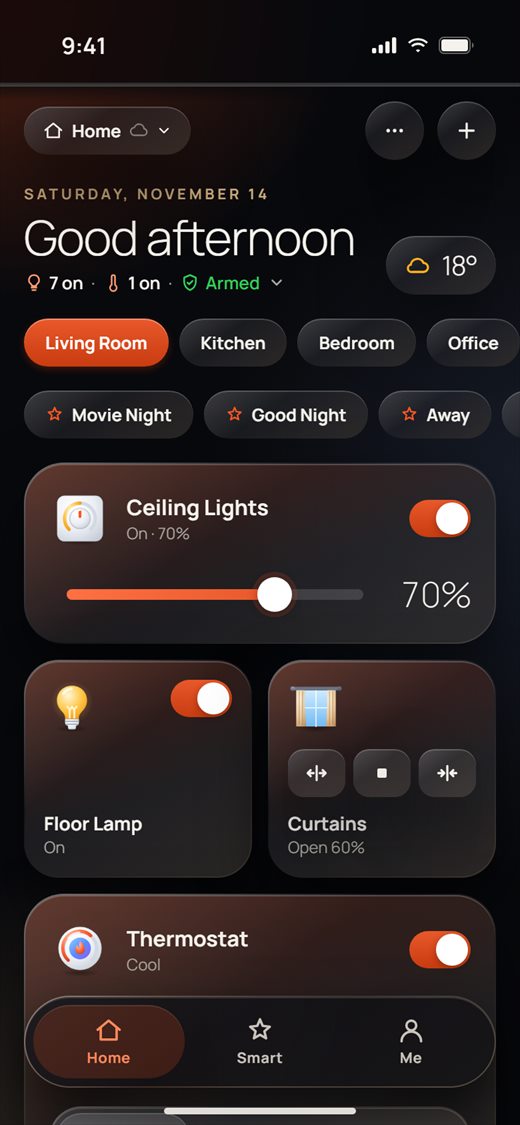
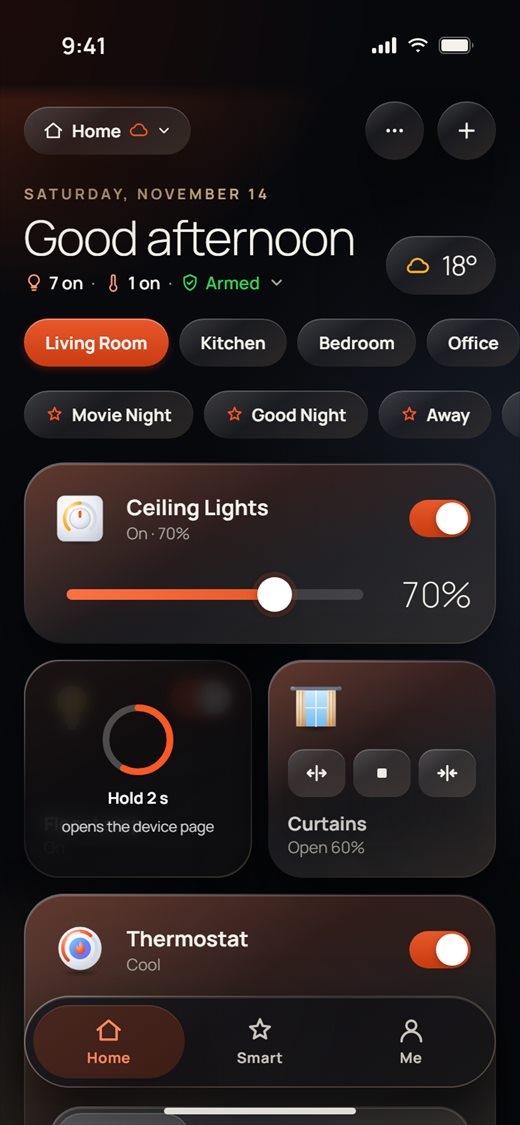
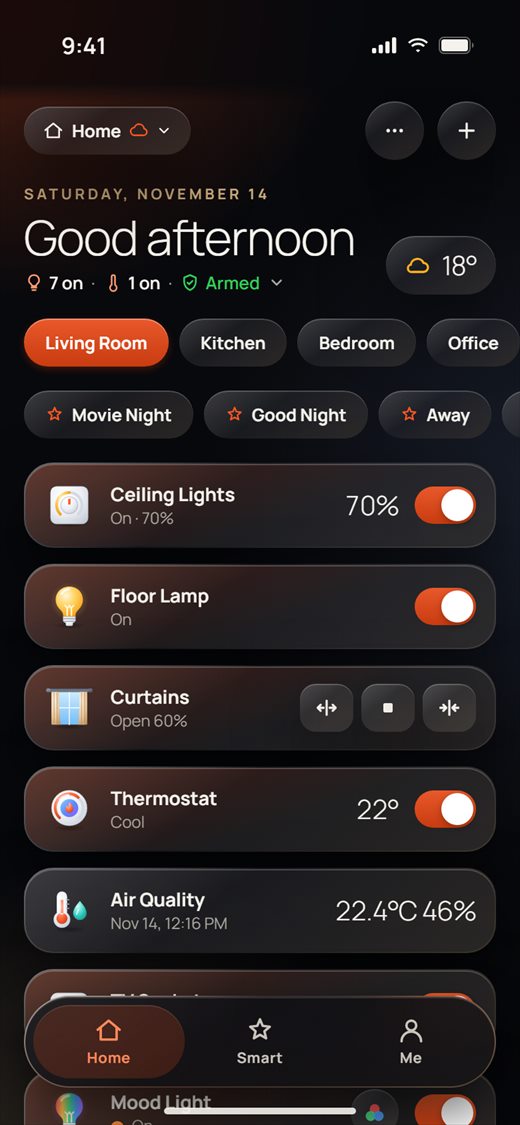
Home is the first tab. It shows one room of your home at a time, with a card for each light, curtain, thermostat and sensor in it.
- At the top left is the name of your home (here Home). The small cloud next to it shows the cloud connection (see "Good to know" below).
- Under it you see the date, a greeting and the summary line for the whole home, for example "7 on · 1 on · Armed".
- The weather pill on the right shows the outside temperature. Tap it to open the Weather page.
- The row of room chips picks the room. The row under it holds your scenes. Tap a scene to run it. You get a "Scene done" message when it has finished.
- The cards of the room follow. Scroll down for more.
- Tap another room chip, for example Kitchen, to see that room's cards.
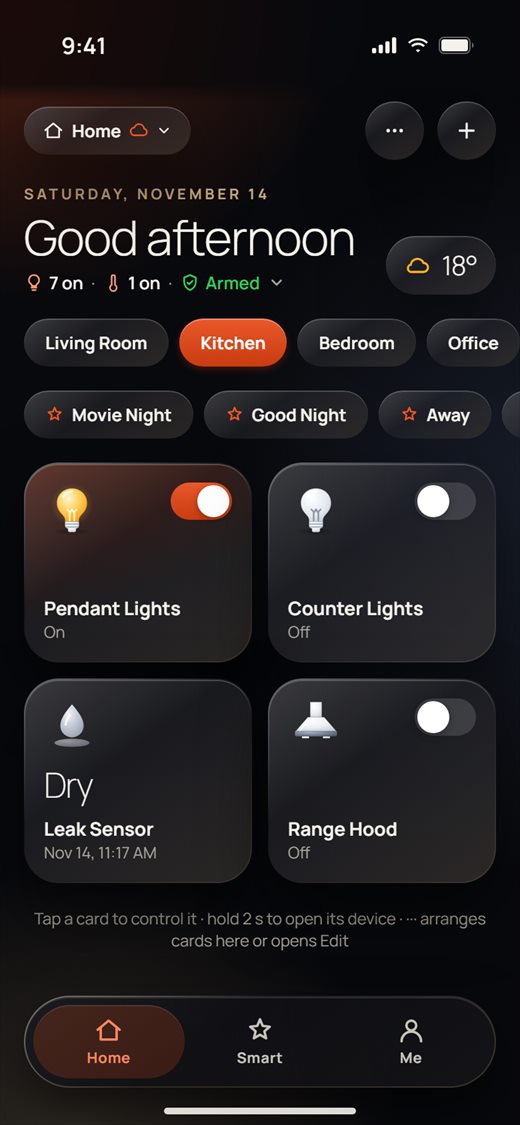
- The two round buttons at the top right are ··· (the More menu) and + (Add device, which adds a new device to the room you are looking at).
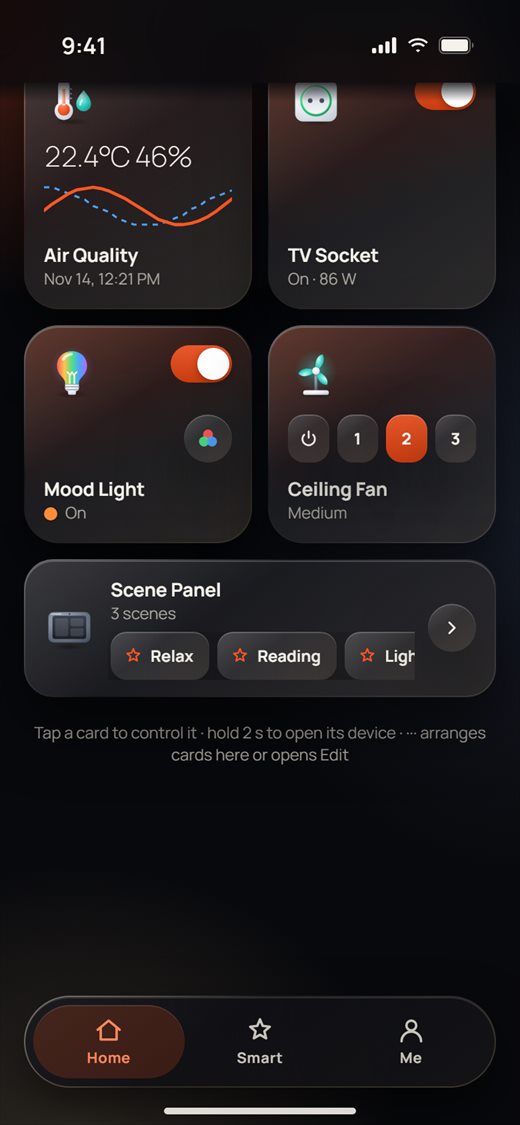
- At the bottom of the room the app reminds you: "Tap a card to control it · hold 2 s to open its device · ··· arranges cards here or opens Edit".
- Cloud icon: an orange cloud means the app is connected. If the cloud blinks and an orange line moves along the top of the screen, the app is still connecting. A gray cloud with a gray line along the top means there is no cloud connection right now. At home, the app can still reach your devices over your home network.
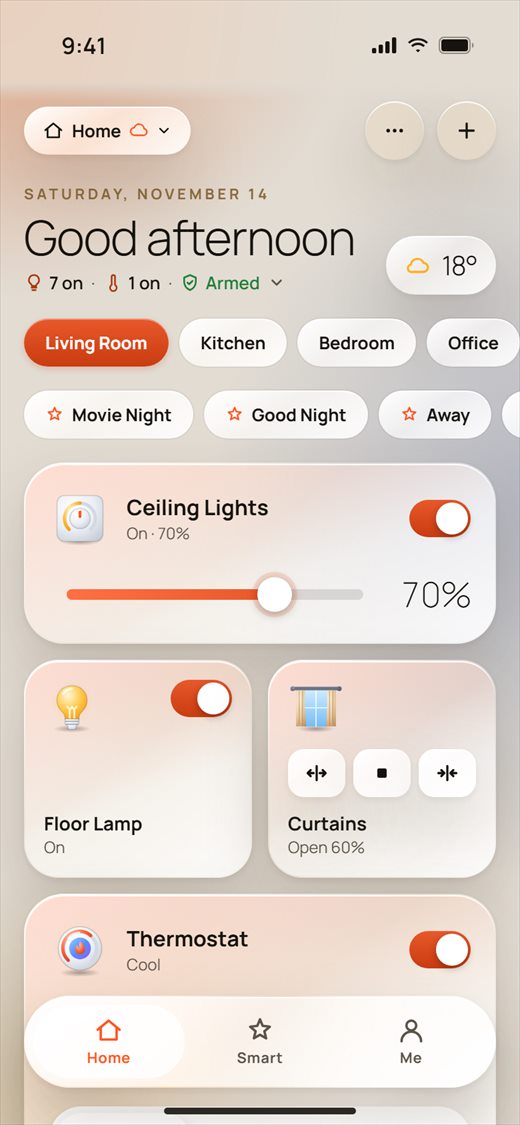
- Dark or Light: Home looks the same in both themes. Change the theme in Me › App style.
Controlling devices from cards
Tap a card or one of its buttons to control the device right away. The card changes only when the device reports its new state.
- Lights and sockets: tap the card or its switch to turn it on or off. A socket with an energy meter also shows how much power it uses now (for example "On · 86 W").
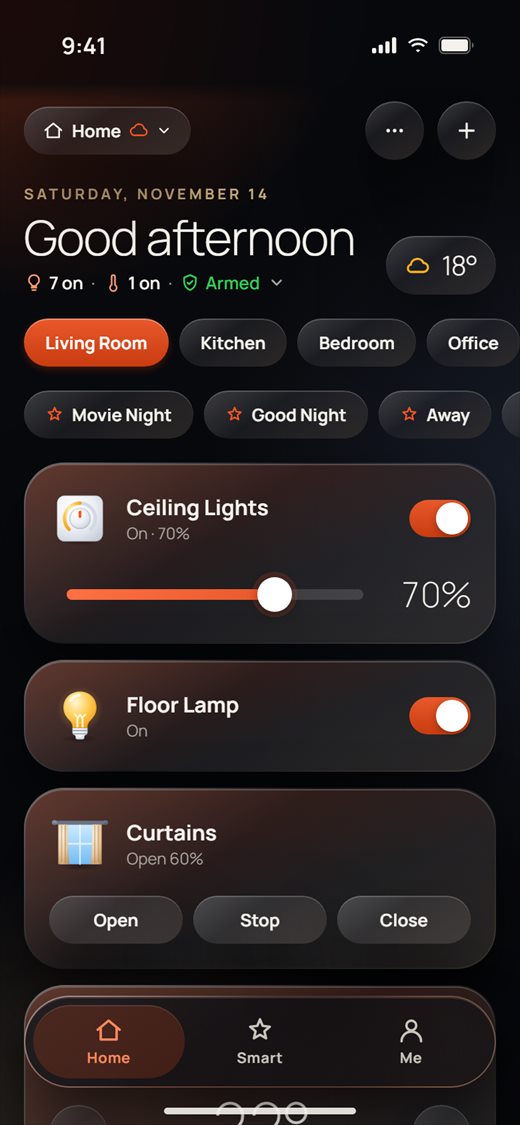
- Dimmers: on a large card, drag the slider to set the brightness. A medium card only turns the light on or off.
- Curtains and blinds: use the open, stop and close buttons. A large card also has a slider for the position, if the motor reports it.
- Thermostats: use the switch to turn it on or off, − and + for the set point, and Cool, Heat or Dry for the mode. The room temperature is shown under the set point.
- Color lights: tap the palette button to choose a color, white or a mood.
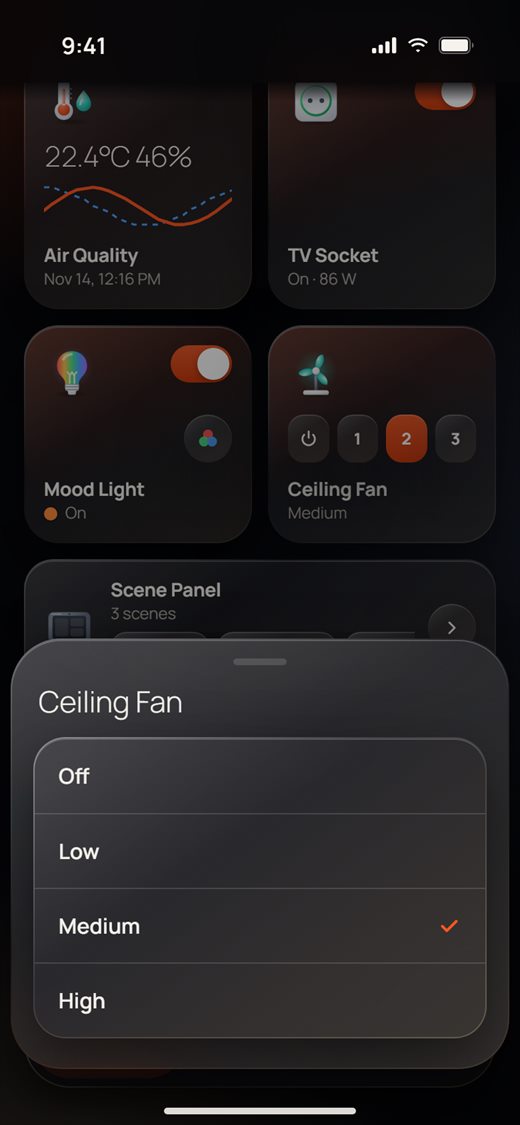
- 3 speed fan: tap ⏻, 1, 2 or 3. Tap the card itself to see the full speed names.
- Touch panel: tap one of the panel's scenes (here Relax, Reading, Lights Off). The arrow opens the panel's page.
- Sensors show their last value. A temperature and humidity sensor also shows a small chart (orange = temperature, blue dashed line = humidity).
Holding a card
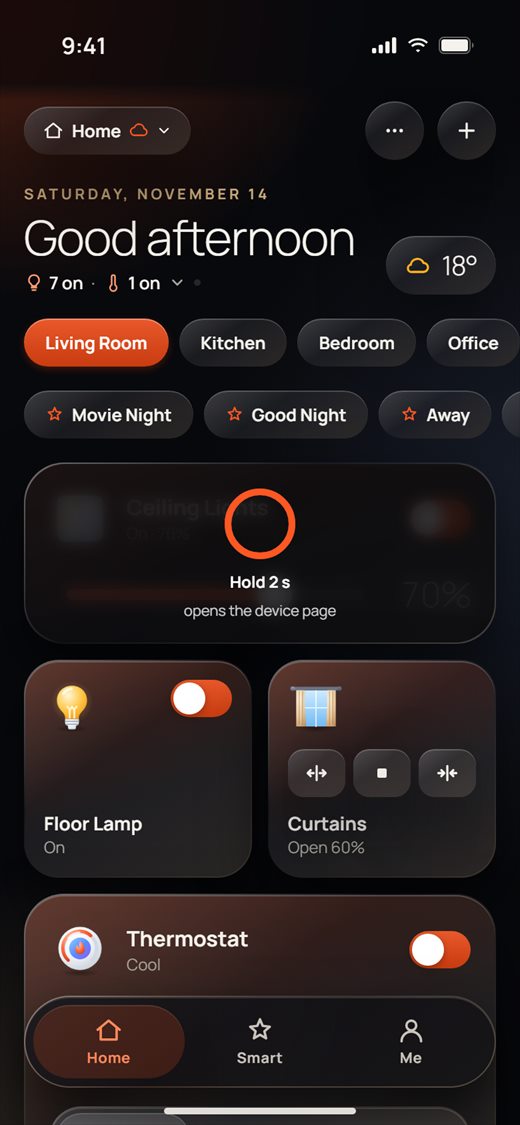
- Hold a card for 2 seconds. A ring fills up with the text "Hold 2 s · opens the device page".
- When the ring is full, the device's own page opens, with all its settings.
- Lift your finger before the ring is full to cancel. Holding a button or a switch on a card never opens the page.
Summary ("At home now")
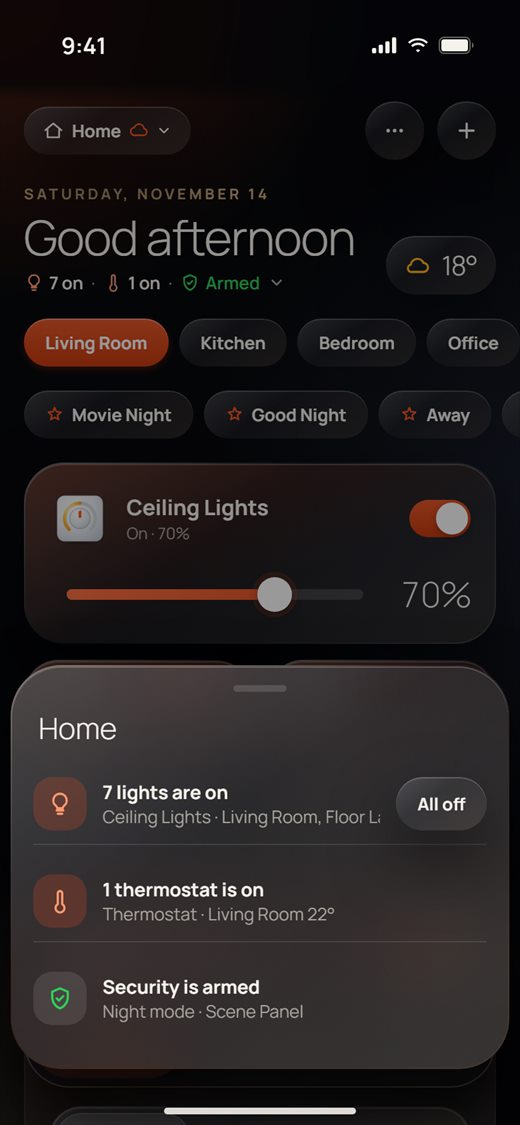
The summary line under the greeting counts the whole home, not only the room on screen.
- Look at the line: the lamp icon counts lights that are on, the thermometer counts thermostats that are on. A green shield with Armed means a touch panel's security mode is on.
- Tap the line. A sheet opens with your home's name as its title. (A home without a name shows "At home now".)
- The sheet lists every light that is on, with its room, and every thermostat that is on, with its set point. It also says "Security is armed" and names the security mode and the touch panel.
- Tap All off to turn off all the lights in the list. Each light goes off when its device reports it.
Card sizes and arranging
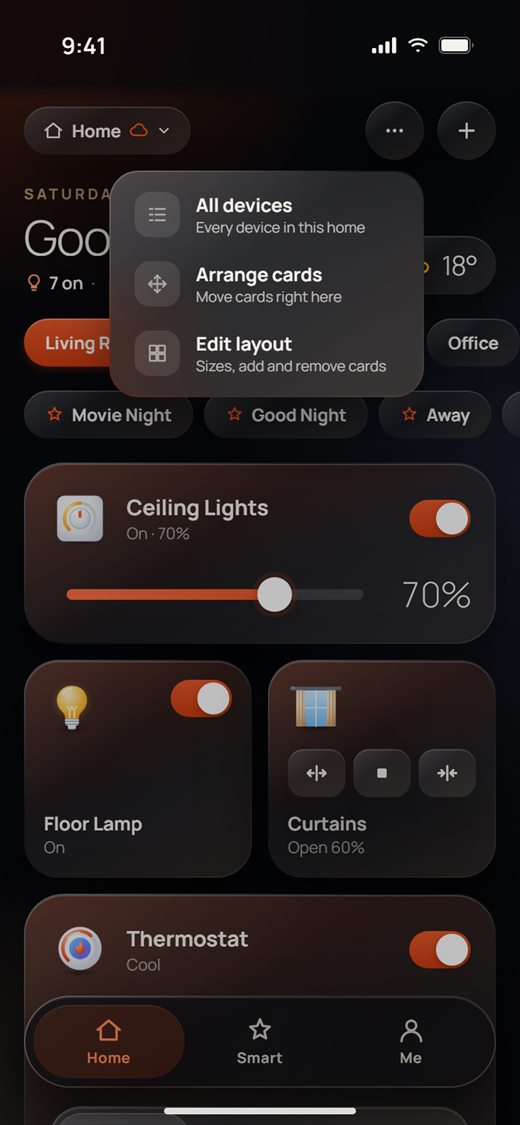
Each card has a size: L (large, full width), M (medium, half width) or — (a one-line row).
- Tap ··· at the top right. The menu shows All devices, Arrange cards and Edit layout.
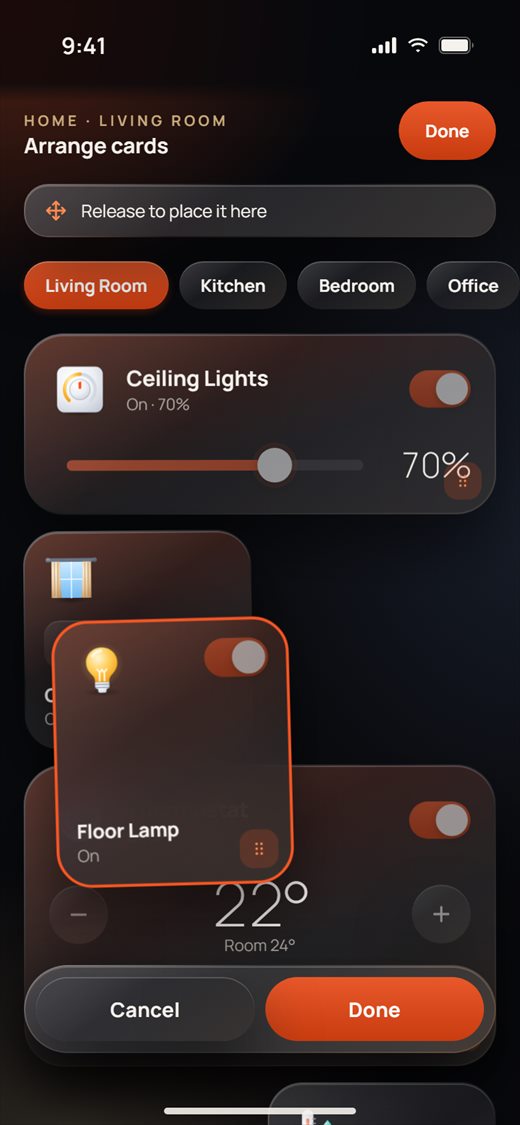
- Tap Arrange cards. The cards start to wiggle, and the header shows "Arrange cards" with the home and room name.
- Hold a card for a moment, then drag it to a new place. The other cards make room. The hint changes to "Release to place it here".
- Tap Done to save the new order, or Cancel to put everything back.
- While arranging, you can tap another room chip. The order of this room is saved first, and the next room opens still in Arrange mode.
The room's layout can also give every card the same shape:
Edit layout and adding cards
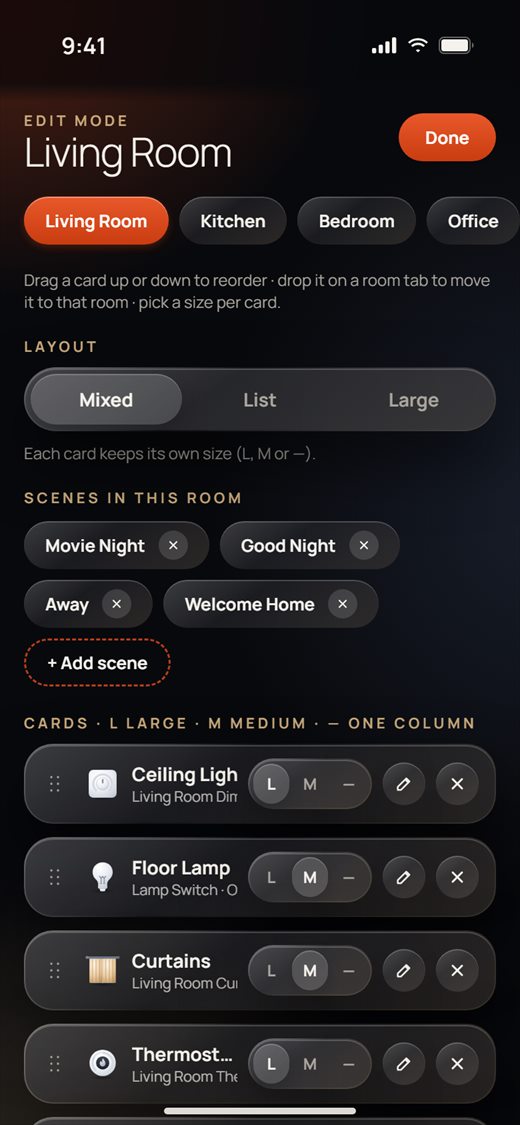
Edit layout changes one room at a time. Every change is saved right away.
- Tap ··· › Edit layout. You can also tap + Scene at the end of the scenes row.
- Pick the room with the room chips at the top.
- Under Layout, choose Mixed (each card keeps its own size), List (every card is a row) or Large (every card is large). With List or Large, the size of each card is used again when you go back to Mixed.
- Under Scenes in this room, tap × to take a scene off this room's row, or + Add scene to add one. You can also add scenes stored on a touch panel.
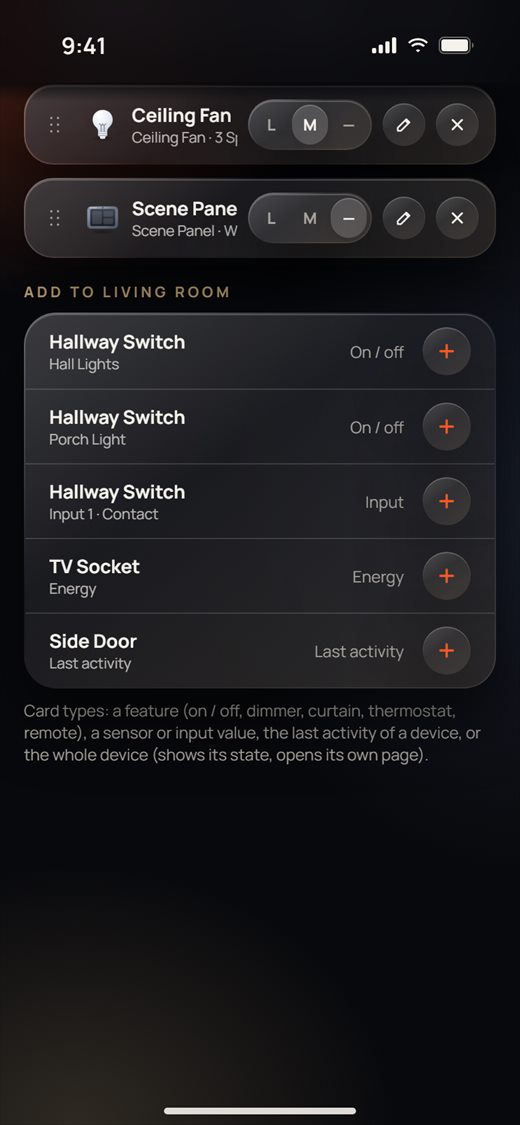
- Under Cards, tap L, M or — to set a card's size. Drag the handle on the left to move a card up or down. Drop it on a room chip to move it to that room. Tap × to remove it from Home.
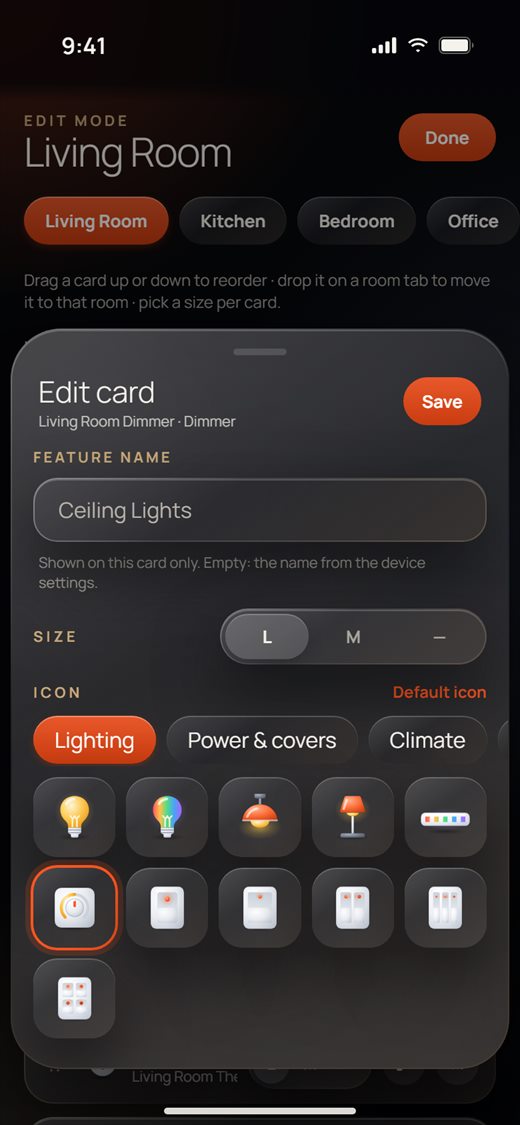
- Tap the pencil on a card to open Edit card. Here you set the Feature name (shown on this card only; leave it empty to use the name from the device settings), the Size and the Icon. Tap Default icon to go back to the normal icon, then tap Save.
- Scroll down to Add to Living Room (the name of your room). It lists every feature that does not have a card in this room yet: switch gangs, inputs, energy meters, last activity and more. Tap + to add it.
- Tap Done when you are finished. Home shows the new layout.
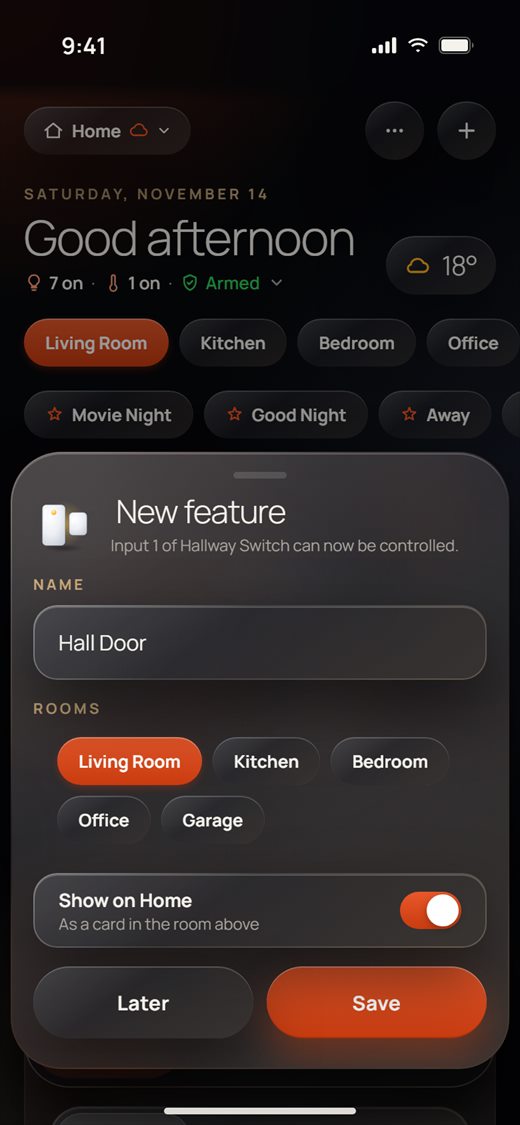
New feature
When a device's settings make a new feature available, for example an input set up as a door contact, Home shows a New feature sheet.
- Read which feature it is, for example "Input 1 of Hallway Switch can now be controlled."
- Type a Name if you like, and choose the room under Rooms.
- Leave Show on Home on to get a card in that room.
- Tap Save. Later puts the card in the device's own room.
All devices
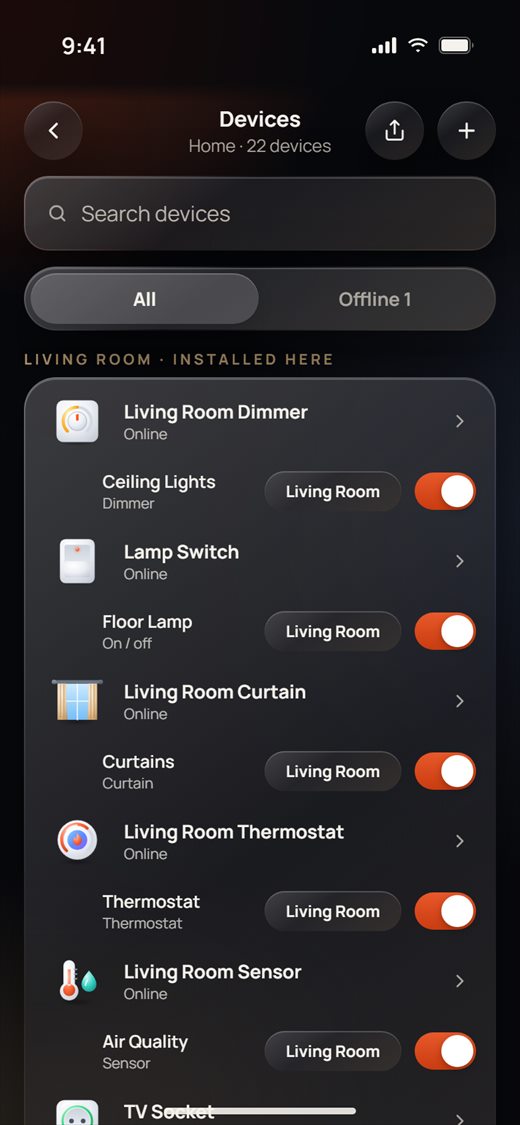
The Devices page lists every device of the home, grouped by the room it is installed in.
- Tap ··· › All devices.
- Type in Search devices to find a device by name. Tap Offline to see only devices that are not reachable (the number shows how many).
- Tap a device to open its page.
- Under each device you see its features. Each feature has its own room chip (tap it to choose a room) and a show on Home switch. Turning the switch off hides the card but keeps its room, size and icon.
- Devices without a room are listed under No room. Tap Choose room to put one in a room.
- The buttons at the top right share devices with other people and add a new device.
Switching homes
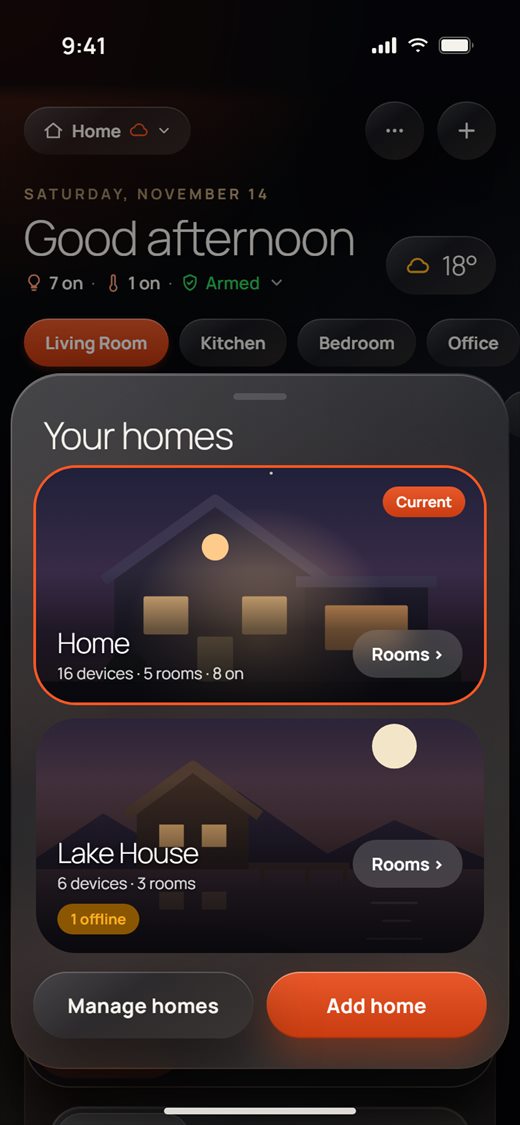
If you have more than one home, switch between them from the home name.
- Tap the home name at the top left (here Home).
- Your homes shows each home as a picture card, with its number of devices and rooms and how many lights are on. The home you are in is marked Current. A badge warns you about a leak, an open door or offline devices.
- Tap another home to switch to it. Home shows that home's rooms and its own weather.
- Tap Rooms › on a card to switch to that home and open its room overview.
- Manage homes renames homes, changes their pictures and turns on Room overview. Add home creates a new home.
To add a home:
- Tap Add home.
- Type the Place name.
- Under Rooms, tap a room to select or unselect it. Tap + New room to add one with your own name.
- Tap Create home.
Rooms and room pictures
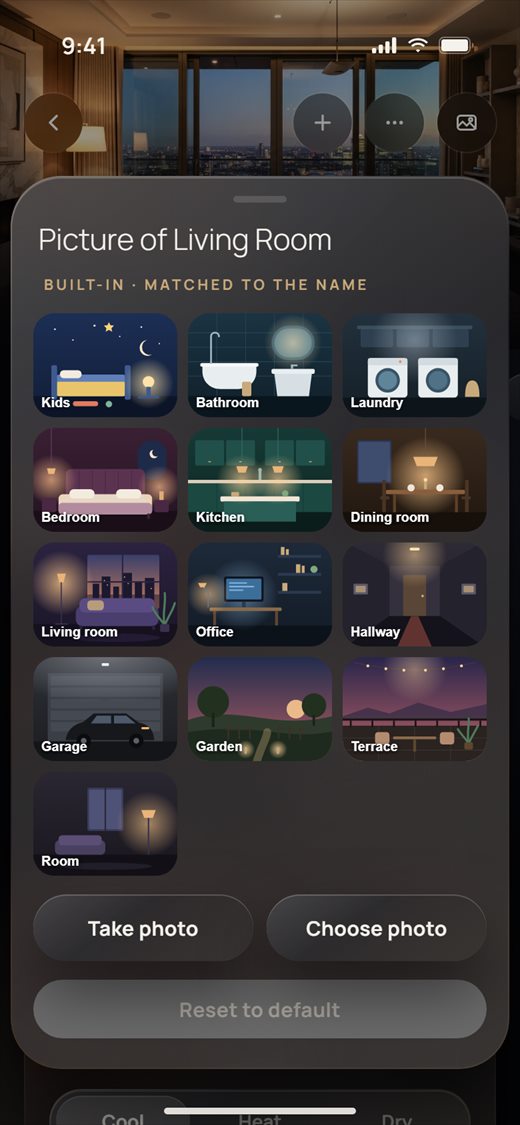
Every room has a picture. The app picks a built-in picture that matches the room's name. You can change it to another built-in picture, a photo, or a camera snapshot.
- Open the room overview (see the next section) and tap a room. The room page shows the room's picture at the top, with the home name, "1 of 5", how many lights are on and the room temperature.
- The cards and scenes of the room are below, and work just like on Home.
- The buttons on the picture are + (add a device to this room), ··· (All devices, Arrange cards, Edit layout) and the picture button.
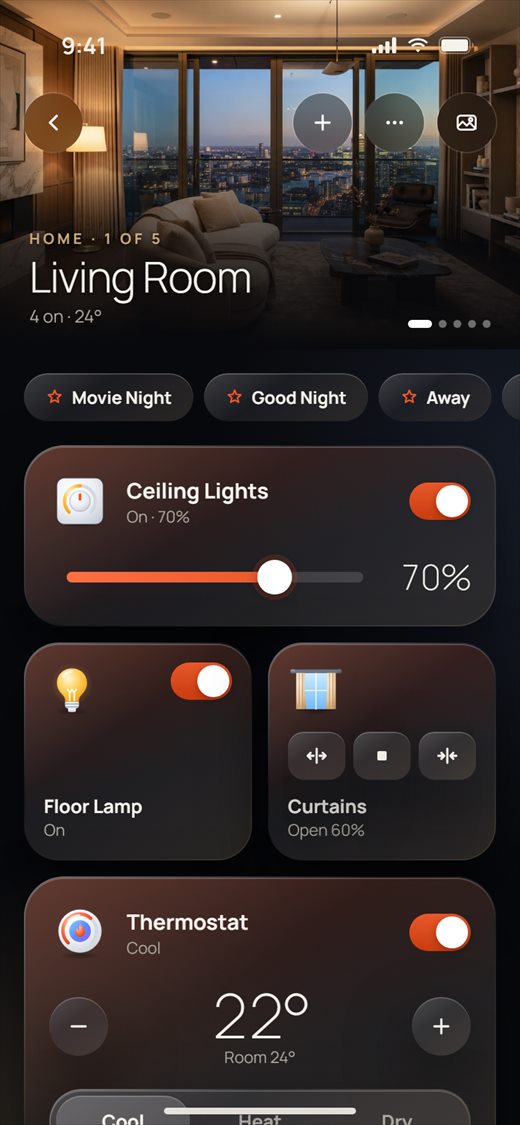
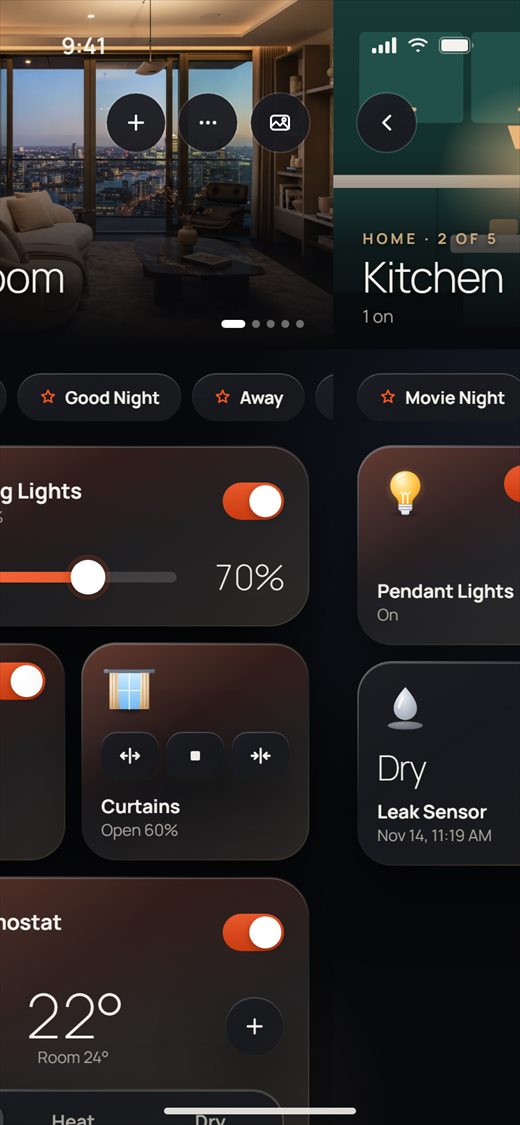
- Swipe left or right to go to the next or previous room. The dots on the picture show where you are.
- To change the picture, tap the picture button at the top right. Picture of Living Room (the name of your room) opens.
- Tap a built-in picture, or tap Take photo or Choose photo to use your own. If a camera is in this room, its latest snapshot can be the picture too. Reset to default goes back to the picture that matches the name.
Room overview
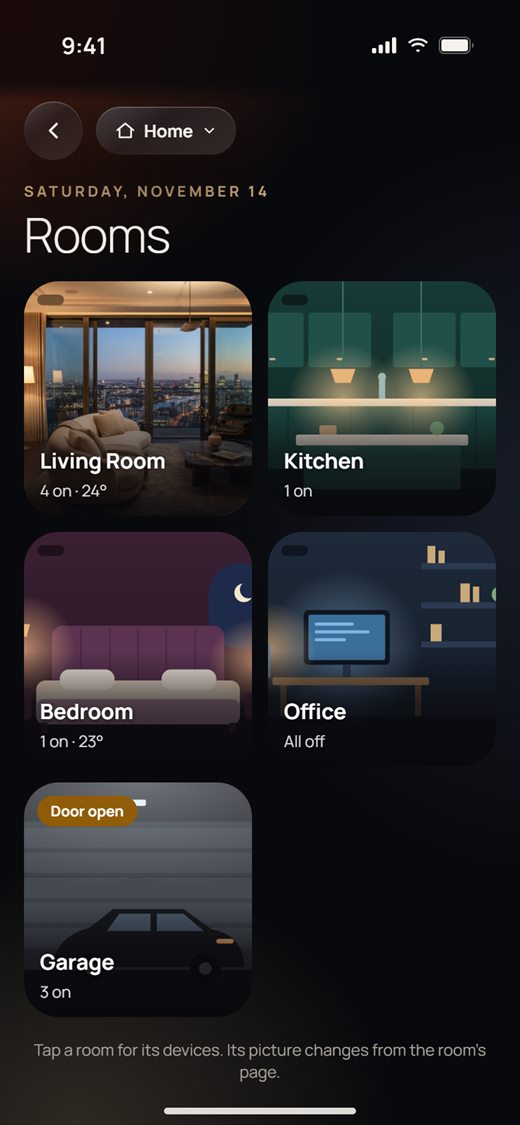
The room overview shows all rooms of the home as pictures, each with a live info line.
- Tap the home name, then Rooms › on the home's card.
- Each room shows how many lights are on ("4 on", or "All off") and the temperature, if it has a sensor or thermostat. A badge warns you about a Leak, a Door open or offline devices.
- Tap a room to open its room page.
Weather
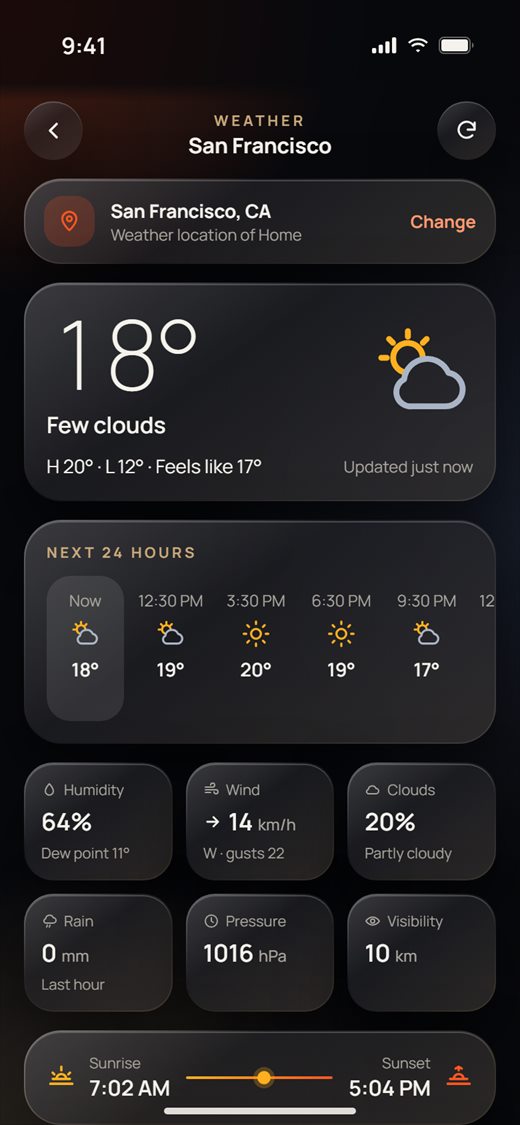
Tap the weather pill on Home to see the weather in detail.
- At the top you see where the weather is for, for example "San Francisco, CA · Weather location of Home".
- Under it: the temperature, the conditions, today's high and low, "Feels like", and when it was updated.
- Next 24 hours shows the forecast every 3 hours. Below that are humidity, wind, clouds, rain, pressure and visibility, then sunrise and sunset, and Next 5 days.
- Tap the refresh button at the top right to update.
Weather location of a home
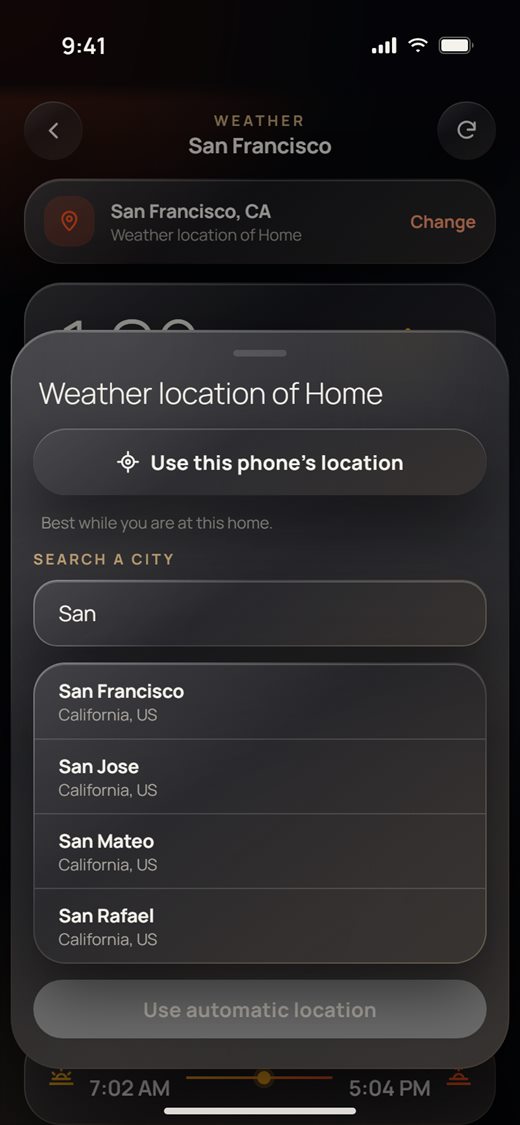
Each home can have its own weather location.
- On the Weather page, tap Change next to the location.
- Tap Use this phone's location. This works best while you are at that home.
- Or type a city under Search a city and tap it in the list.
- Use automatic location goes back to the approximate location from the internet.
Part 1 · Home owners
Your devices
Every device has its own page with all of its controls. This part shows each kind of device page and what you can do there.
Opening a device
On Home, a tap on a card controls the device right away. Hold the card to open its full page.
- On Home, tap a card's switch, slider or buttons to control it right away.
- To open the device's page, touch the card and hold it for 2 seconds. A ring fills up ("Hold 2 s · opens the device page"), and the page opens when the ring is full.
- At the top of every device page you see the room, the device name and whether it is Online. The button at the top right opens Device settings (name, room and the device's own options).
- To go back, tap the back arrow or swipe from the left edge.
- If you lift your finger or move it before the ring is full, nothing opens. Scrolling the page never opens a device.
- The page only shows what the device itself reports. After you tap a button it dims for a moment until the device confirms the change.
- If a device is Offline, its controls are grayed out until it is reachable again.
Lights and dimmers
Switches with 1 to 4 gangs, relays and dimmers each get a simple page.
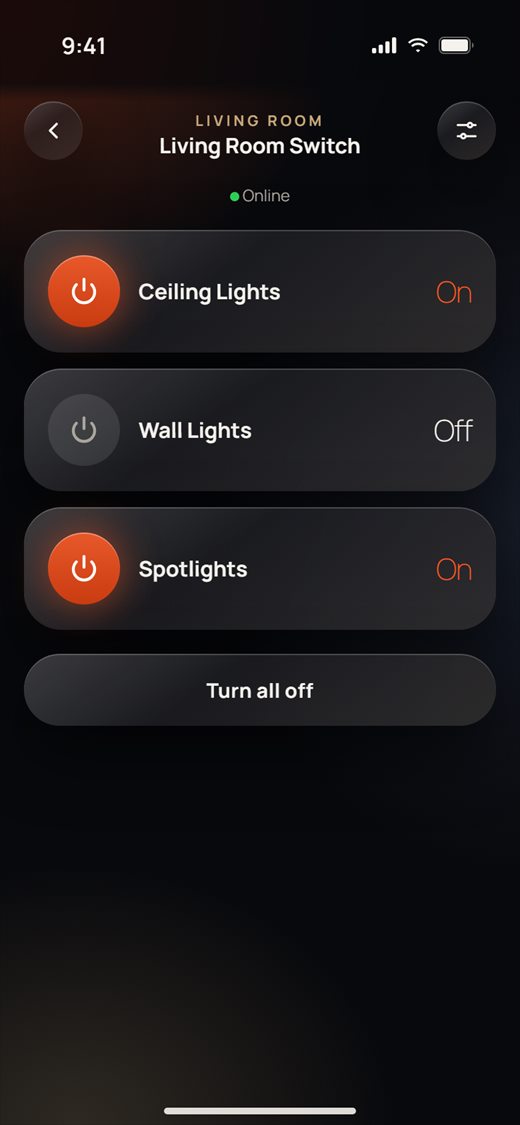
- Open a light switch. Each gang has its own row with its name (for example "Ceiling Lights") and On or Off.
- Tap a row to turn that light on or off.
- Tap Turn all off to switch off every gang that is on.
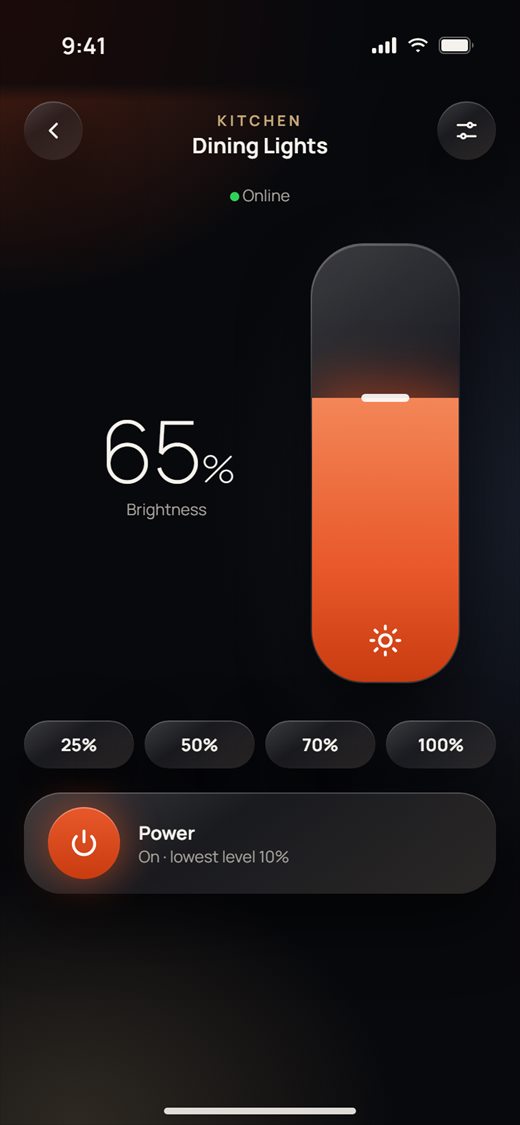
- Open a dimmer. Drag the tall slider up or down, or tap 25%, 50%, 70% or 100%.
- Tap Power to turn the light off, and tap it again to go back to the last level. If the dimmer has a lowest level set, it is shown under Power (for example "lowest level 10%").
- Gang names come from the device settings. Renaming a card on Home never renames the device.
- A relay module also has Delay all off: choose minutes and seconds, and every channel turns off after that time.
- If the device has inputs (contacts or temperature probes), they are listed under Inputs.
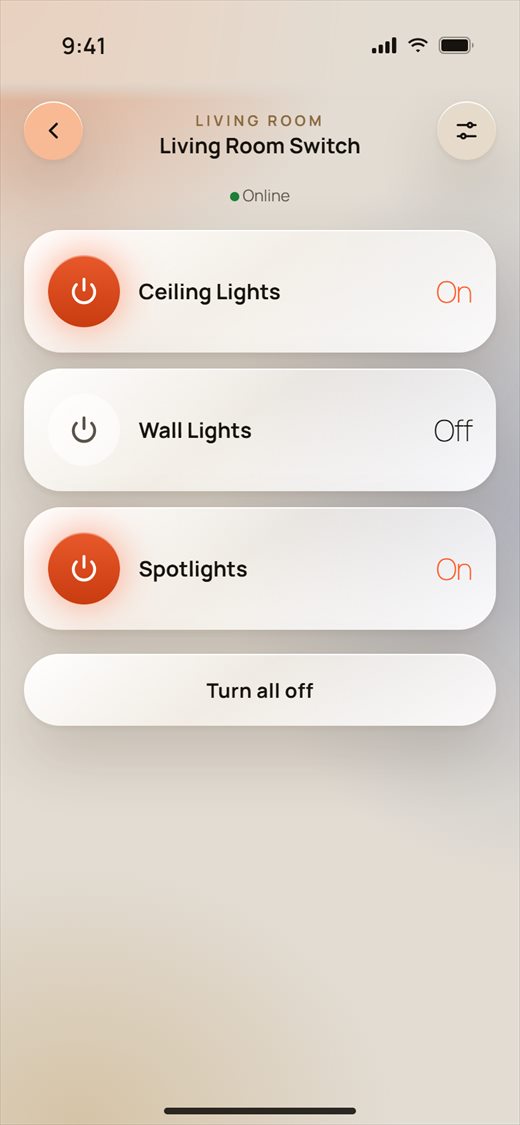
- You like a bright look? Choose Light in Me › App style. Every device page follows it.
Curtains
The curtain page draws your curtain the way it really opens (center, left, right or roller blind).
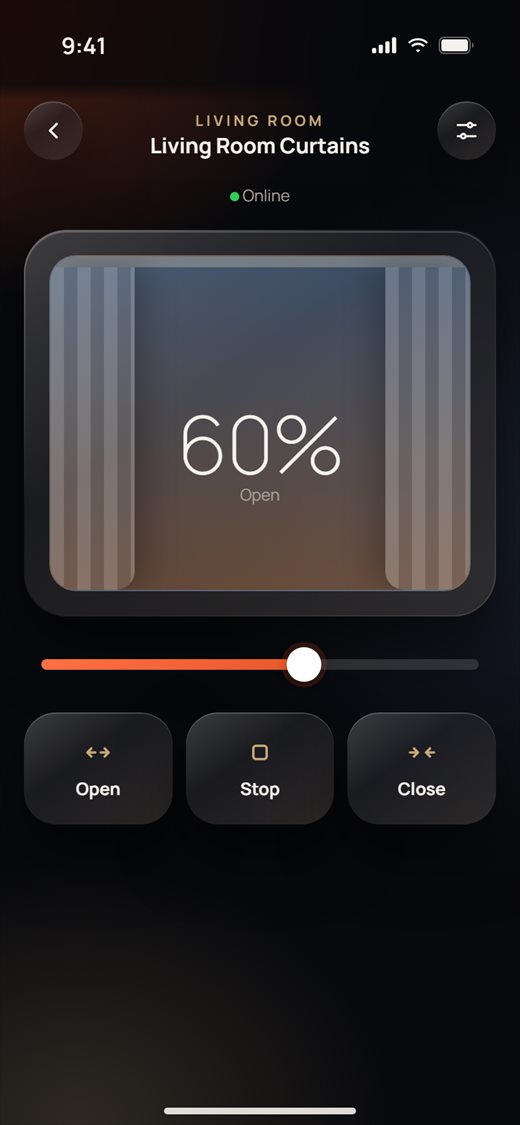
- Open a curtain. The picture shows how far it is open, for example 60% Open.
- Tap Open, Stop or Close. The picture moves while the motor runs.
- With a curtain motor you can also drag the slider to a position. The curtain moves there when you let go.
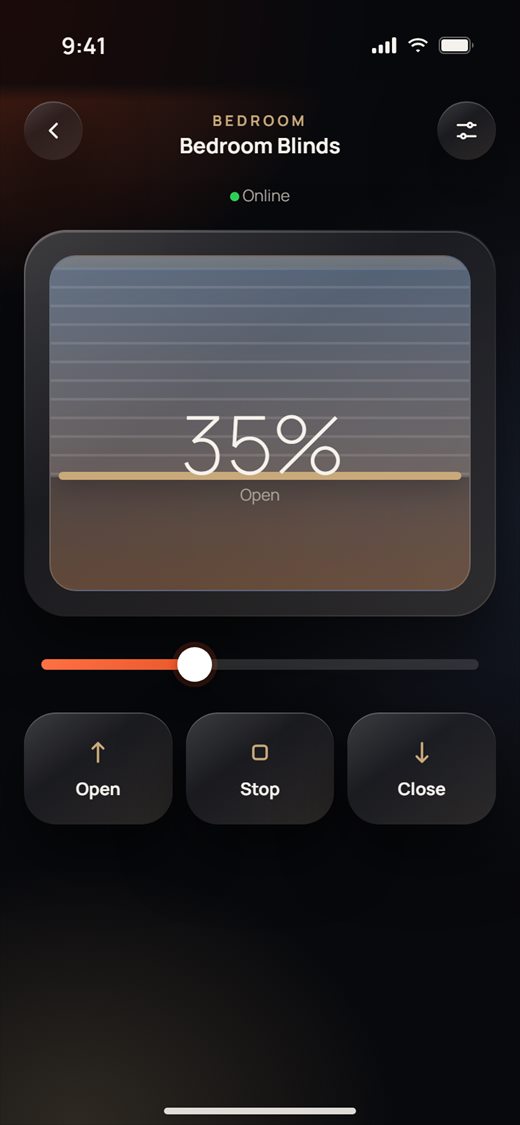
- The curtain type (center, left, right, roller) is chosen in Device settings. It only changes how the app draws it.
- A curtain switch has no position sensor, so it only shows Open or Closed and has no slider.
Climate
Thermostats, air conditioners and floor heating share one page with a round dial.
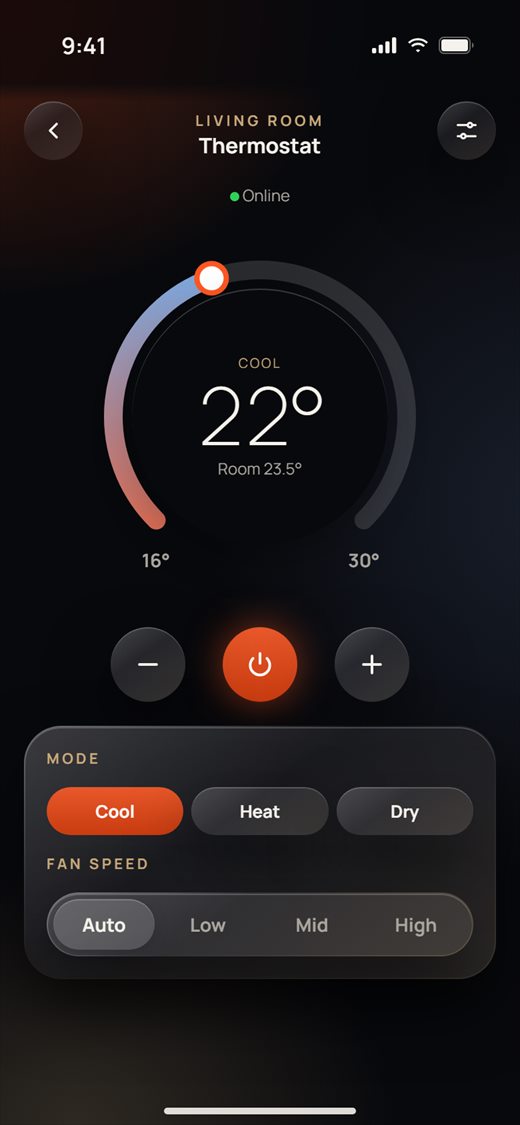
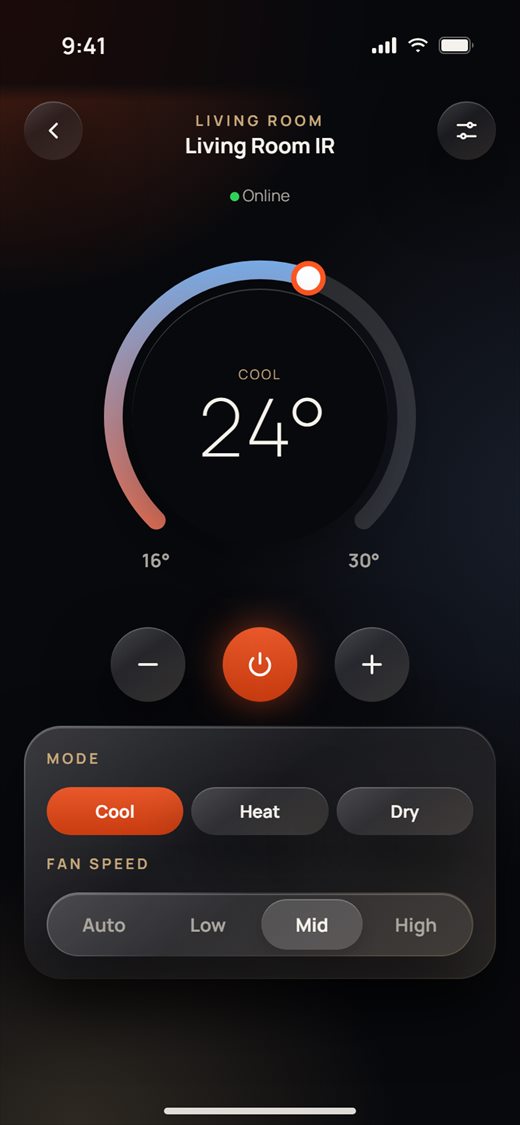
- Open a thermostat. The dial shows the set temperature, the mode (for example COOL) and the room temperature ("Room 23.5°").
- Drag around the ring, or tap − and +, to change the set temperature. It is sent a moment after your last change.
- Tap the round power button in the middle to turn it on or off.
- Under Mode choose Cool, Heat or Dry. Under Fan speed choose Auto, Low, Mid or High.
- A floor-heating thermostat shows HEATING and a Valve card (Open or Closed) instead of modes and fan speeds.
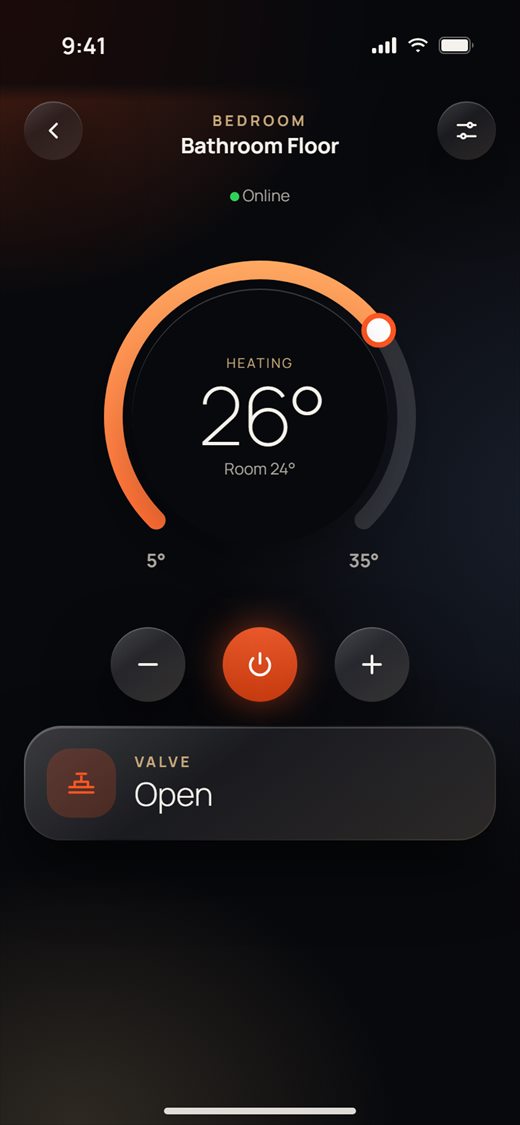
- The lowest and highest temperatures under the dial come from the device. If you see "!", the device reported a range that is not valid, and the app uses the default range.
- Mode and fan buttons only work while the thermostat is on.
Color lights
RGB lights have three tabs: Color, White and Moods.
- Open a color light. On Color, drag on the color wheel to pick a color, then set its Brightness.
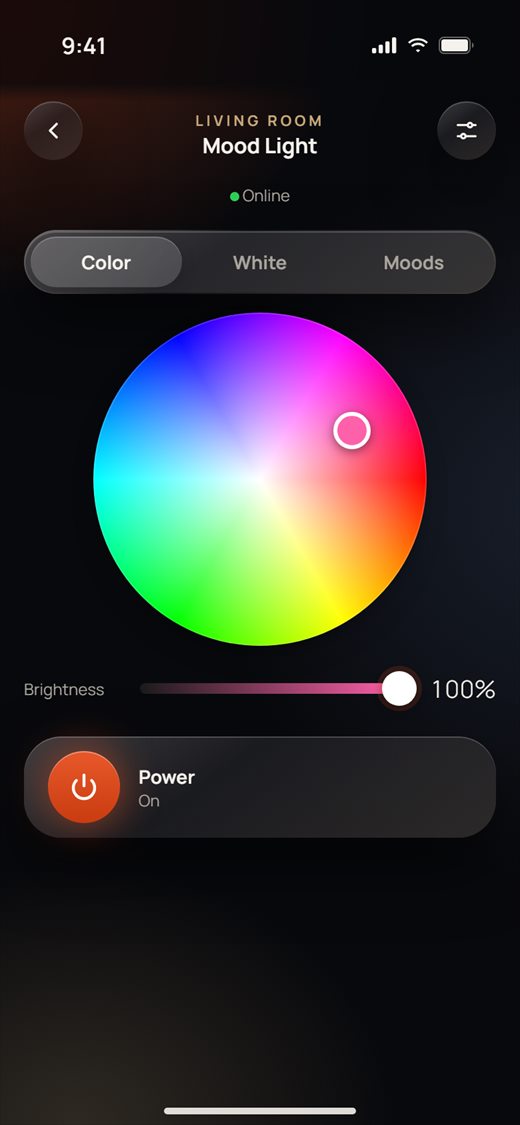
- On White, slide between Cold and Warm, and set the white Brightness. Color and white light are set separately, so both can be on together.
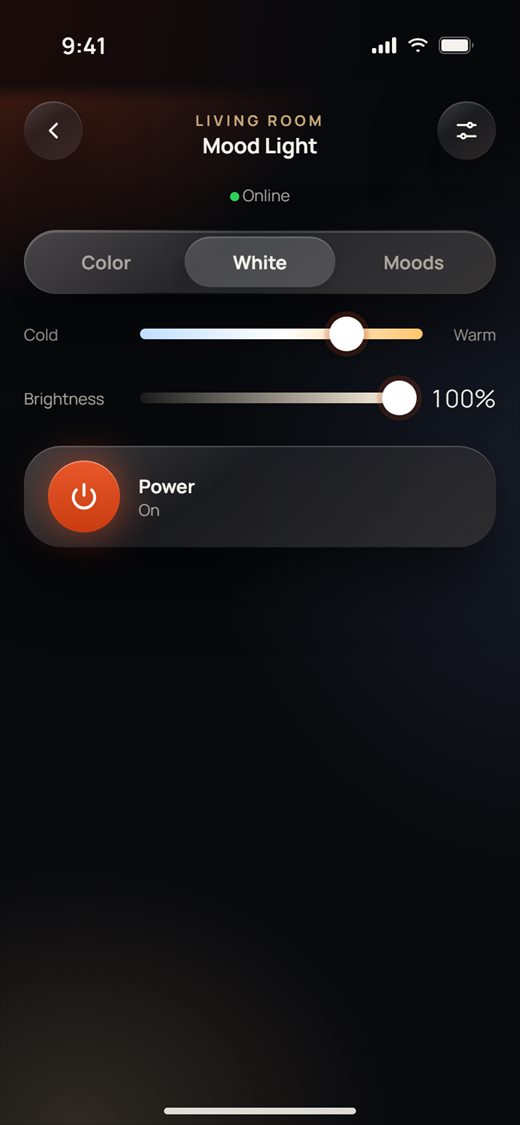
- On Moods, tap one of the 10 moods: Relax, Study, Night, Dance, Party and User defined 1 to 5. The mood that is playing is shown under Power.
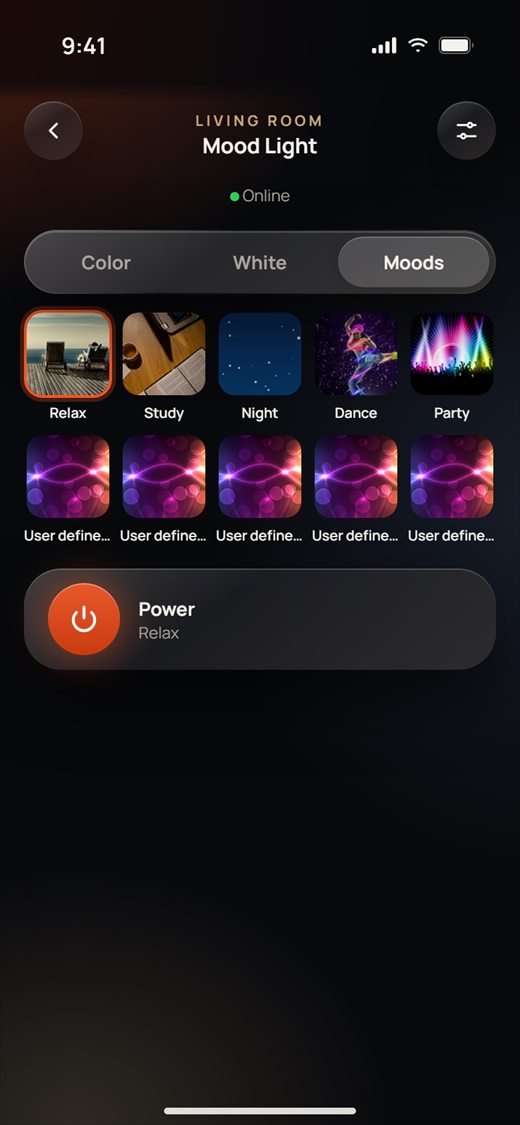
- Tap Power to turn the light off or on.
- To change a mood's colors, open Device settings and choose the mood. Pick up to 10 colors (+ and −). For each color, use the wheel and Brightness, or tap No color for white light only, then set Cold light and Warm light. Choose a Transition mode (Rapid or Smooth) and a Transition speed, then tap Save.
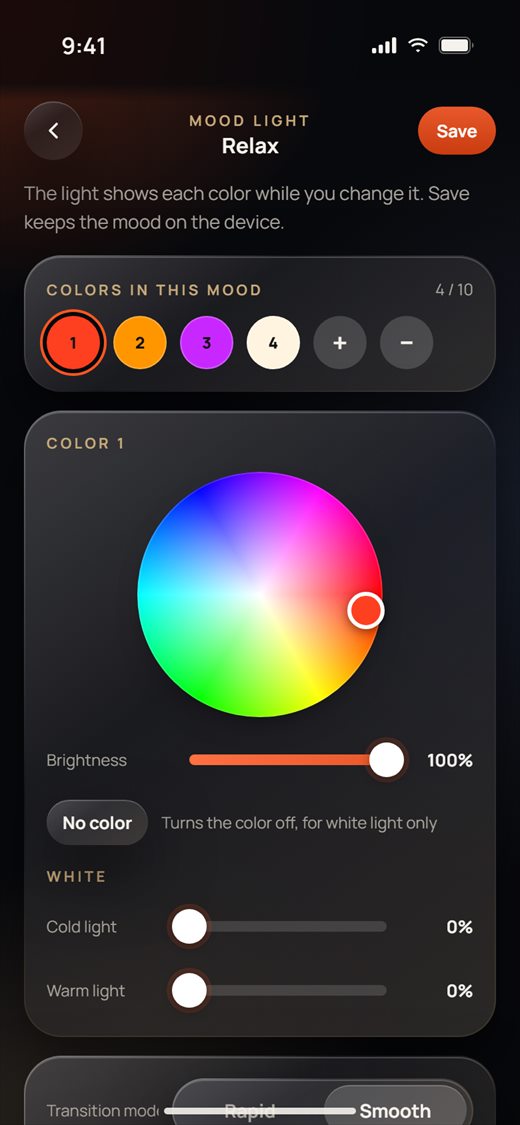
- While you edit a mood, the light shows each color so you can see it for real. Nothing is kept until you tap Save.
- The tabs you see depend on which outputs your light driver has (color, cold, warm).
Sockets and energy
A socket with an energy meter shows how much power it uses.
- Open the socket. Tap Power to turn it on or off.
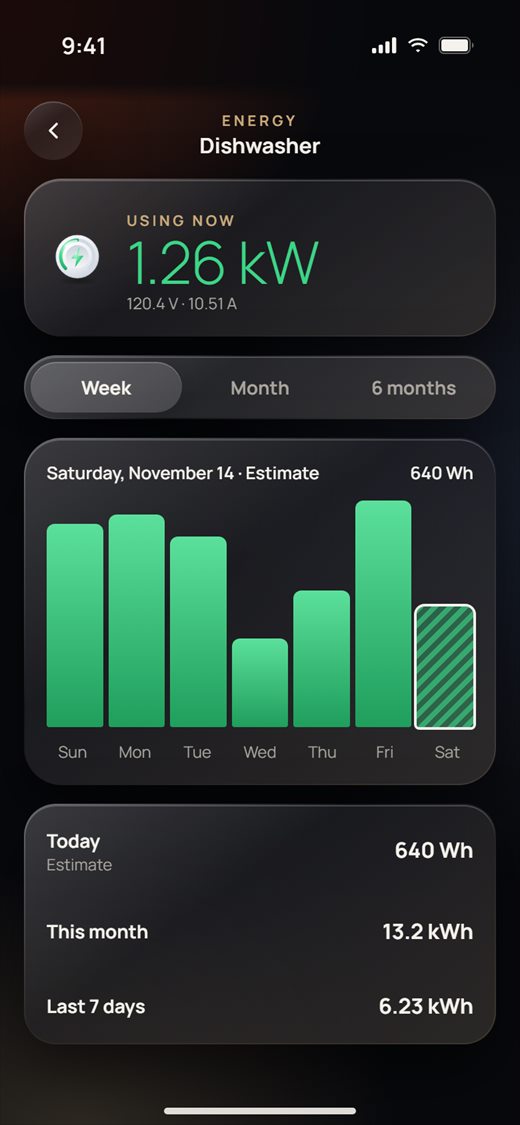
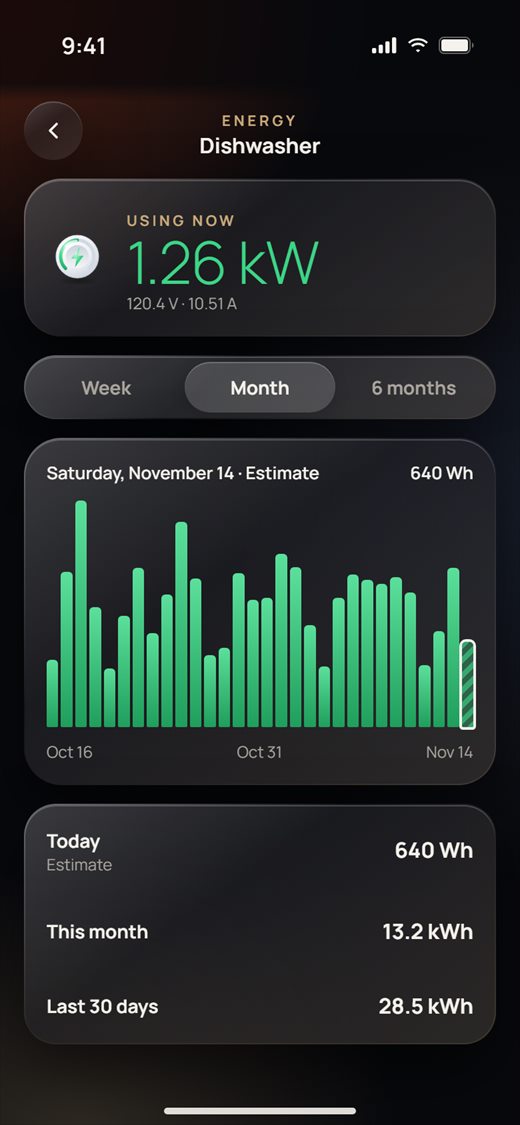
- The Using now row shows the live power (for example 1.26 kW) with the voltage and current. Tap it to open the energy page.
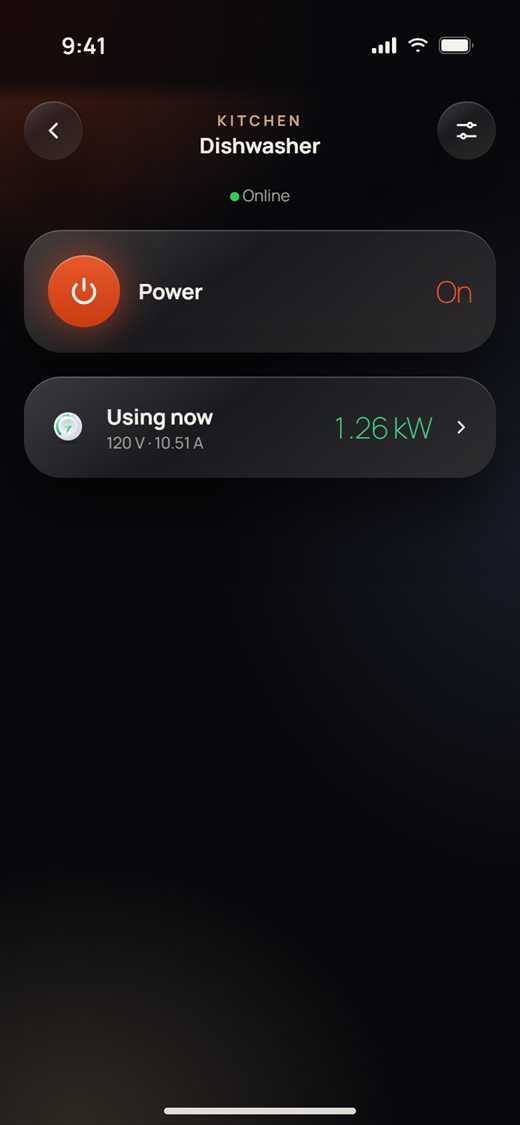
- On the energy page, Using now updates every few seconds.
- Tap Week, Month or 6 months to see the use per day (or per month). Tap a bar to read its date and value. Today's bar is striped because it is an Estimate until the day ends.
- At the bottom you see Today, This month and the total for the chosen period.
- If the meter is turned off in the device settings, the page says so and shows no live values.
- The history comes from the device's own memory, so the first time it can take a few seconds to show.
Sensors and temperature
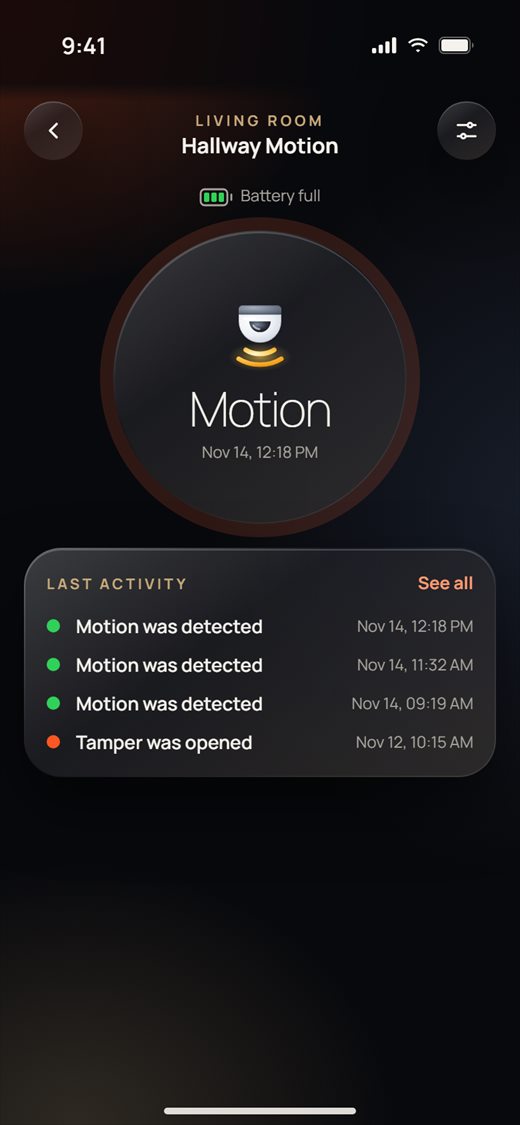
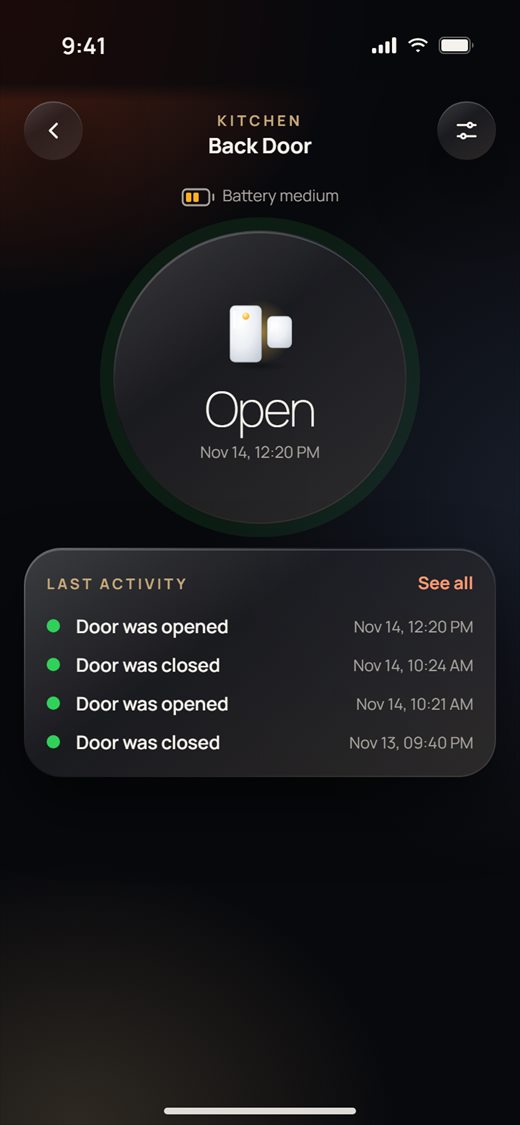
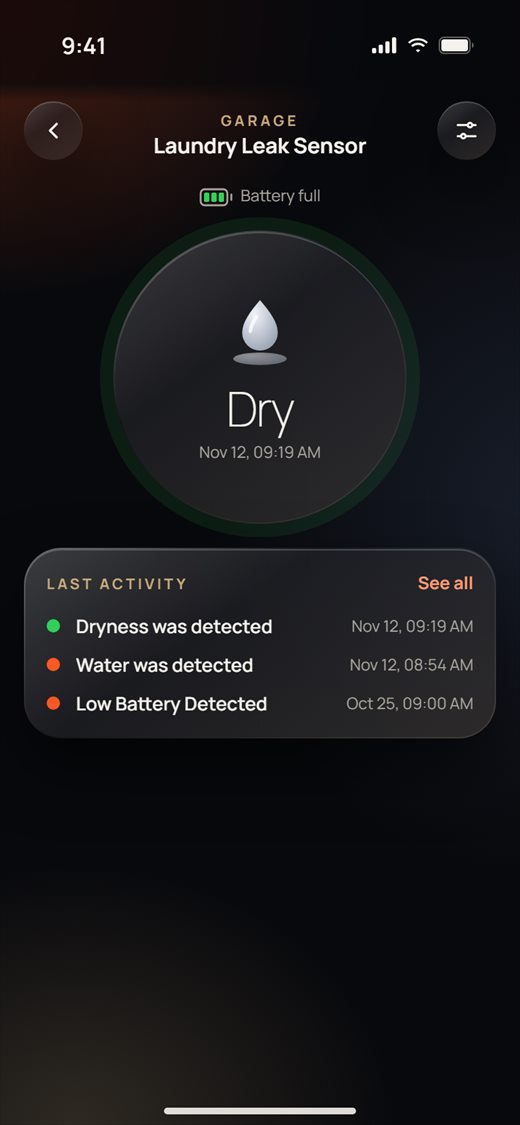
Motion, door and water-leak sensors show their state in a big circle, with recent activity below.
- Open a sensor. The circle shows its state (Motion / No motion, Open / Closed, Water / Dry) and when it changed.
- The battery level is shown under the name (Battery full, Battery medium or Battery low).
- Under Last activity you see the latest events. Tap See all for the full history.
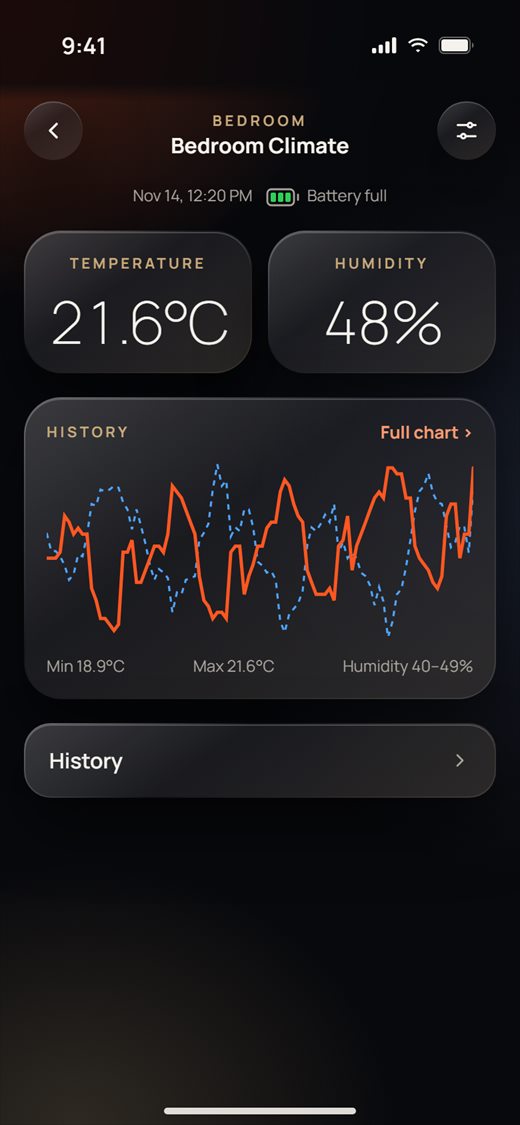
- Open a temperature and humidity sensor to see both values, the time of the last reading and the battery.
- The History card shows a small chart (temperature in orange, humidity dashed in blue). Tap Full chart ›.
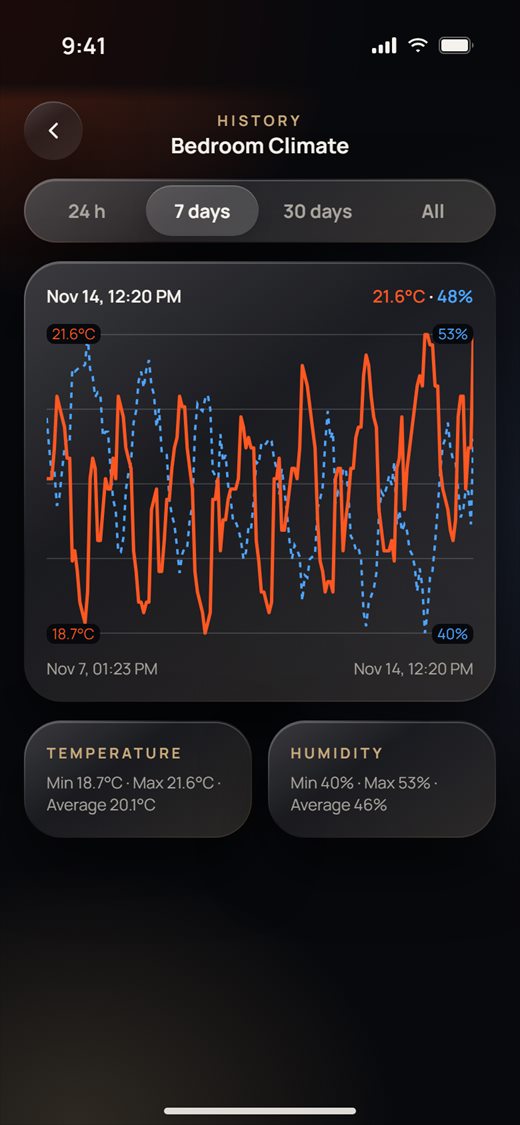
- On the chart, choose 24 h, 7 days, 30 days or All. Touch the chart and slide your finger to read any point. Below the chart you see the min, max and average values.
- Battery sensors report on their own, so they have no Online line, only the battery level.
- A motion sensor shows Motion for about a minute after it sees movement, then No motion.
Infrared remotes
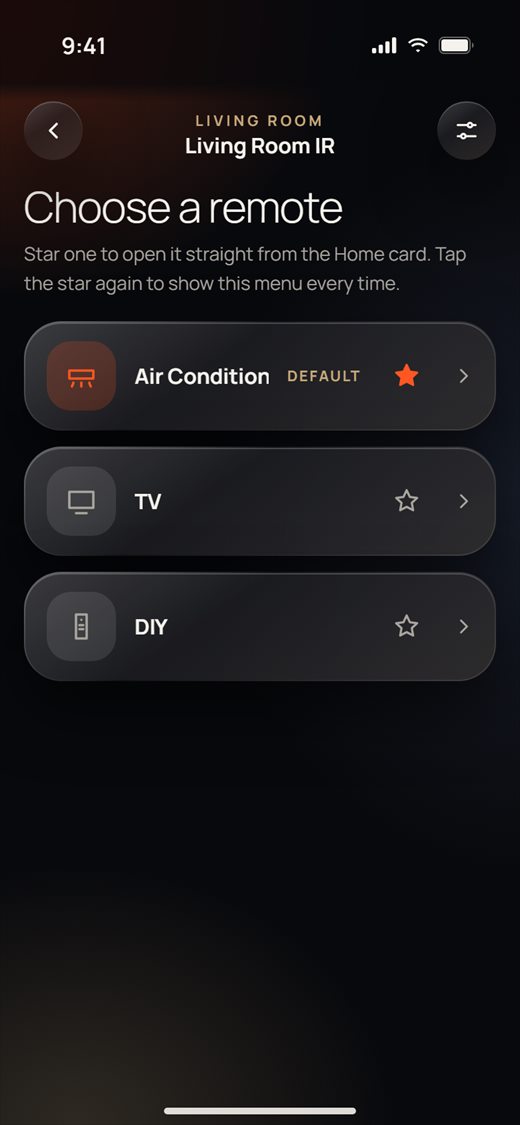
An IR emitter can work as an air-conditioner remote, a TV remote, and up to 30 learned buttons (DIY).
- Open the IR emitter and choose a remote: Air Condition, TV or DIY.
- Tap the star next to one to make it the default. The Home card then opens that remote directly. Tap the star again to see this menu every time.
- The air-conditioner remote works like the thermostat page: set the temperature, tap power, and choose the mode and fan speed. (The emitter does not measure the room, so no room temperature is shown.)
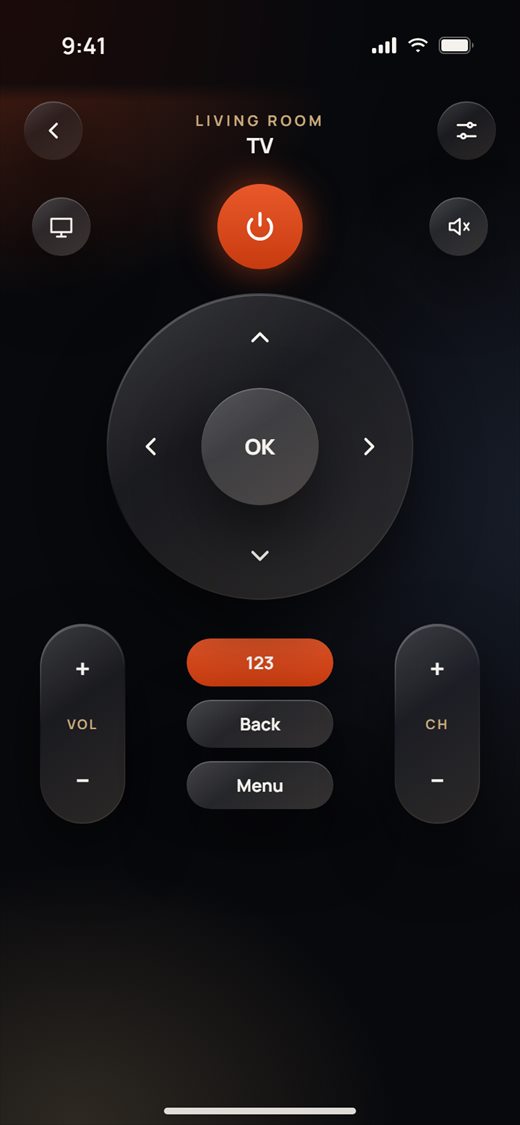
- The TV remote has power, input, mute, the arrow pad with OK, VOL and CH, Back and Menu.
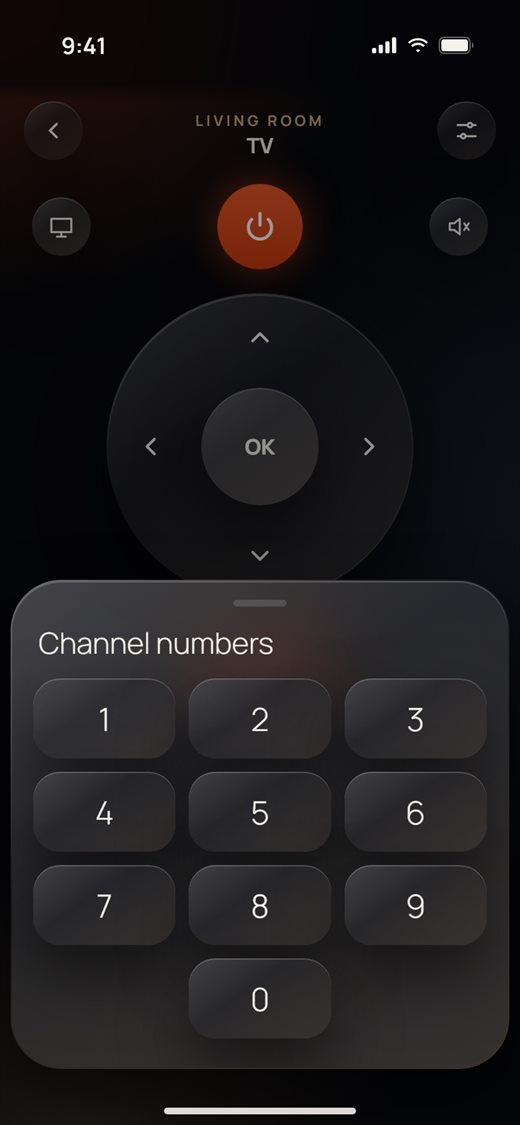
- Tap 123 to open Channel numbers.
- On DIY, tap a button to send it. Buttons without a name show as "Memory 13", "Memory 14" and so on.
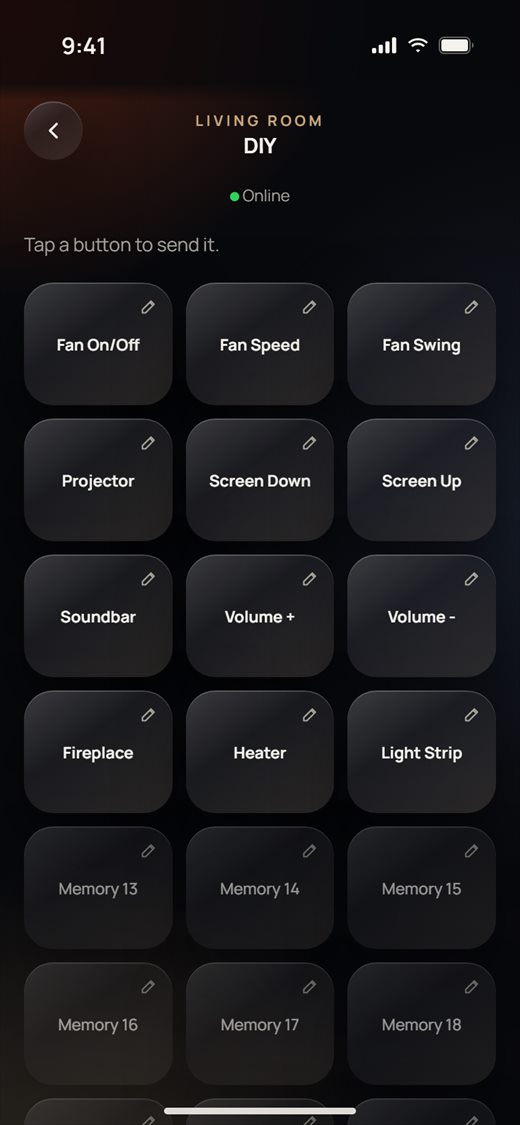
- To name or learn a button, tap its pencil. Type a Key name and tap Save name. Tap Learn this button, point your original remote at the emitter and press the button once. The emitter listens for about 30 seconds.
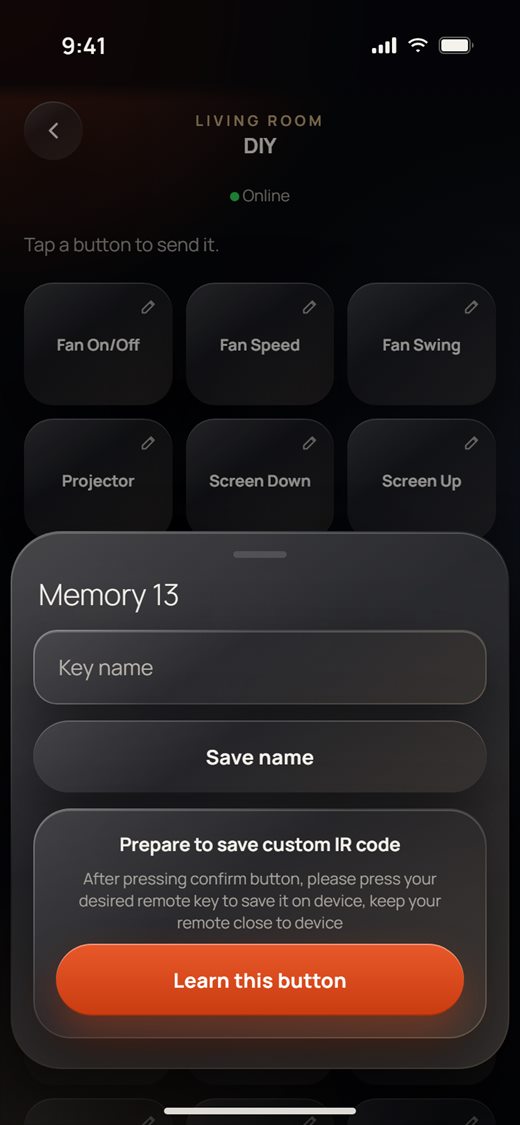
- Sync names from device reads the button names saved on the emitter (about 15 seconds).
- Only the device owner sees Format memory, which erases all learned buttons.
Touch panels and AiO
A touch panel page shows its security state, scenes, security modes, schedules and history.
- Open the touch panel. The top card shows Security (for example Not armed), whether it is online, and its connection and clock (for example "Wi-Fi · 9:41").
- Under Scenario, tap a scene to run it on the panel. Tap Sync to read the panel's lists again.
- Under Schedule, turn a schedule on or off with its switch.
- Tap Report at the bottom to see the panel's history.
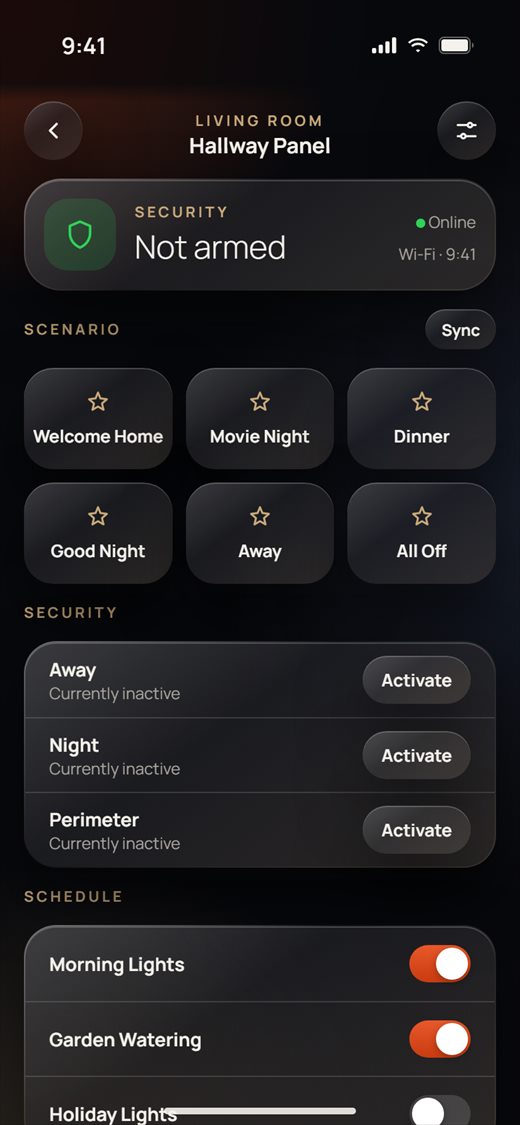
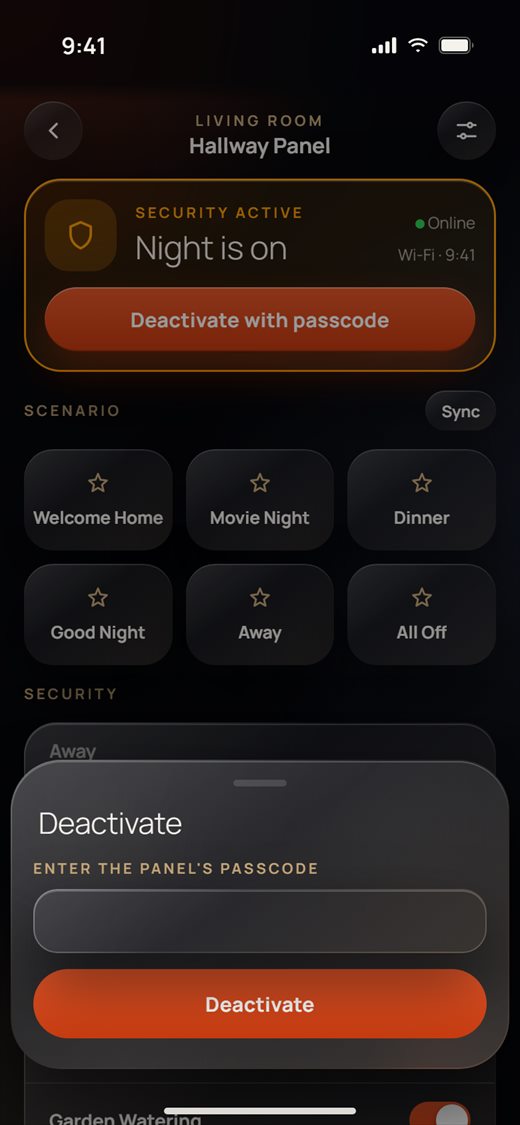
- Under Security, tap Activate next to a mode (for example Night). Enter the panel's passcode and confirm. The top card then turns orange ("Night is on").
- To turn it off, tap Deactivate with passcode and enter the passcode again.
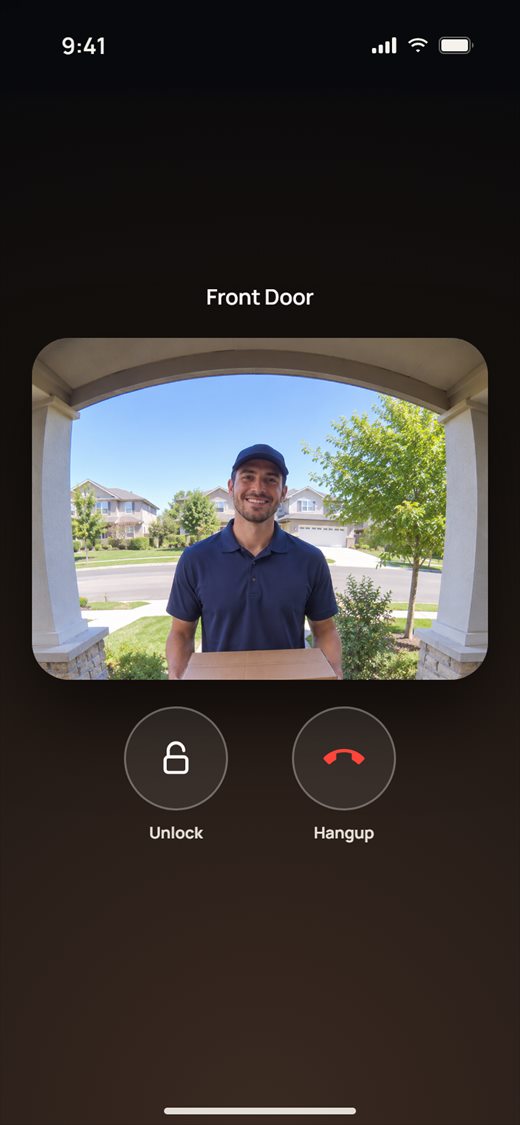
- When someone rings the panel while its page is open, the call opens with the panel's picture. Tap Unlock to open the door or Hangup to end the call.
- Open an AiO panel to see its weather and clock, its Relays (tap to switch), its thermostats under Climate (switch on or off, or tap the card for the full dial), and its Inputs.
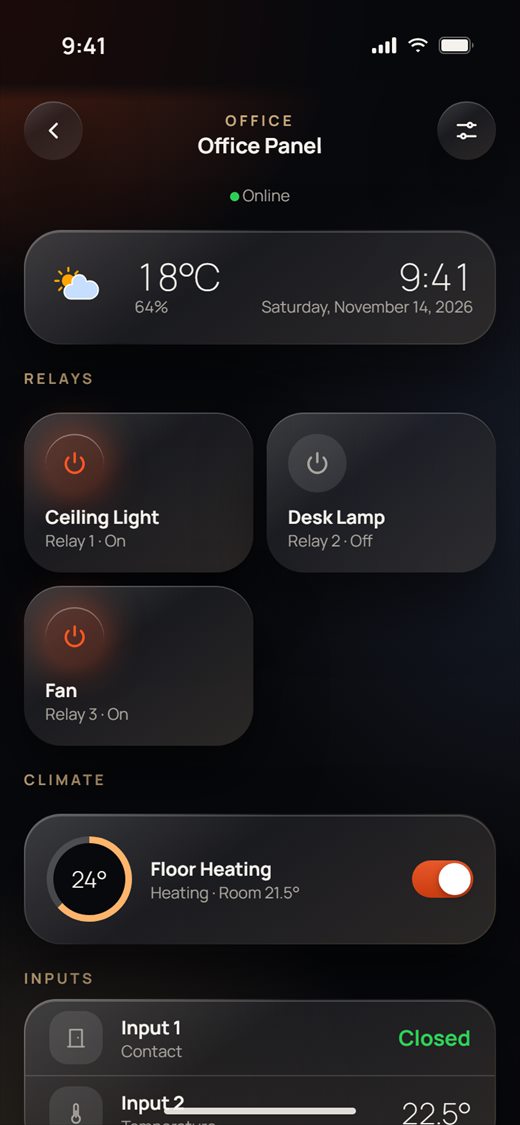
- The passcode is asked every time and is never saved in the app.
- Only one security mode can be on. Turn the active one off first before you start another.
- Relays that a thermostat of the AiO uses are not shown under Relays.
Door locks
There are two lock series. The new series opens with a 3-second hold and has Live view. The old series opens when the lock asks you.
- Open the lock. At the top you see Status, Battery (Full, Medium or Low) and the time of the Last report.
- New series: press the big lock and hold it for 3 seconds ("Hold 3 seconds to unlock"). The ring fills up, and the door opens when it is full. If you let go early, nothing is sent. You see "Lock is opened successfully." when it worked.
- Tap Live view to see the lock's camera.
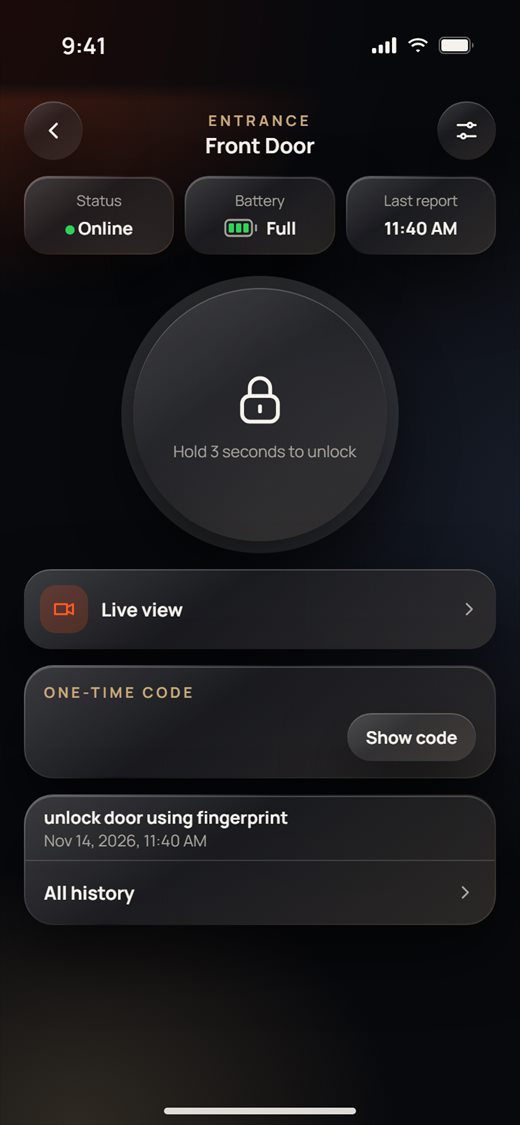
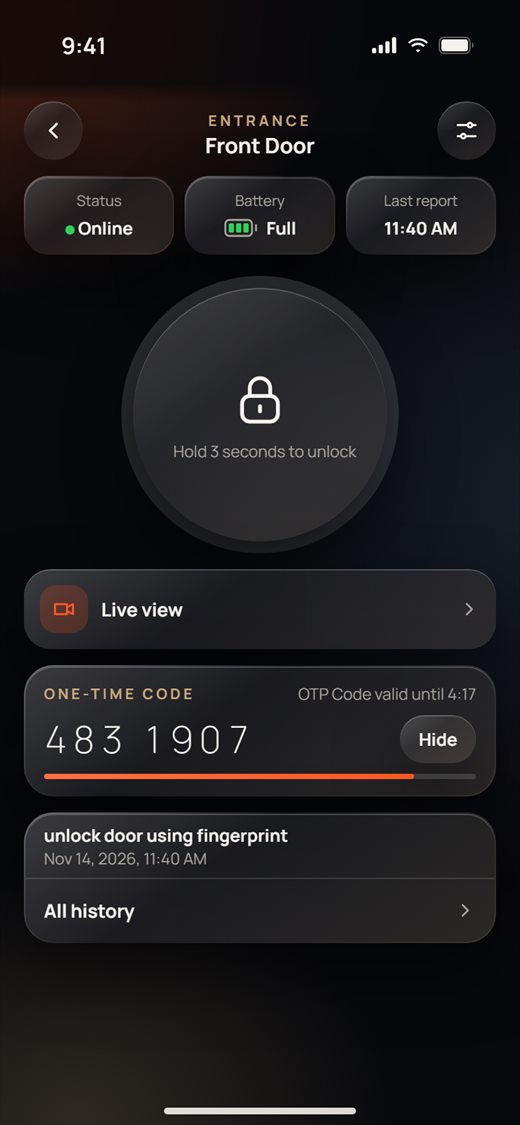
- Under One-time code, tap Show code. Give this code to a guest. It works once and is valid for 5 minutes (the bar and "valid until" show the time left). Tap Hide to hide it.
- Old series: the lock in the middle says Opens when the lock asks. Someone at the door asks to open it (for example after ringing). The app then asks you, "would you like to open the lock?". Tap Yes to open it or No to leave it locked.
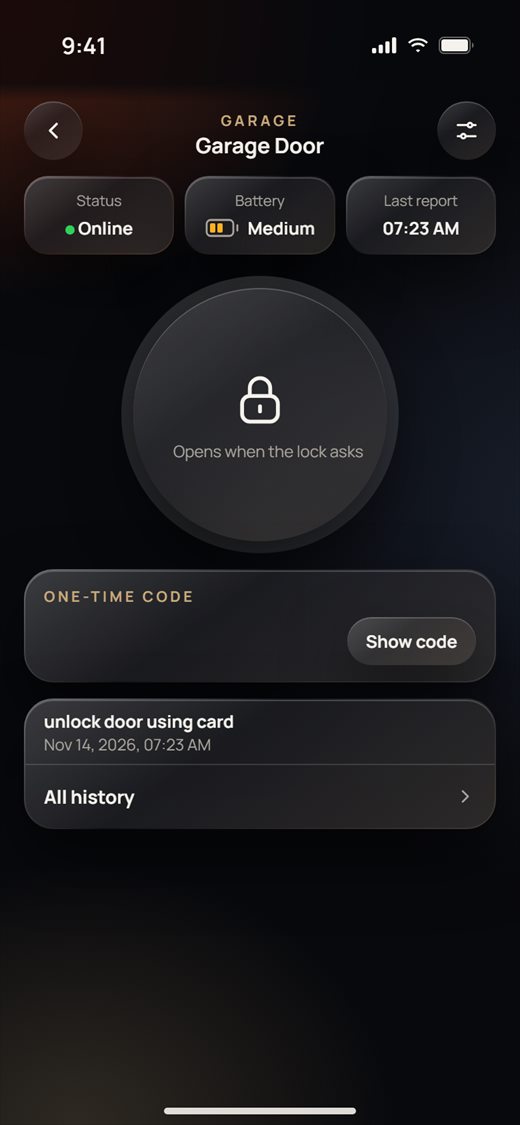
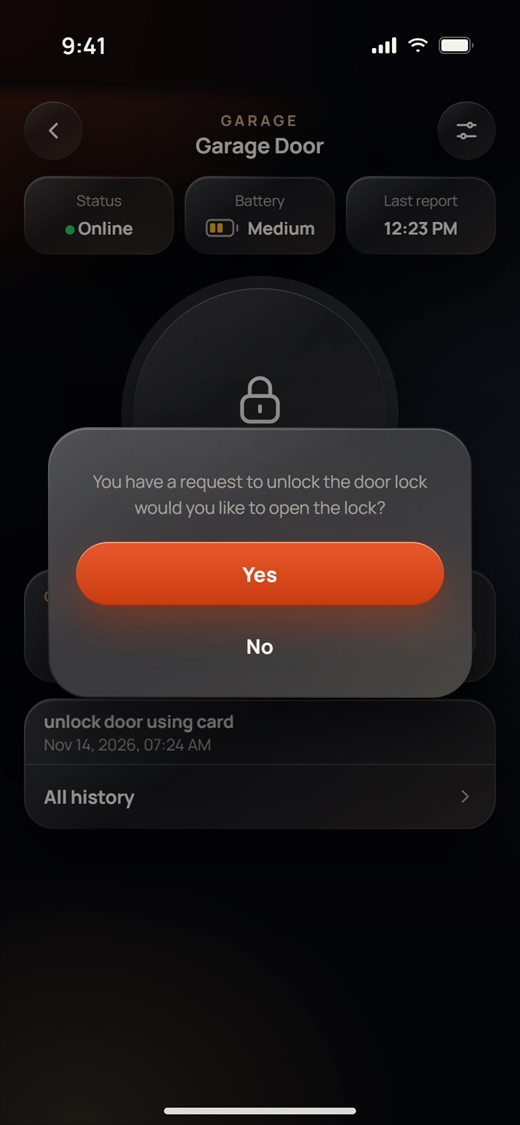
- The last activity is shown at the bottom. Tap it, or All history, to see everything.
- When someone rings a new-series lock while its page is open, the call screen opens by itself.
- The one-time code stays the same while it is valid, so you can show it again.
- The battery is shown as a level, never as a percent.
History
Every lock, sensor and panel keeps a history of what happened.
- Open the history from a device page (All history, See all, History or Report).
- Events are grouped by day (Today, Yesterday, then dates), newest first. Alarms are shown in red.
- For locks, filter with the chips: All, Unlocks, Doorbell, Snapshots, Alerts (a chip only shows when there are such events).
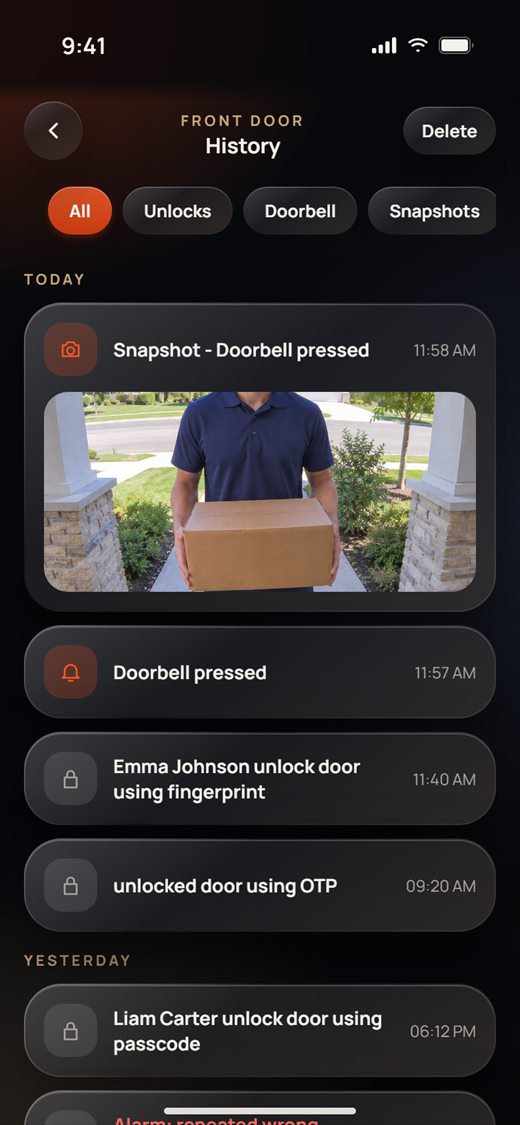
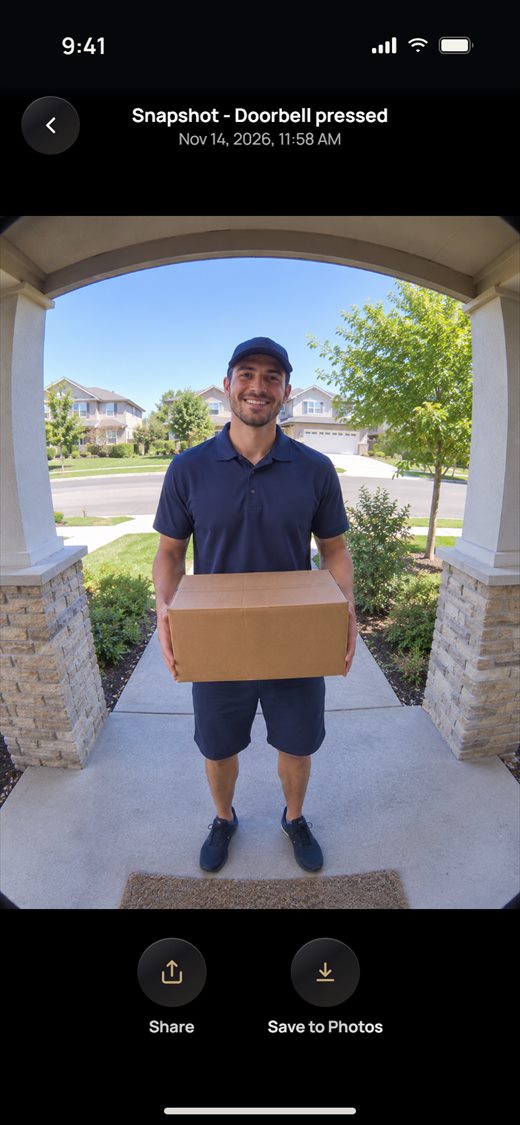
- Tap a snapshot to view it full screen. Pinch or double-tap to zoom. Tap Share or Save to Photos.
- Tap Delete at the top of the history to clear it.
- Snapshot links are valid for a short time. If a picture no longer opens, go back and open the history again to get fresh links.
- If a device was shared with you and its history is for the owner only, the page says "You are not owner of this device".
Part 1 · Home owners
Scenes, sharing, cameras and calls
Scenes
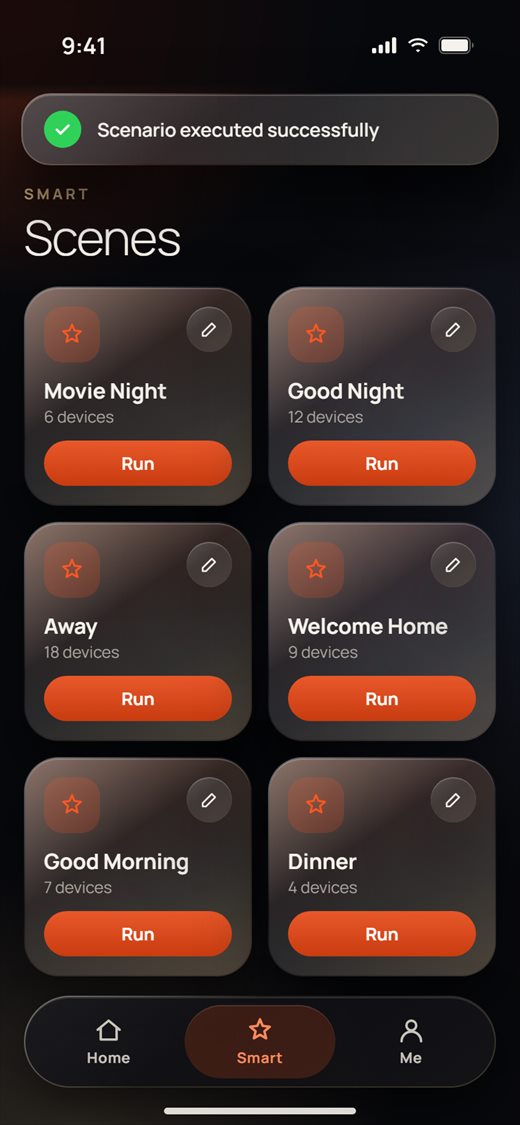
A scene sets many devices in one tap: lights to a level, curtains closed, the thermostat to your favorite temperature, and so on. Open the Smart tab at the bottom to see your scenes.
- Tap Smart. Each card shows the scene's name and how many devices it controls. To see another home's scenes, tap the home name at the top left.
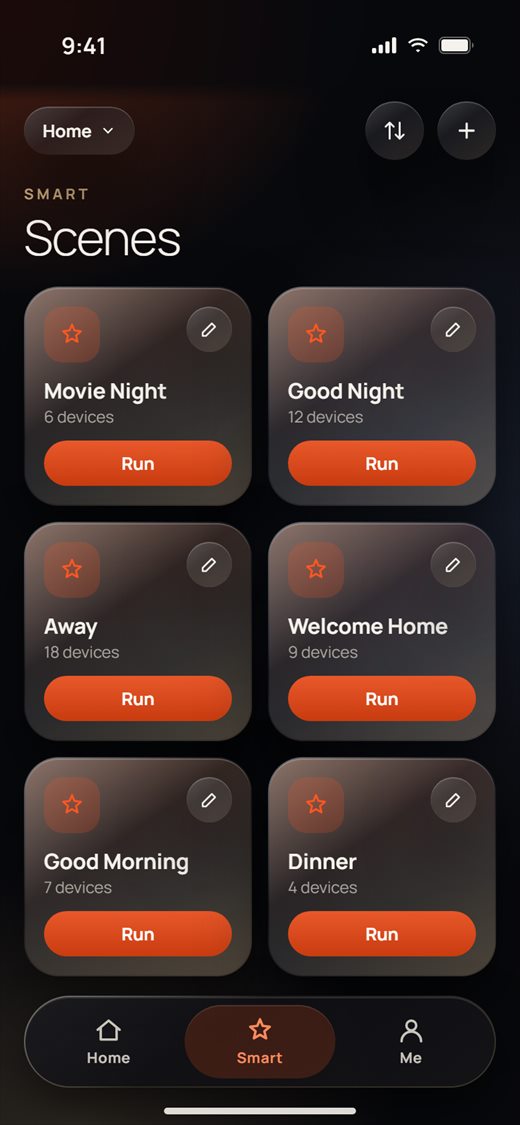
- Tap Run on a scene. The app sends the commands to all its devices at once, and each device follows its own steps in order. When every device has answered, a short message at the top says it worked.
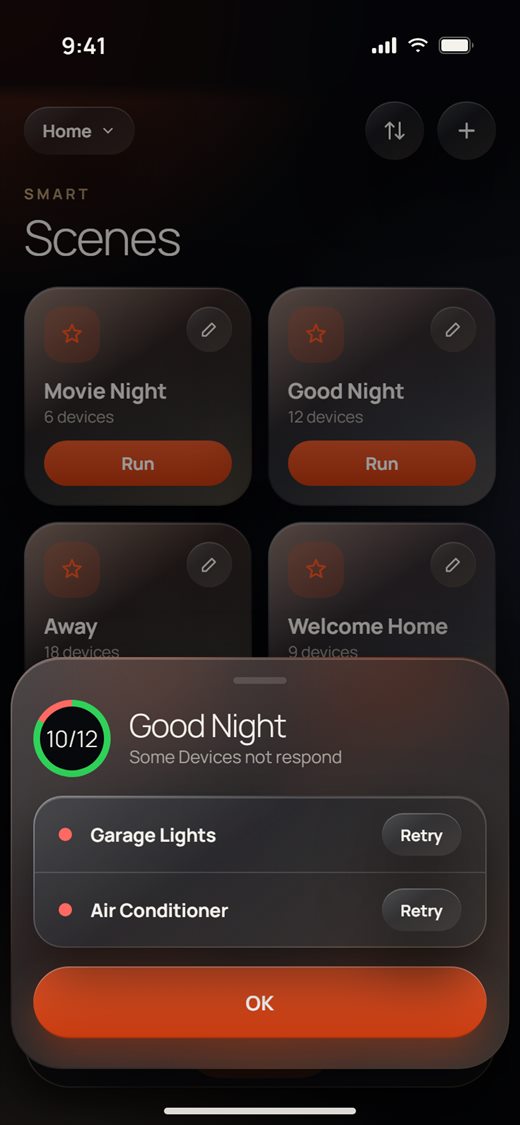
- If some devices did not answer, a sheet shows how many answered (for example 10/12) and lists the ones that did not. Tap Retry next to a device to send its part of the scene again, or OK to close the sheet.
Create a scene
- On the Smart tab, tap + at the top right.
- Type a Scene name, then tap + Add device.
- Tick the devices you want. Use the search field or the chips (Lights, Curtains, Climate, IR & music, Appliances) to find them faster, then tap Add (the button shows how many you picked).
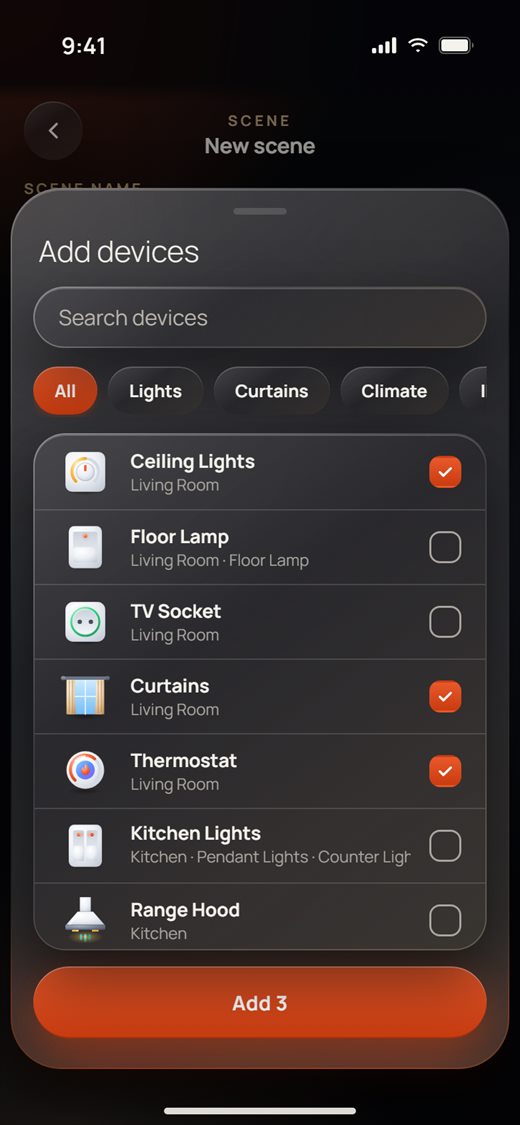
- Each device now has a card under Actions. Set what it should do:
- Switches and sockets: On, Off or Skip (leave it as it is) for each switch.
- Dimmers: drag the slider to the level you want.
- Curtains and blinds: Open, Stop, Close, or Position with a slider.
- Thermostats and air conditioners: On, Off or Auto, then the mode, the fan speed and the temperature.
- Tap Save scene.
Edit a scene and add delays
- Tap the pencil on a scene's card. You see its name and one card per device.
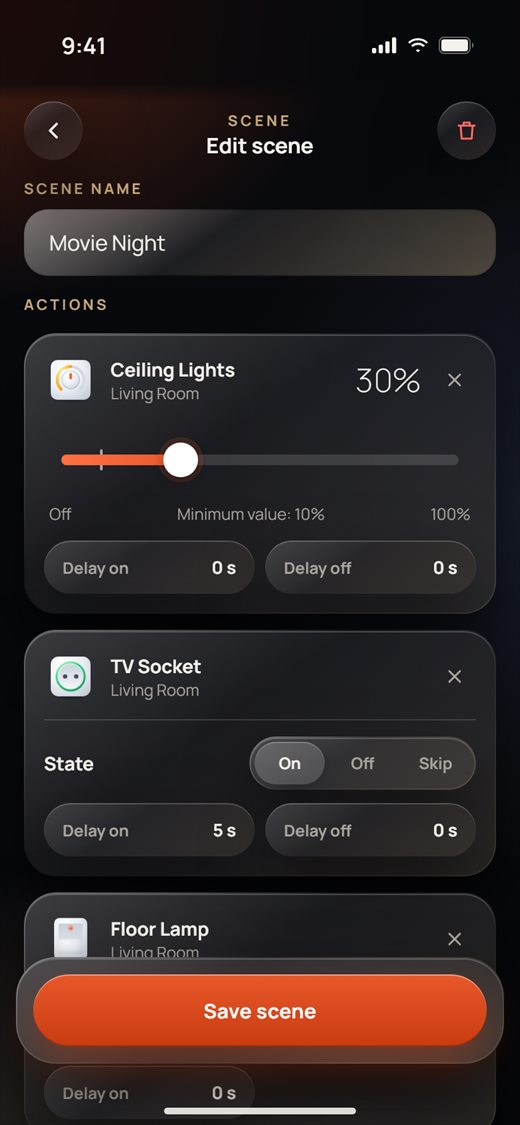
- Scroll down to see the rest of the devices. Tap × on a card to take that device out of the scene, or + Add device at the bottom to add more.
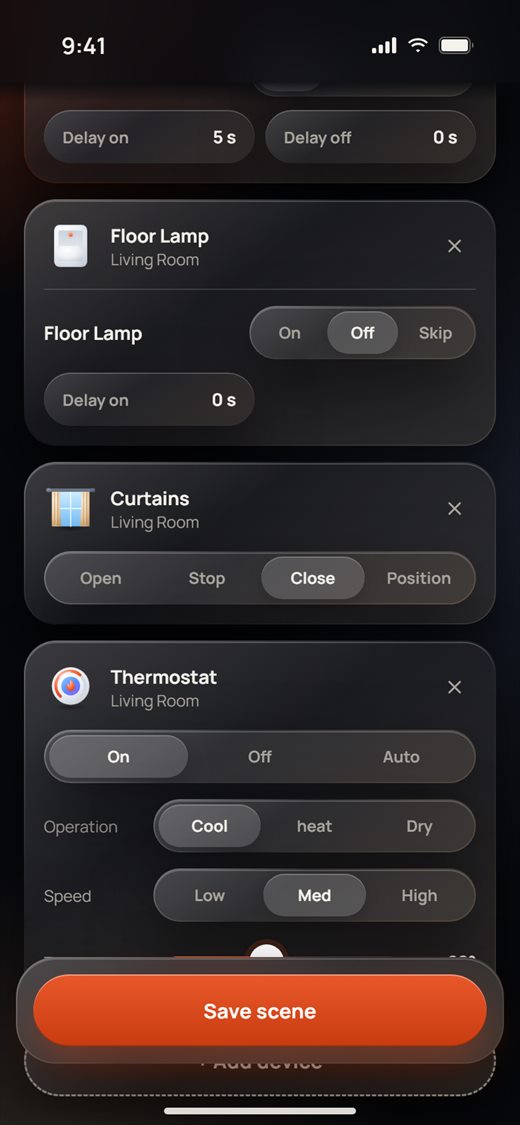
- To make a device wait before it acts, tap Delay on (or Delay off) on its card, pick minutes and seconds, and tap Done. For example, a TV socket with Delay on 5 s turns on 5 seconds after the scene starts. Delay off turns the device off again after the time you pick.
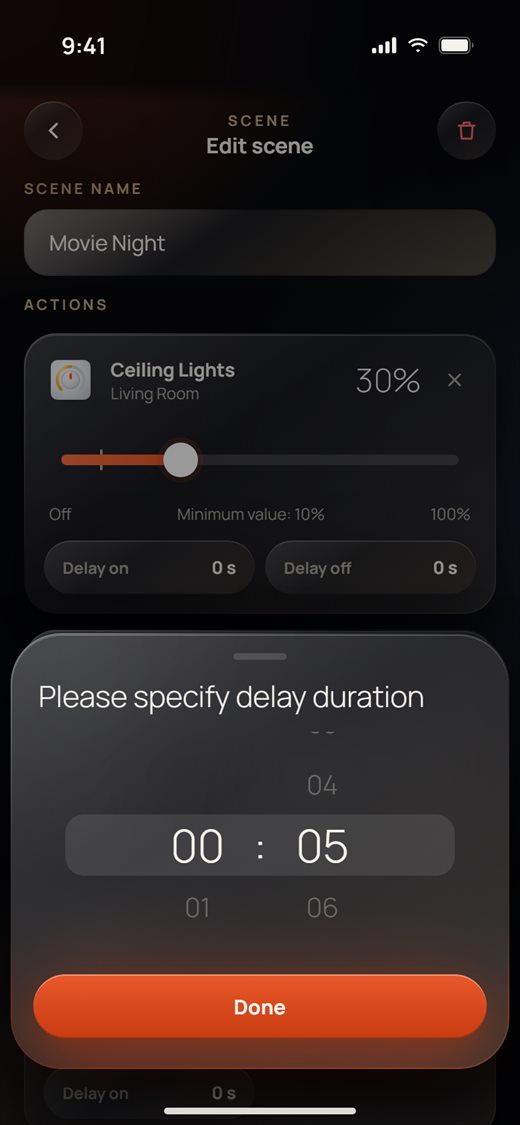
- Tap Save scene. To delete the scene, tap the red trash can at the top right and confirm.
Change the order of your scenes
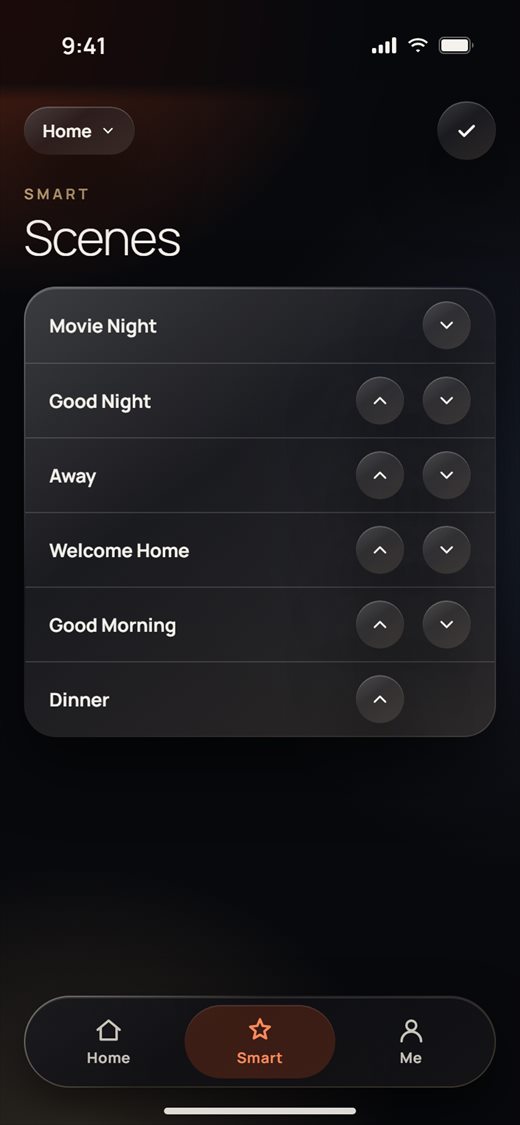
- On the Smart tab, tap the arrows button next to +.
- Use the up and down arrows to move each scene.
- Tap the check mark to save the new order.
Sharing devices with family and guests
You can let other people control your devices from their own NEXiiO app. They can use the devices, but the settings stay with you. Only devices you own can be shared.
Share several devices with one person
- Go to Me › Sharing (or tap the share button at the top of the All devices page).
- The app checks which devices are yours (this takes a moment), then lists them by room. Tick the devices you want to share, or tap Select all next to a room. Tap Next.
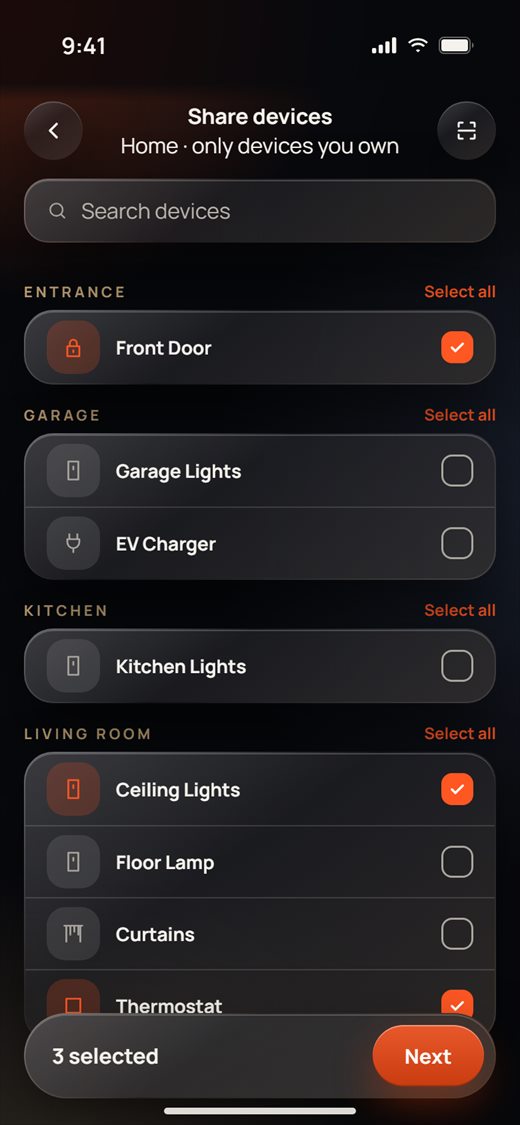
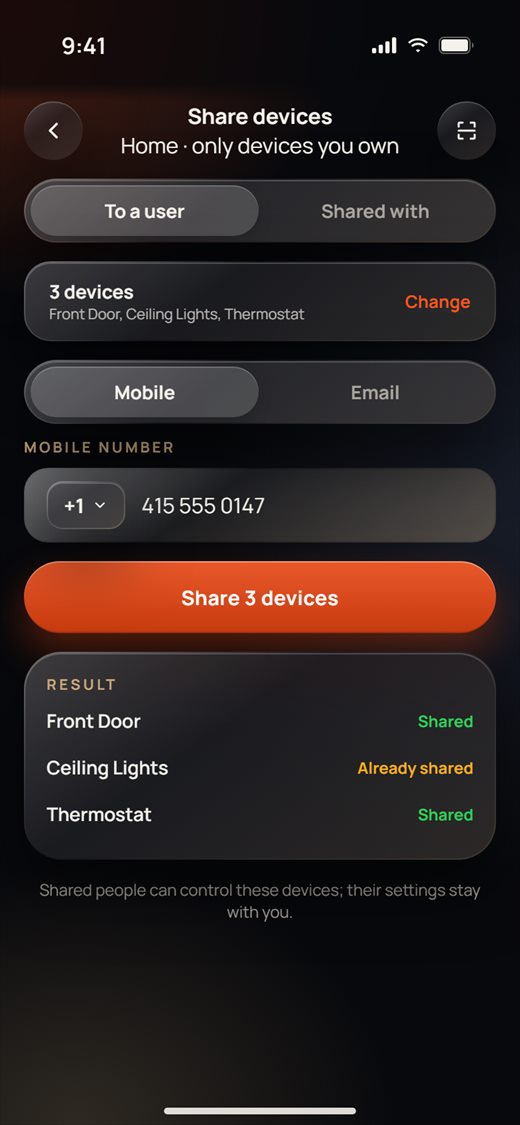
- On To a user, choose Mobile or Email and type the person's mobile number (for example +1 415 555 0147) or email address.
- Tap Share 3 devices (the number matches what you picked). Under Result each device shows Shared, Already shared, or why it could not be shared.
See and remove shares
- On the same screen, tap Shared with. You see everyone who has any of the chosen devices.
- Switch between By person and By device to see the list the way you like.
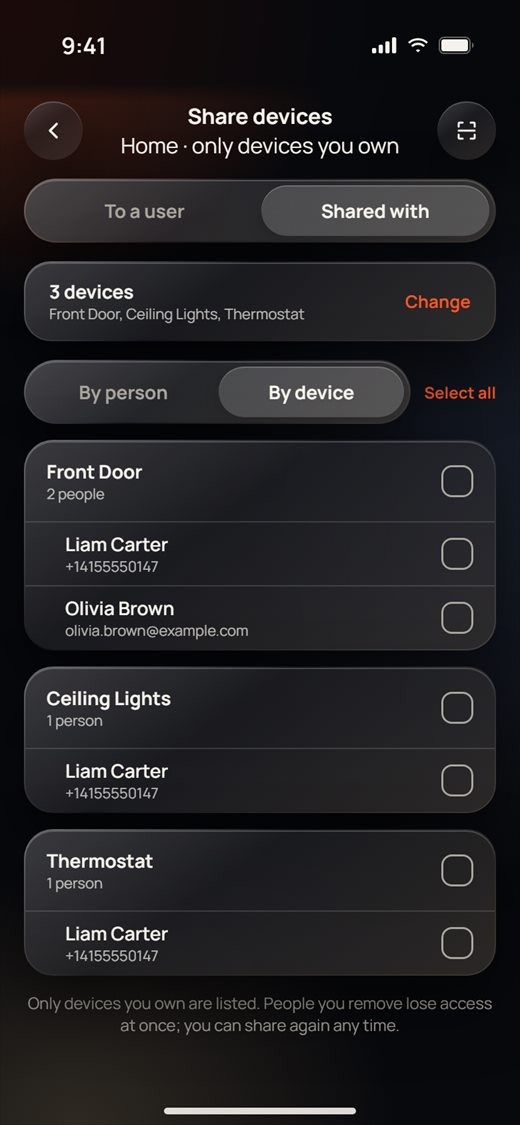
- Tick the shares you want to end: tick a person to pick all their devices, or tick single devices under them.
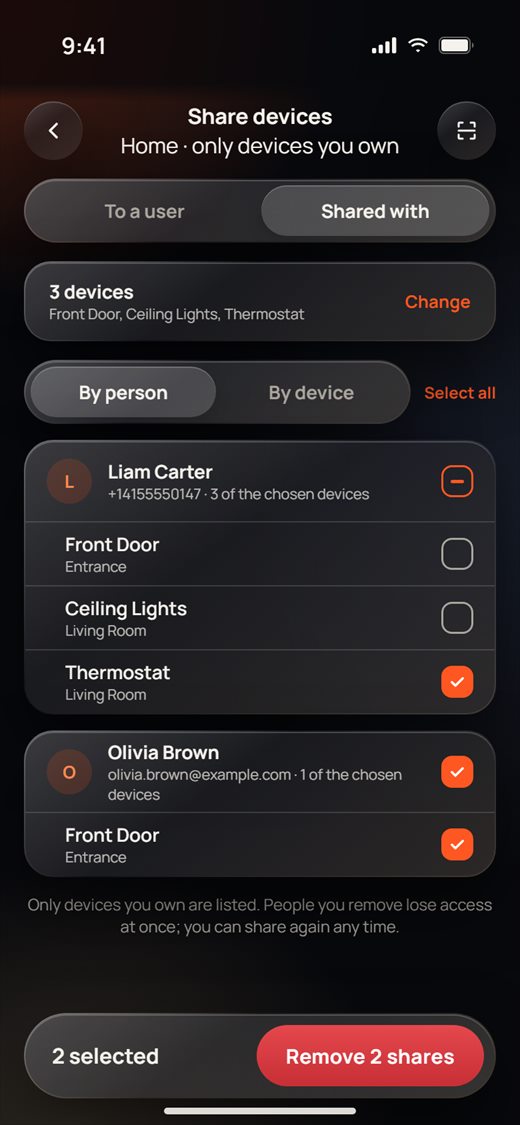
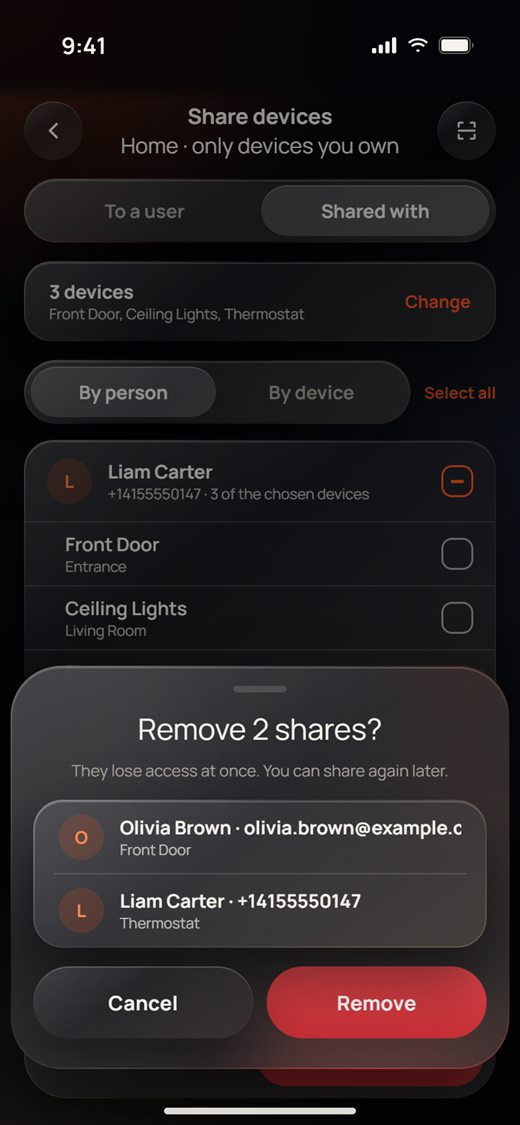
- Tap Remove 2 shares (the number matches your ticks), check the list and tap Remove. They lose access at once. You can share again later.
Share one device, or give a time-limited QR code
Each device also has its own sharing page: open the device, tap the gear at the top right, then Sharing.
- Under Share with a mobile number or email, choose Mobile or Email, type it and tap Share.
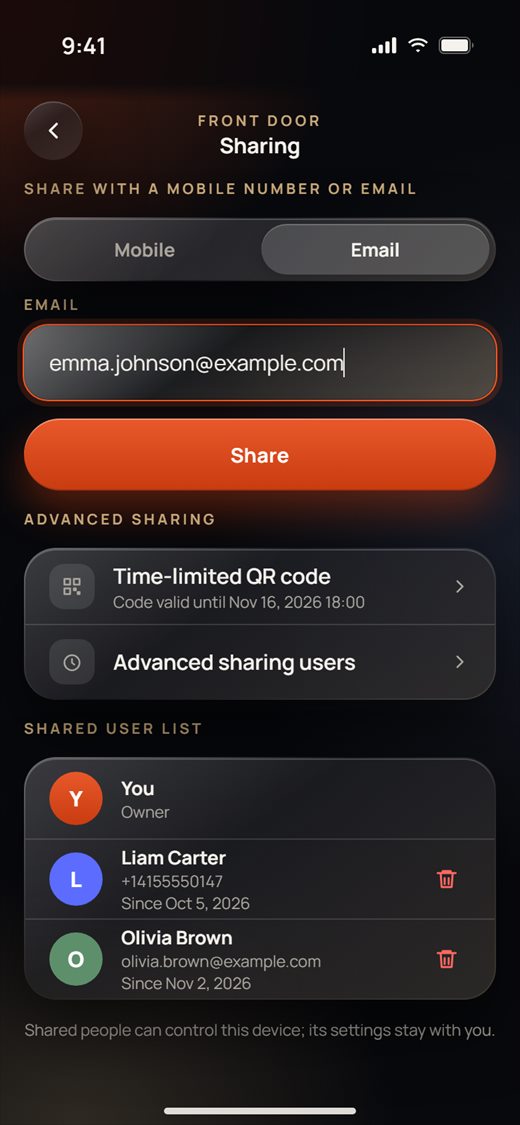
- Shared user list shows you as Owner and everyone who has the device, with the date they got it. Tap the red trash can next to a person and confirm to remove them.
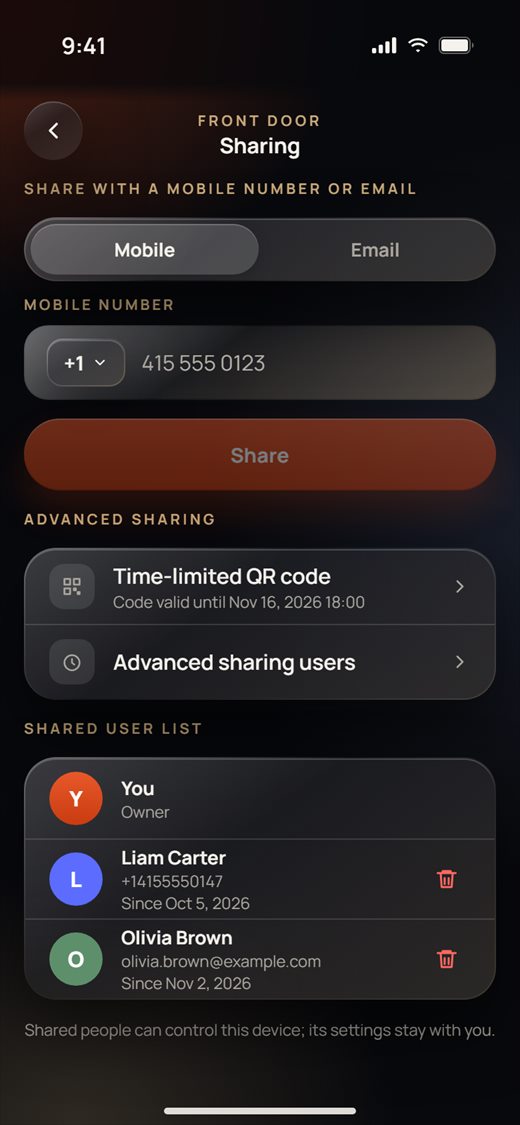
- For a guest, such as a dog walker or a house sitter, tap Time-limited QR code:
- Name shown to the person: what the guest sees, for example "Front Door".
- The code can be scanned until: pick a Date and Time. Nobody can scan the code after that.
- Access lasts: For hours (1–24 hours from when each person scans it) or Till expiration time.
- Tap Save. The QR code appears at the top. Tap Share to send it in a message, or Save image to keep it in Photos.
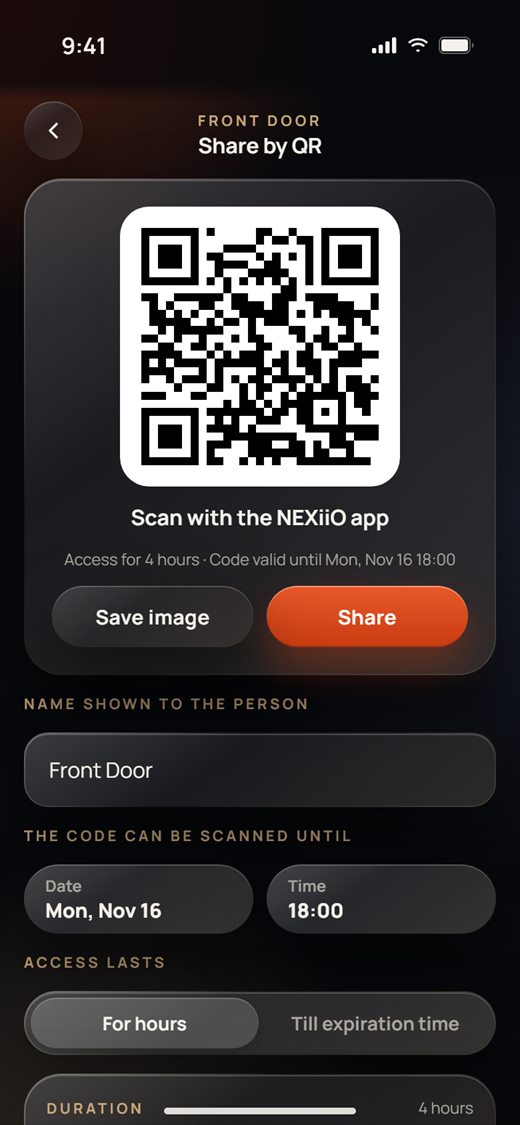
- The guest scans the code with the scanner in their NEXiiO app (the scan button at the top of Share devices).
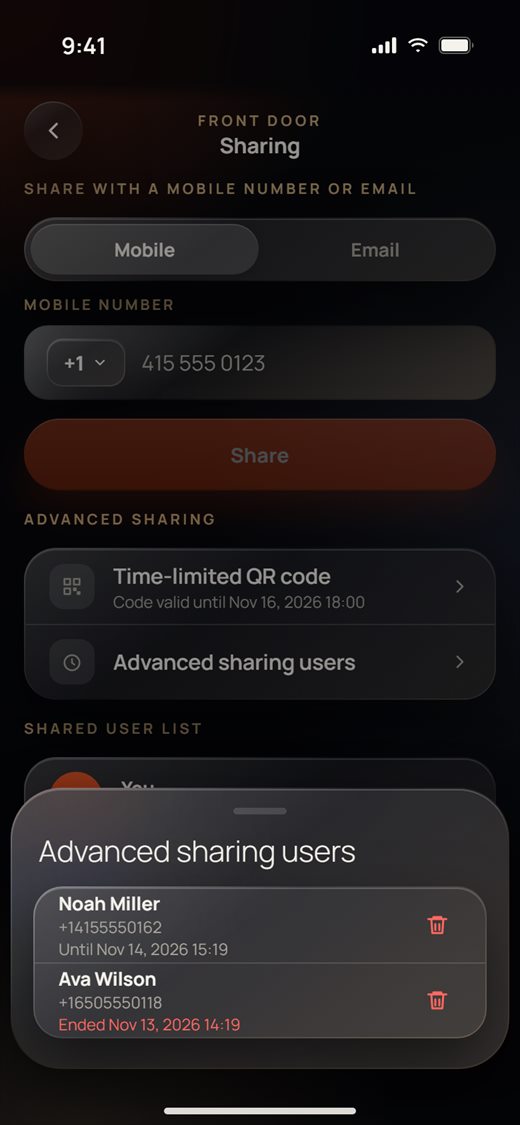
- To see who scanned the code, tap Advanced sharing users. Each person shows until when they have access, or when it ended. Tap the trash can to end someone's access early.
Notifications
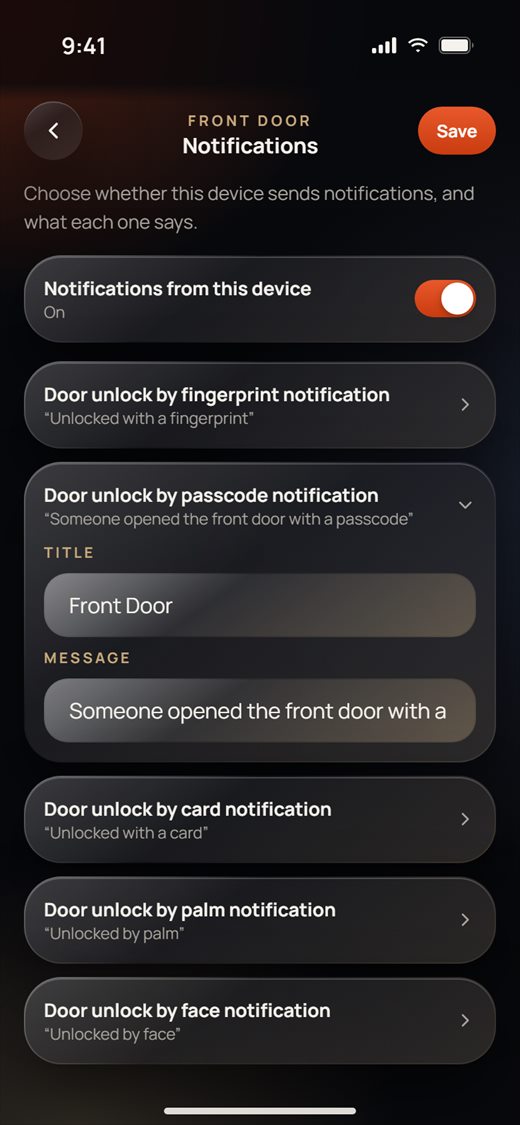
Choose which devices send notifications to your phone and what each one says. Open the device, tap the gear at the top right, then Notifications.
- Turn Notifications from this device on or off. This switch covers all the device's events.
- Each event (for a door lock: unlock by fingerprint, passcode, card, palm or face) shows its message. Tap an event to change its Title and Message.
- Tap Save at the top right.
Cameras
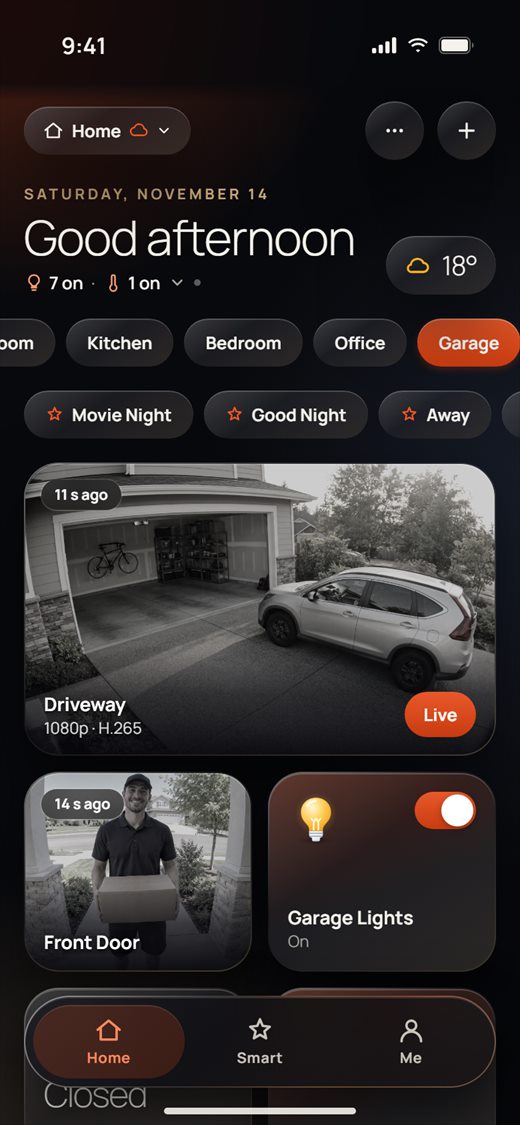
Your IP cameras show on the Home tab next to your devices, with a snapshot that refreshes every few seconds.
Add a camera
- On Home, tap +, then IP camera.
- The app searches your home network. Cameras that answer show under Found on this network · ONVIF: tap Use next to yours, then type its User and Password. A camera already in the app shows Added.
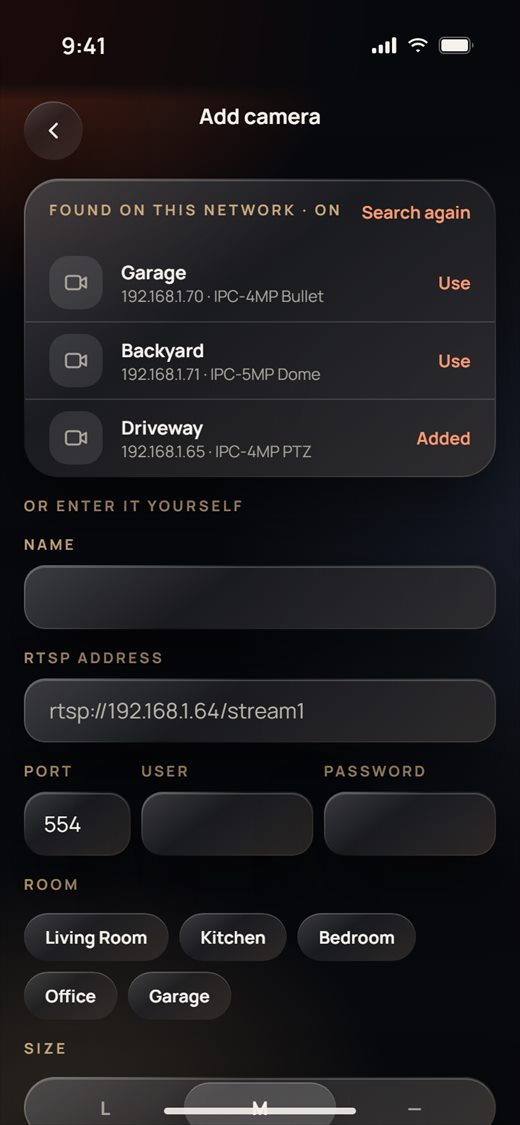
- If your camera is not found, type it yourself under Or enter it yourself: a Name, the RTSP address (from the camera's manual, for example rtsp://192.168.1.70/stream1), Port (usually 554), User and Password.
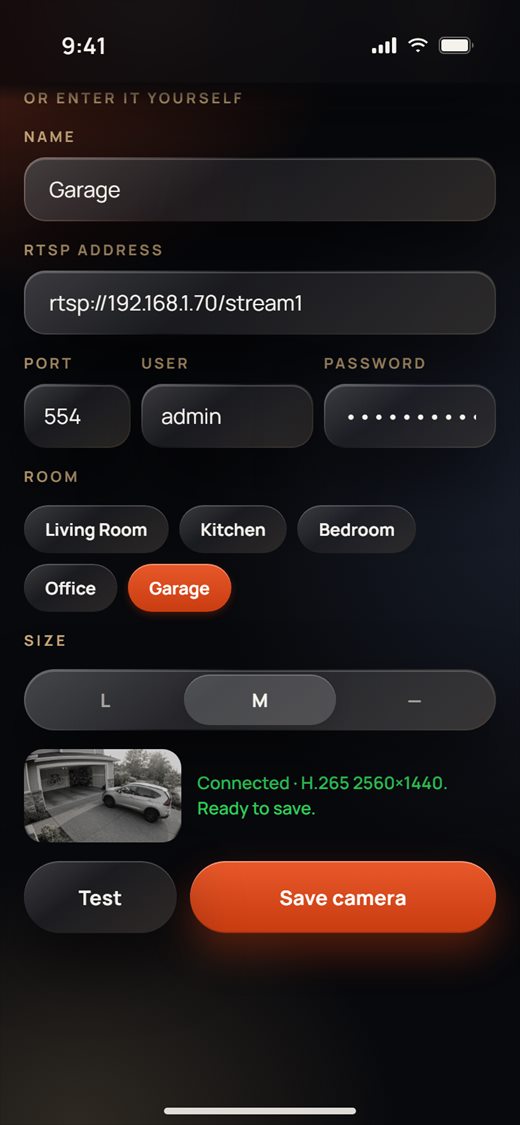
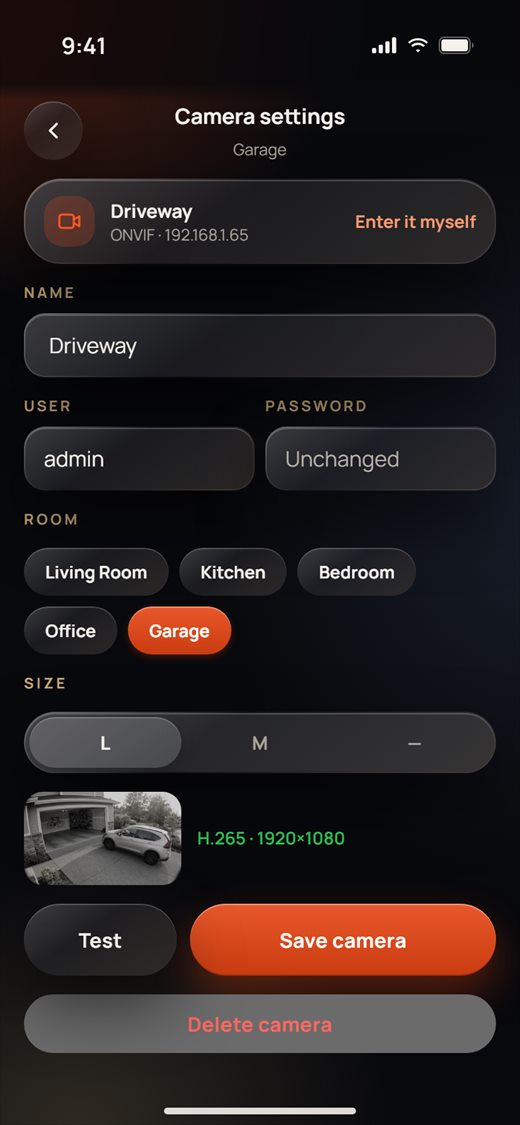
- Pick the Room and the card Size on Home (L large, M medium, or — a full-width row).
- Tap Test. When it works you see a picture from the camera, its video format and size, and "Ready to save". Tap Save camera.
Live view
- Tap a camera card on Home. The live picture opens, with Live at the top and the video format in the corner.
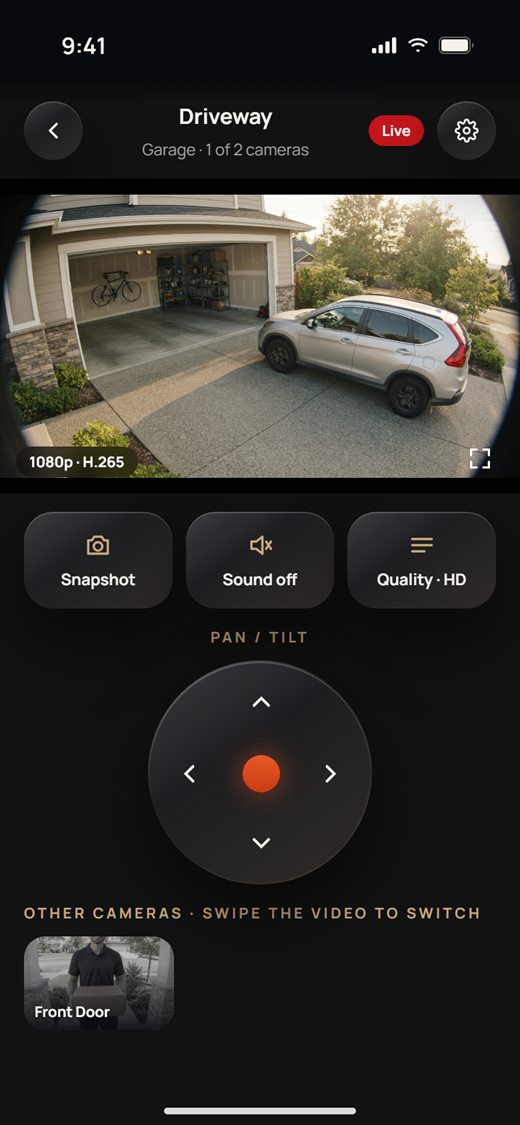
- Under the video:
- Snapshot: saves the current picture to your Photos.
- Sound off / Sound on: plays the camera's sound (cameras with G.711 audio).
- Quality · HD / Quality · SD: switches between the full picture and a lighter stream, useful on mobile data.
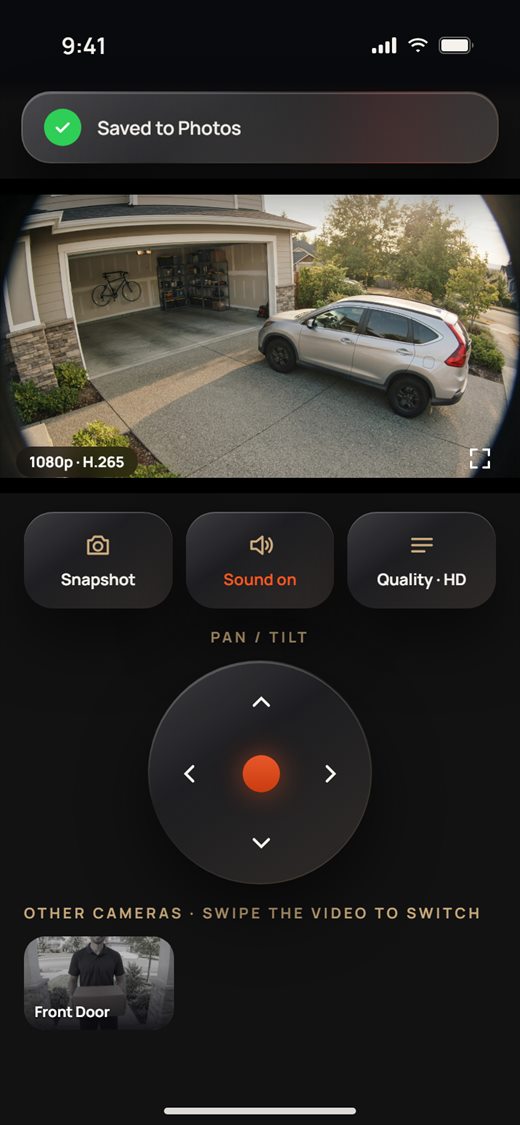
- Pan / tilt: on cameras that can move, press and hold an arrow on the round pad. The camera moves while you hold it and stops when you let go.
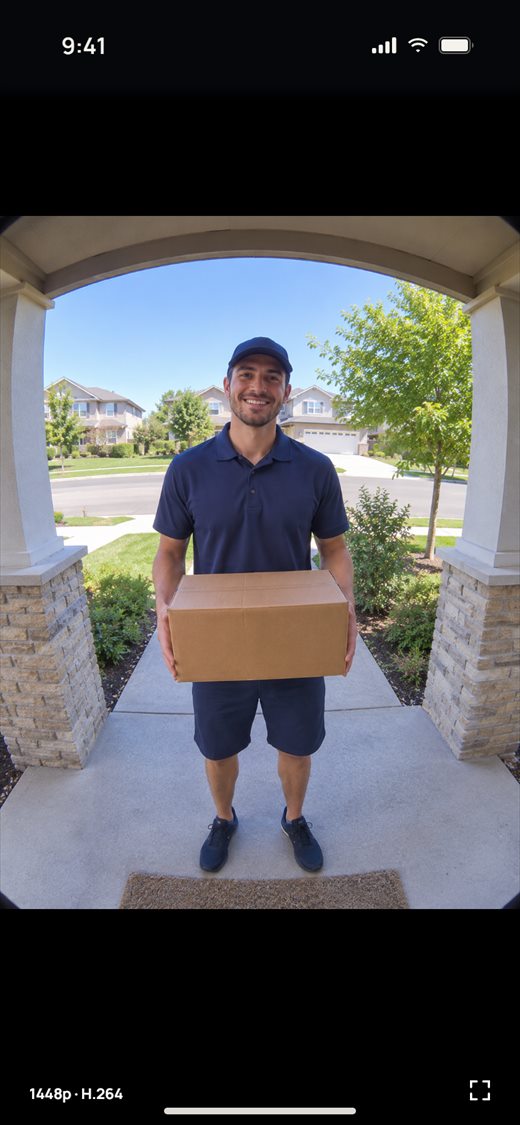
- Other cameras: tap a picture under Other cameras, or swipe the video left or right, to switch cameras.
- Tap the corners button on the video for full screen; tap it again to go back.
Change or delete a camera
- In live view, tap the gear at the top right (or hold the camera's card on Home and tap Camera settings).
- Change the name, login, room or size, then tap Save camera. The password stays as it was unless you type a new one.
- To remove the camera, tap Delete camera and confirm.
Answering the door
When someone rings your smart door lock or touch panel, your phone rings like a normal phone call, even when the NEXiiO app is closed or the phone is locked. Answer it to open the call screen.
- The call screen shows the live picture from the door. You can see who is there before you talk: they can't hear you yet.
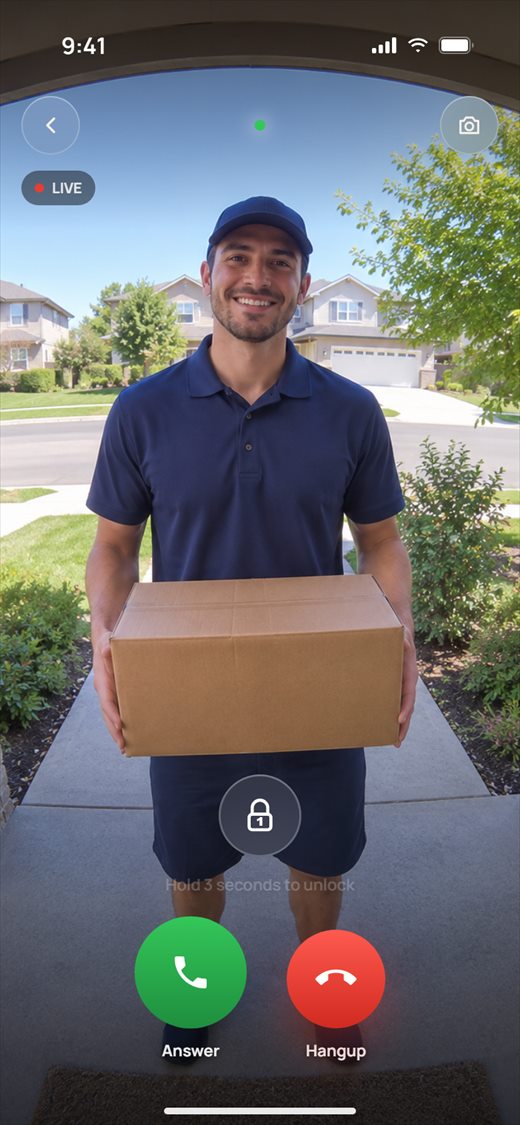
- Tap Answer to talk. The app gets the microphone ready for a few seconds, then Mute takes the place of Answer.
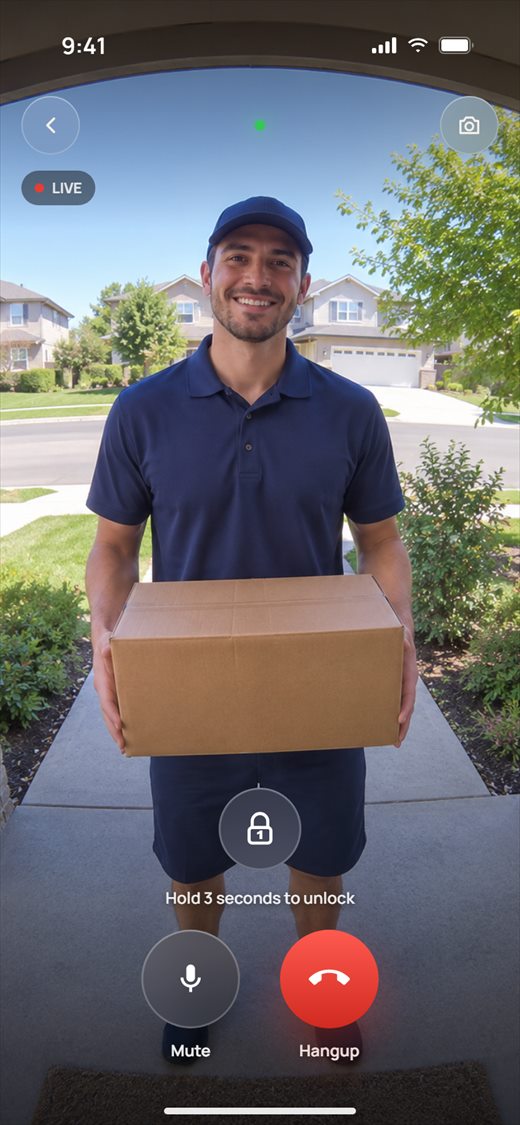
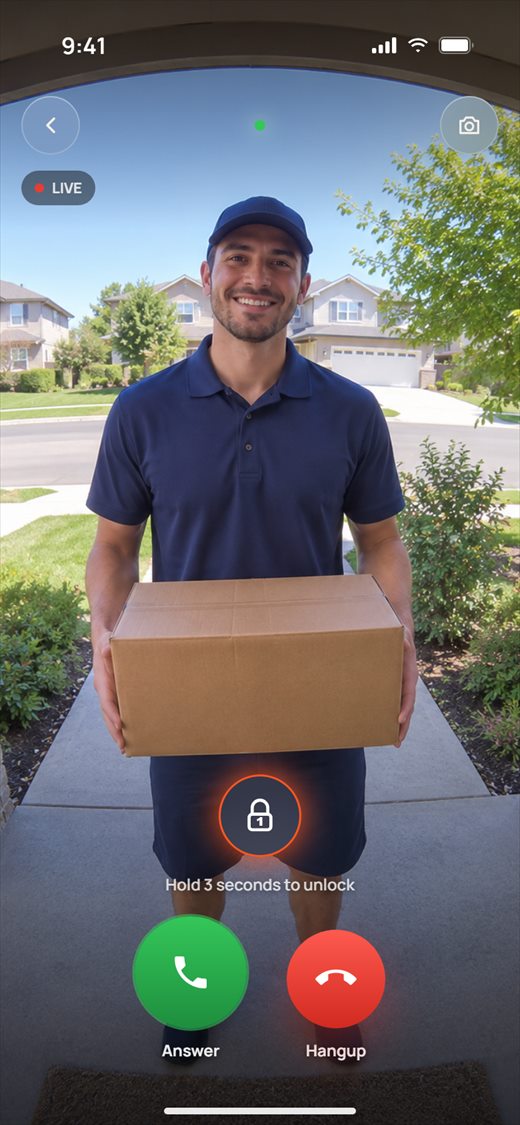
- To open the door, press and hold the lock button for 3 seconds. The ring around it fills while you hold it. A quick tap does nothing, so the door can't open by accident. The app tells you when the lock has opened.
- Tap Mute to turn your microphone off; tap it again to turn it back on.
- Tap the camera button at the top right to take a snapshot. It is saved to the door lock's timeline.
- Tap Hangup to end the call. The back button at the top left closes the screen without ending the call.
Part 2 · Installers
For installers
This part walks you through putting NEXiiO devices into a home with the NEXiiO app: adding them, naming them, setting each one up, and handing the home over to the owner.
Before you start
A few minutes of setup at the start saves time on every device.
- Use the owner's account. Each device is saved to the account that is signed in when you add it, and only that account (the owner) can change its settings later. Sign in with the home owner's account, or plan to share the devices with them at the end (see *Handing over to the owner*).
- Join the home's 2.4 GHz Wi-Fi. NEXiiO devices only work on 2.4 GHz networks. Put your phone on the same network the devices will use, and keep the phone, the device and the router close together.
- Allow the permissions when the app asks:
- Location: iOS needs it so the app can read the Wi-Fi name.
- Bluetooth: needed to find devices nearby.
- Local Network: needed to find and control devices at home. If you turned it off, go to iPhone Settings › NEXiiO and turn Local Network back on.
- Power the devices first. Each device should be installed, wired and switched on before you add it.
Adding devices
Tap + (Add device) at the top of Home. You can also add devices from the Devices page.
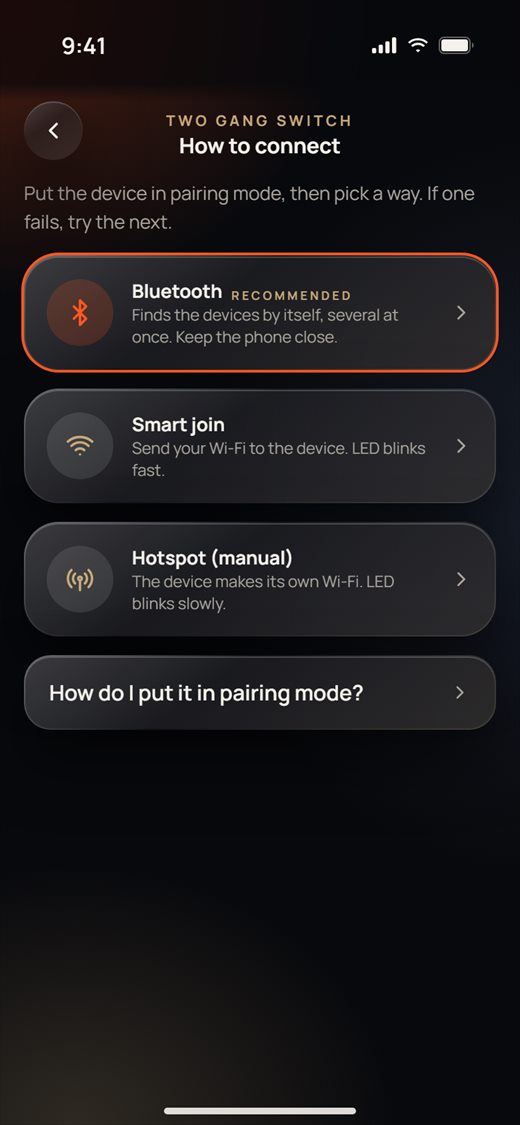
- Add a device shows the device types in groups (Electrical, Security and Sensors, Small Home Appliances …). Tap the type you are adding. At the top, the Bluetooth row shows how many NEXiiO devices the phone can already see nearby. Tap it to go straight to the Bluetooth list.
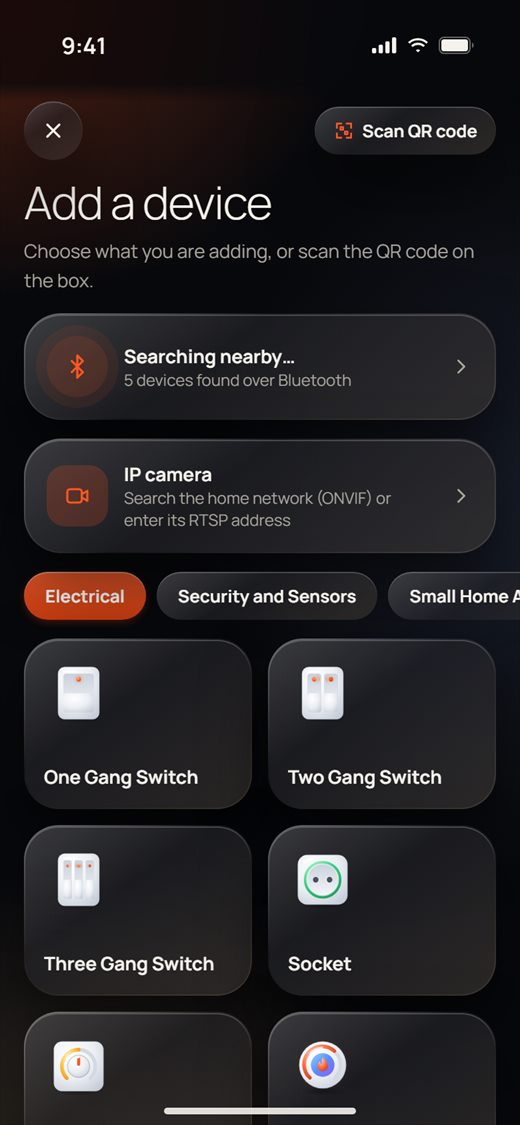
- How to connect gives you three ways to connect. Try them in this order. If one fails, try the next:
- Bluetooth (*Recommended*): finds devices on its own and can add several at once.
- Smart join: sends your Wi-Fi to the device while its light blinks fast.
- Hotspot (manual): the device makes its own Wi-Fi, and its light blinks slowly.
Not sure how to put the device in pairing mode? Tap How do I put it in pairing mode?
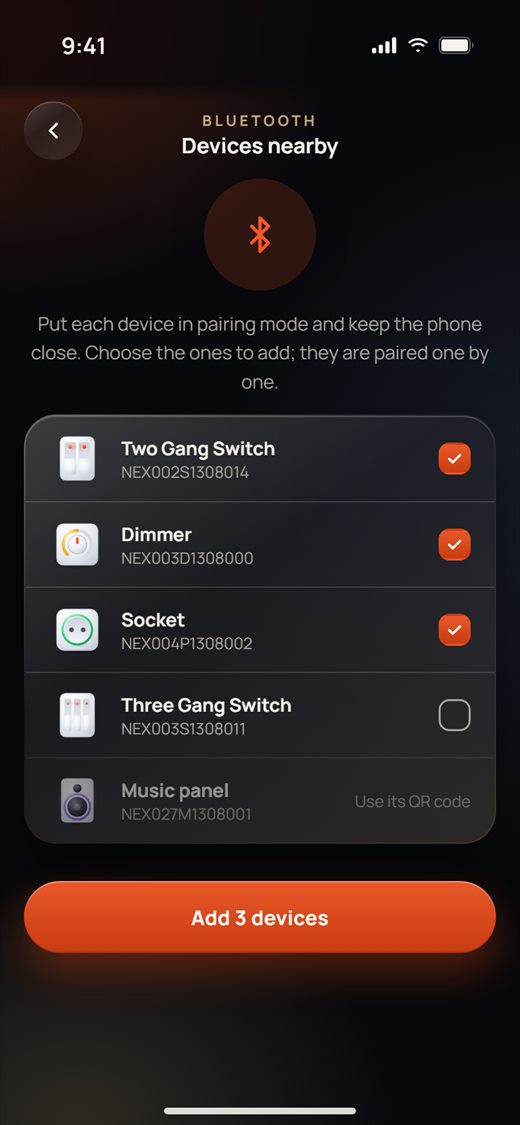
Bluetooth: several devices at once
- Put each device in pairing mode and keep the phone close. Devices nearby lists every NEXiiO device it finds, with its model code under the name.
- Each device is ticked when it is found. Tap a row to untick a device you don't want to add now. A panel shows Use its QR code, because panels are added with the scanner.
- Tap Add 3 devices (the button counts the devices you ticked).
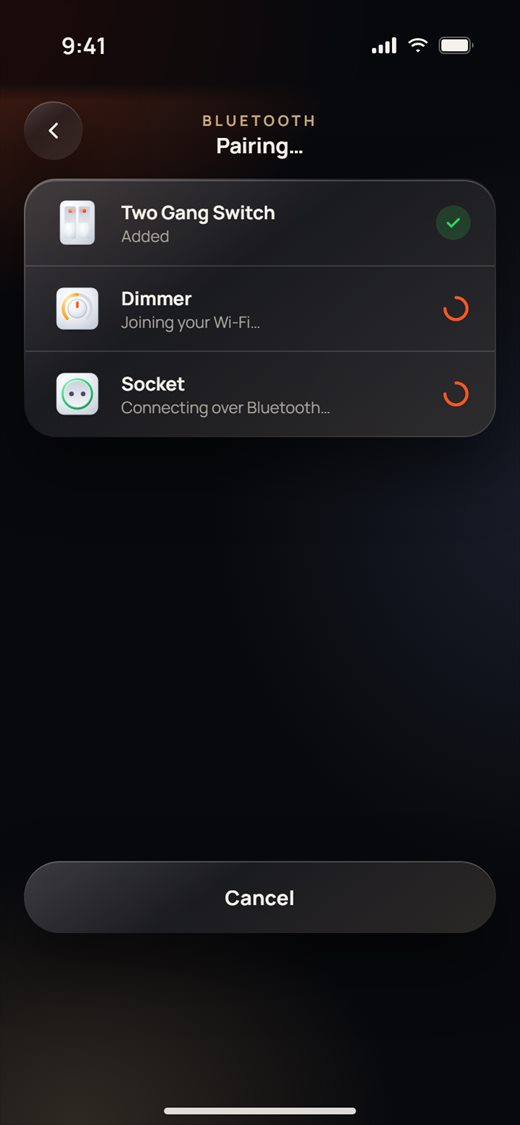
- The first time, the app asks for the Wi-Fi password once, and every device you picked gets it (see *Wi-Fi name and password* below).
- The devices are paired one by one: Connecting over Bluetooth…, then Found · sending your Wi-Fi…, then Joining your Wi-Fi…, then Added. The next device starts while the one before it is still joining the Wi-Fi. Tap Cancel to stop.
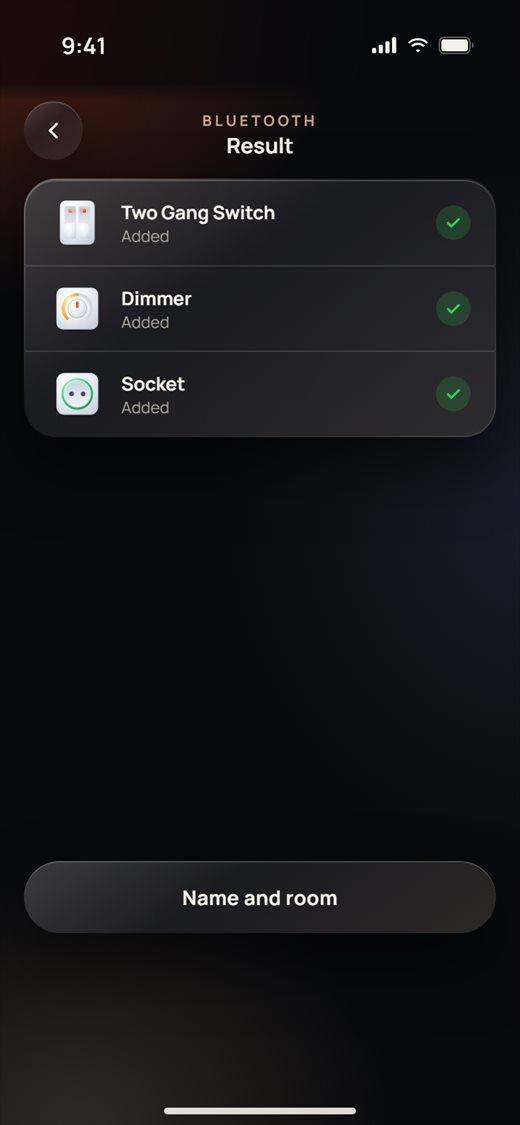
- When the list is done, tap Name and room.
Wi-Fi name and password
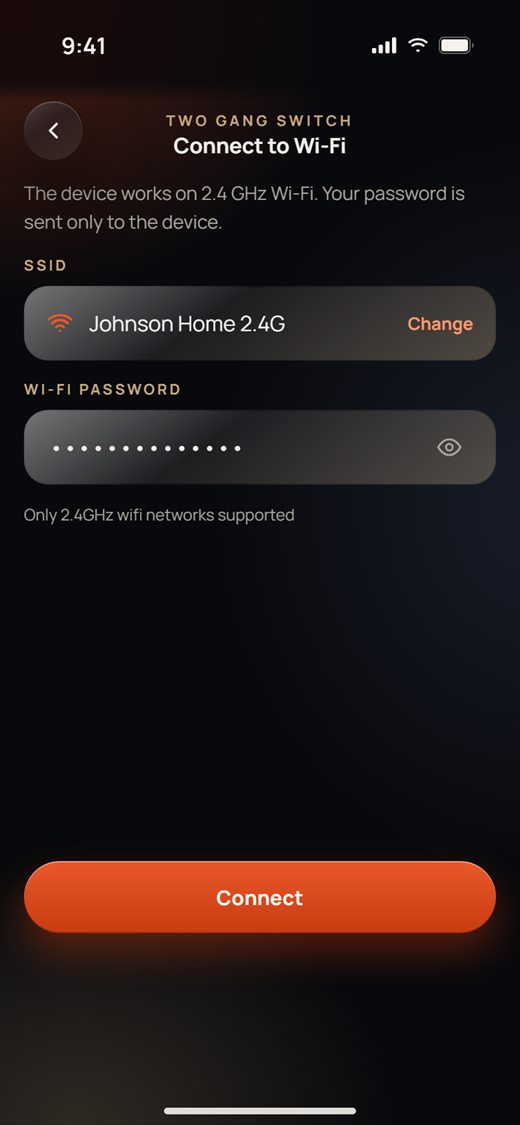
- Connect to Wi-Fi shows the network the phone is on. To use a different network, tap Change and join it in iPhone Settings.
- Enter the Wi-Fi password. Tap the eye to check it. The password is only sent to the device.
- Tap Connect. If you leave the password empty, the app asks before it goes on.
Smart join
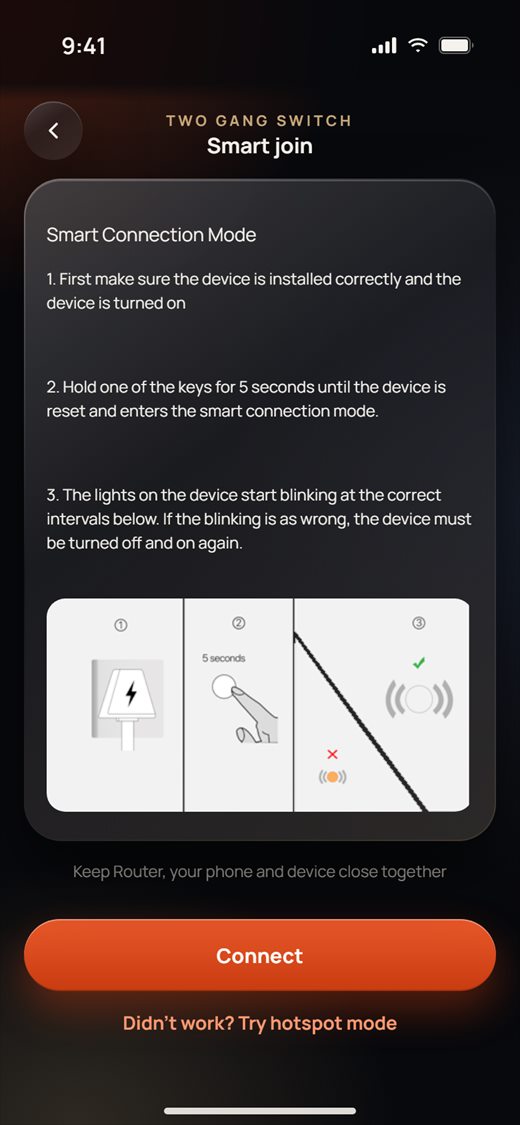
- Follow the device's own guide on the screen. For a switch, hold one key for 5 seconds until the lights blink at the rate shown in the picture.
- Tap Connect.
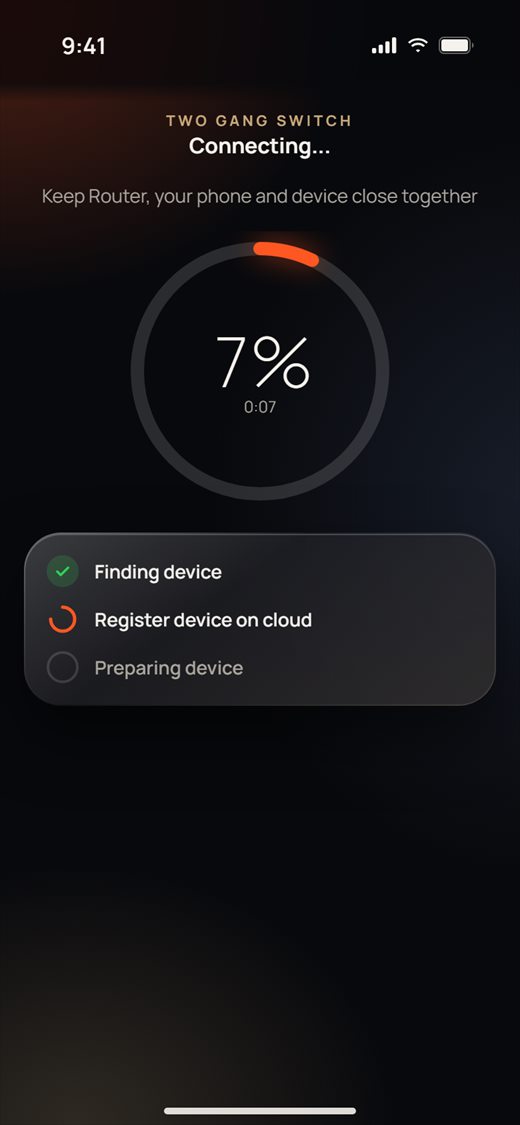
- The app looks for the device (Finding device), registers it in the cloud (Register device on cloud) and gets it ready (Preparing device). This can take up to 100 seconds. Cancel appears after 60 seconds.
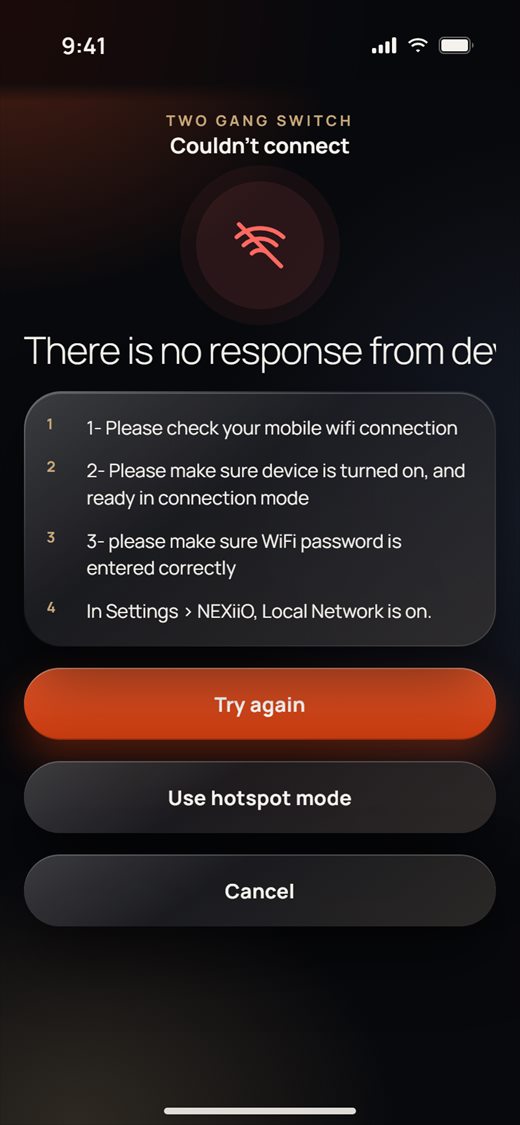
- If the device doesn't answer, the app shows what to check. Tap Try again to go back to the guide, or Use hotspot mode.
Hotspot mode
Use hotspot mode when Smart join doesn't work. On the Smart join page, tap Didn't work? Try hotspot mode.
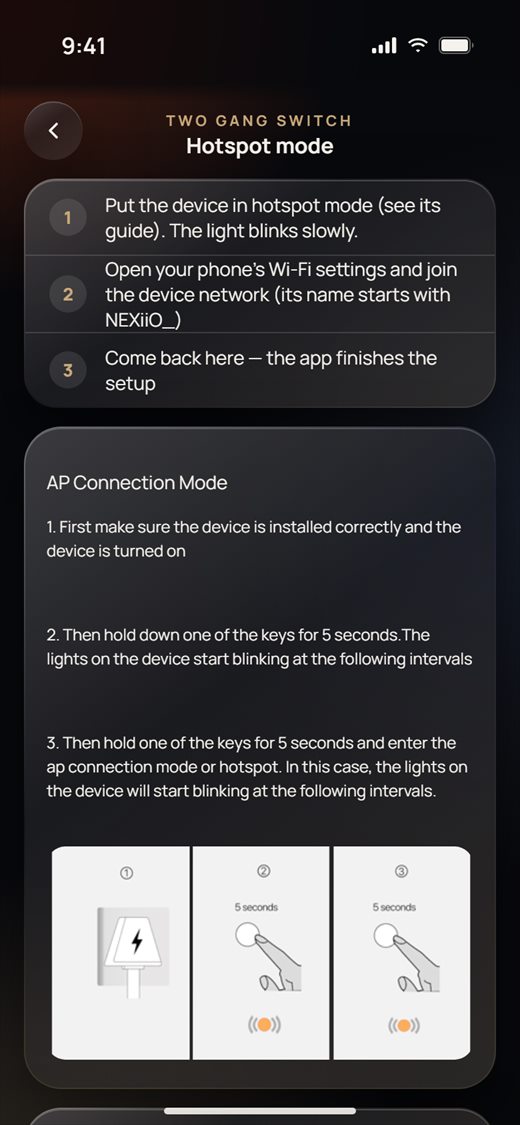
- Put the device in hotspot mode, following its guide. For a switch, hold a key for 5 seconds, then hold it for 5 seconds again. Its light blinks slowly.
- Tap Open Wi-Fi settings and join the device's own network (its name starts with NEXiiO_).
- Come back to the app. The status line turns green (On the device network). Tap I've joined it · continue and the app finishes the setup.
Adding with a QR code
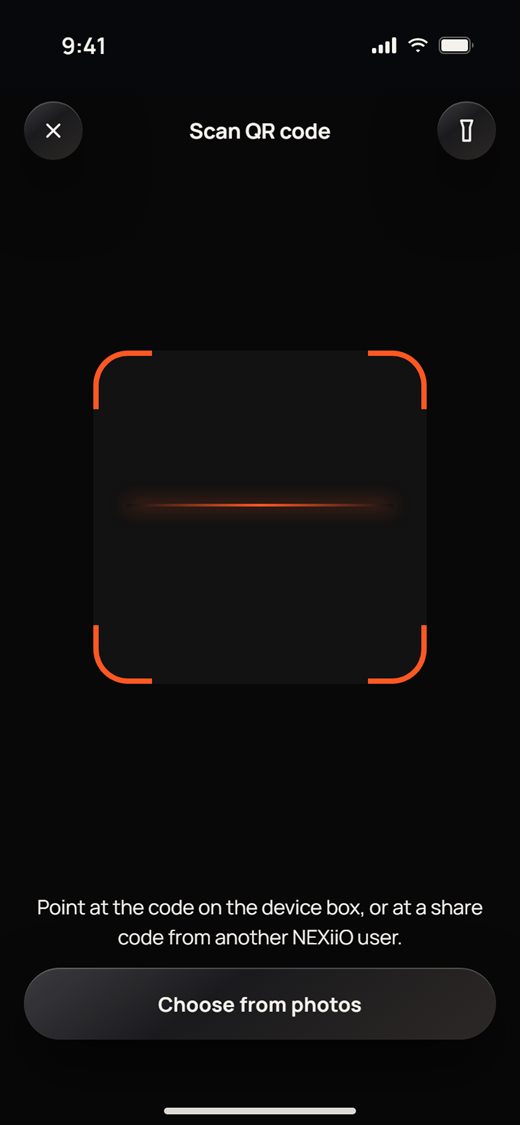
- On Add a device, tap Scan QR code (touch panels and music panels open the scanner by themselves).
- Point the camera at the QR code on the device box. Use the flashlight button in dim rooms, or tap Choose from photos if you have a photo of the code.
- The device is added to the account. Tap Done to name it and choose its room, or Scan another code.
Naming and rooms
Give each device a clear name and room right away, so the owner finds everything on Home.
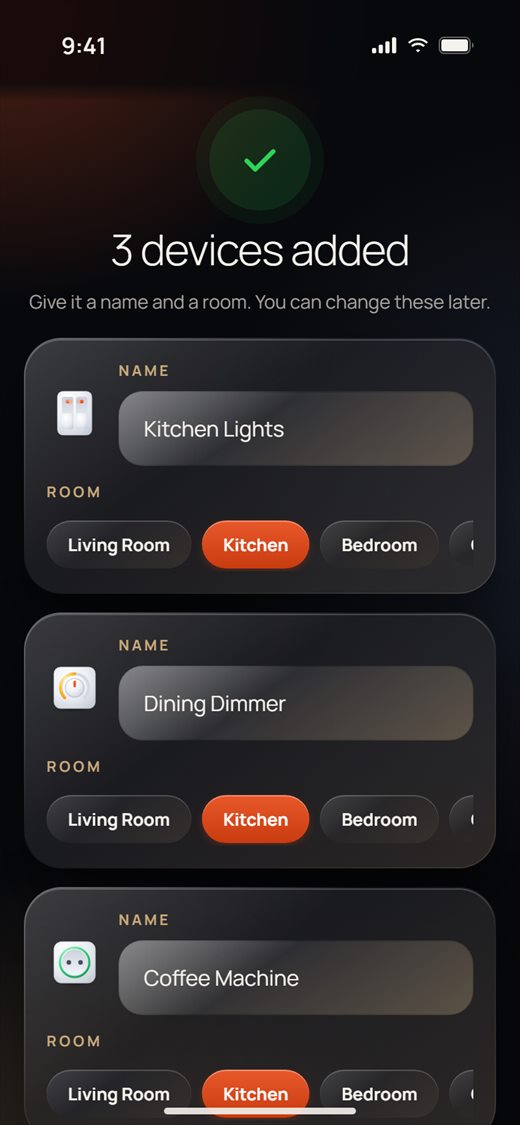
- After adding, each new device gets a card. Type a Name and tap its Room. Tap Done to save. A device you leave without a room is offered again on Home.
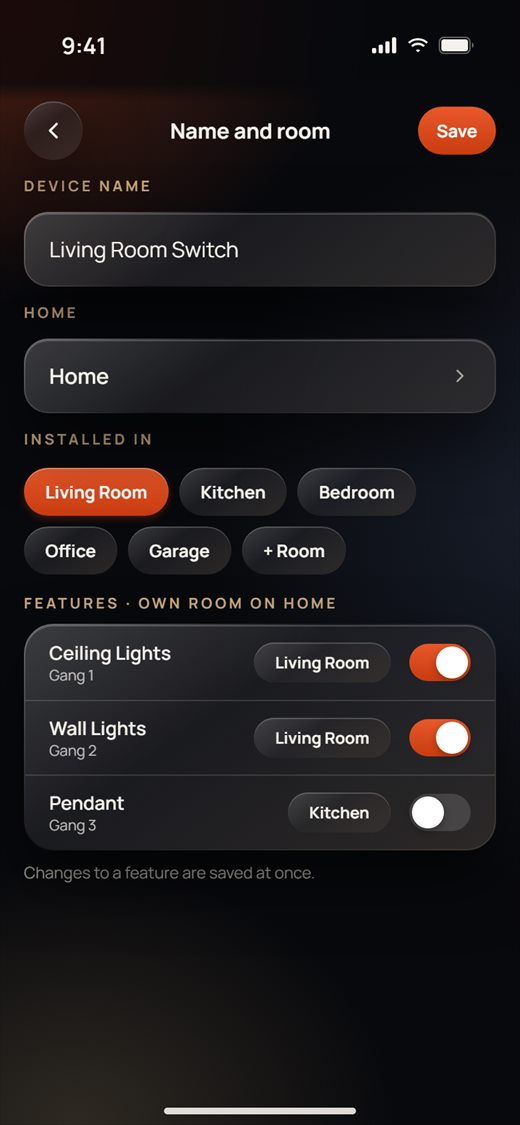
- To change this later, open the device, tap the settings button at the top right, then tap Edit next to the device name.
- On Name and room, change the Device name and tap Save. Tap a room under Installed in and it is saved straight away. Tap + Room to make a new room, or tap Home to move the device to another home.
- Features · own room on Home: each gang or channel can have its own room on Home and its own switch to show or hide it. These changes are saved straight away.
Device settings
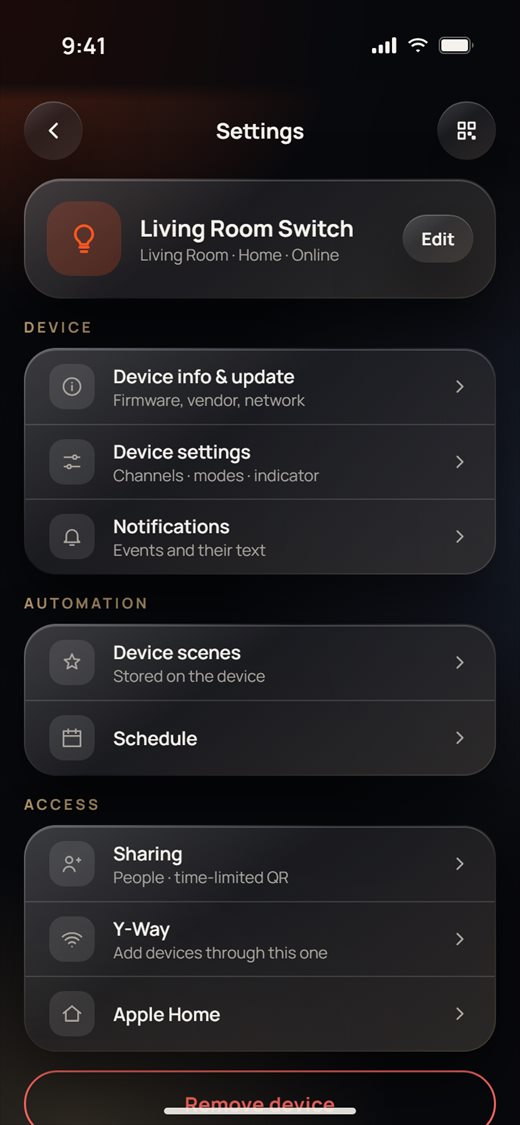
Every device has the same settings page. Open the device and tap the settings button at the top right.
- Settings shows the device with its room, home and Online / Offline, followed by its rows:
- Device: Device info & update, Device settings, Notifications
- Automation: Device scenes, Schedule
- Access: Sharing, Y-Way, Apple Home
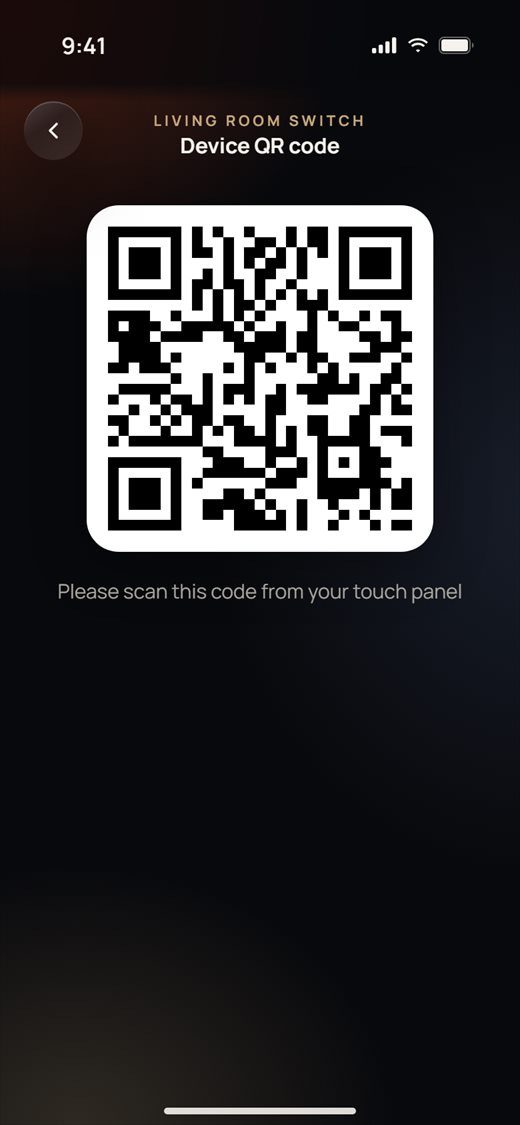
Only the rows that apply to that device type are shown. The QR button at the top right shows the device QR code. Remove device removes the device from the account.
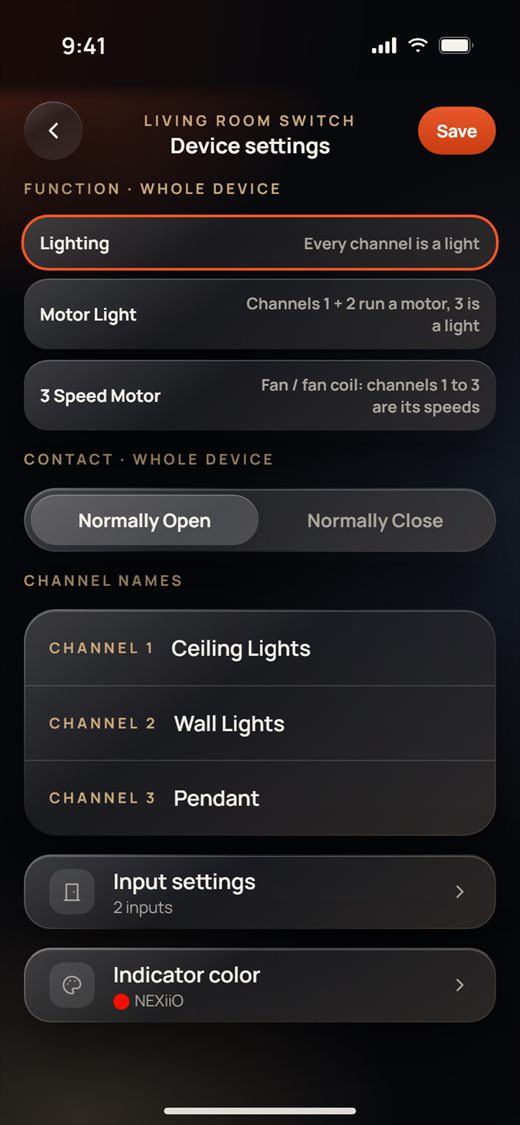
Device settings are read from the device. Change what you need and tap Save to send it. Here is what the page offers for the most common devices:
Switches and relays. Under Function · whole device, choose what the gangs do: Lighting, a Motor Light (gangs 1 + 2 run a curtain or shutter motor) or a 3 Speed Motor for a fan coil. The motor modes ask for a motor run time. Also set the Contact type and a name for each channel. Input settings and Indicator color appear when the device has inputs or an indicator light.
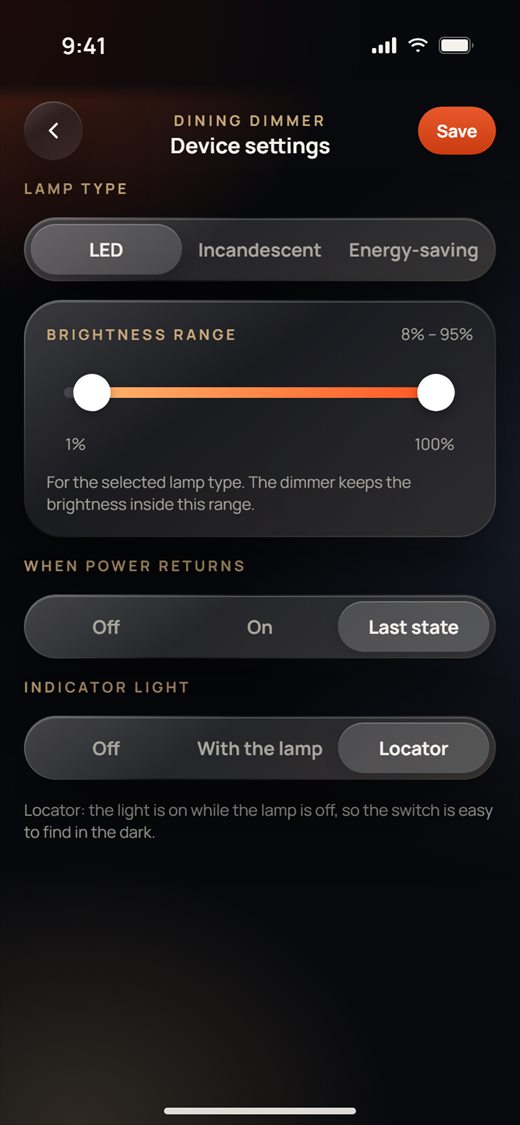
Dimmer (new series). Choose the Lamp type (LED, Incandescent, Energy-saving) and drag the two knobs to set the Brightness range for that lamp type. Then choose what happens When power returns and how the Indicator light behaves. Locator keeps the light on while the lamp is off, so the switch is easy to find in the dark. Older dimmers show a Lowest level slider instead: raise it if the lamp flickers at low levels.
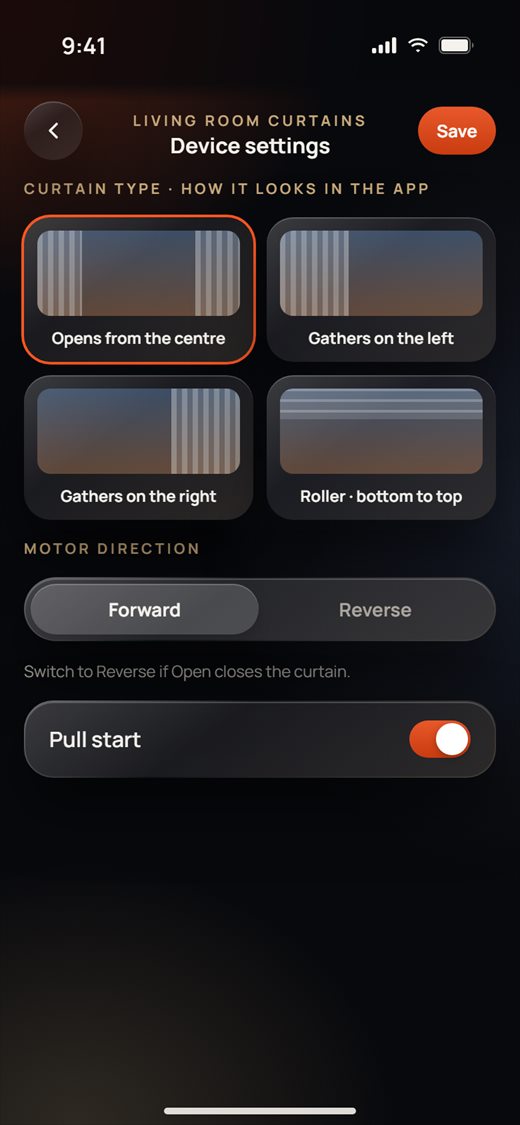
Curtain motor. The curtain type only changes how the curtain looks in the app. Under Motor direction, switch to Reverse if Open closes the curtain. Pull start lets the motor start when someone pulls the curtain by hand. A curtain switch also has a full travel time.
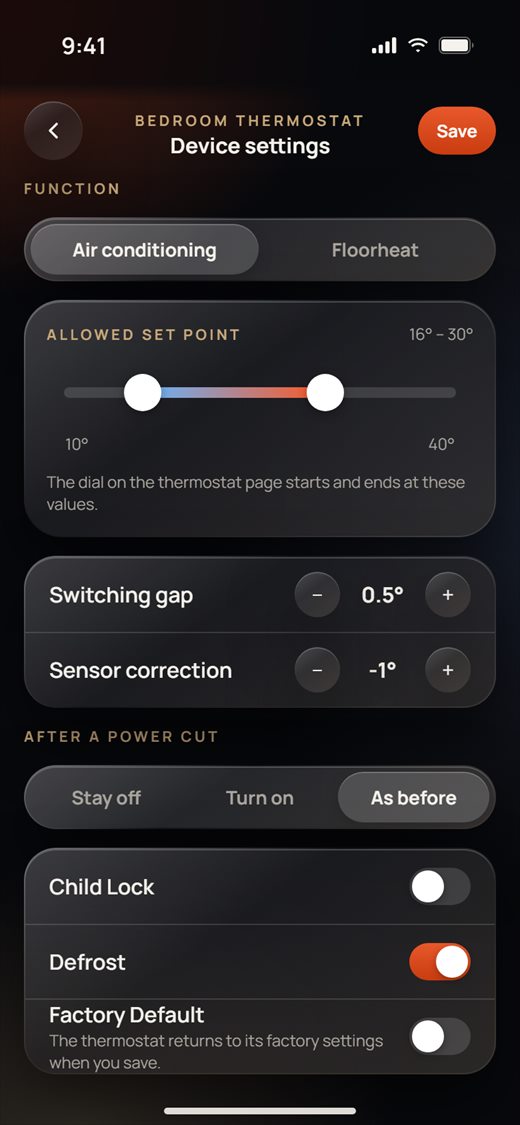
Thermostat. Choose Air conditioning or Floorheat, then drag the Allowed set point range (the dial on the thermostat page starts and ends at these values). Below that are Switching gap (0.5° or 1°), Sensor correction (−5° to +5°), what happens After a power cut, Child Lock and Defrost. Factory Default resets the thermostat when you save, and the app asks you to confirm first.
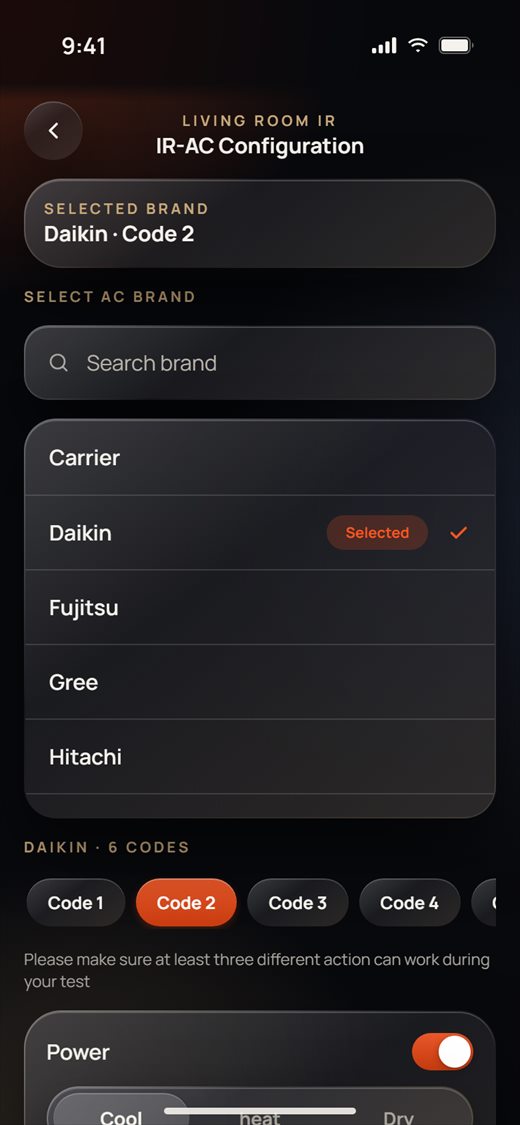
IR transceiver (air conditioner). On the IR device's AC page, tap the settings button. Search for or pick the brand, then try Code 1, Code 2 … Point the IR device at the air conditioner and use the test remote (Power, mode, set point, fan, Test) until the AC responds. Then tap Select this one. Code detect (lower on the page) listens for 60 seconds and shows each code it picks up from the original remote. The TV remote works the same way.
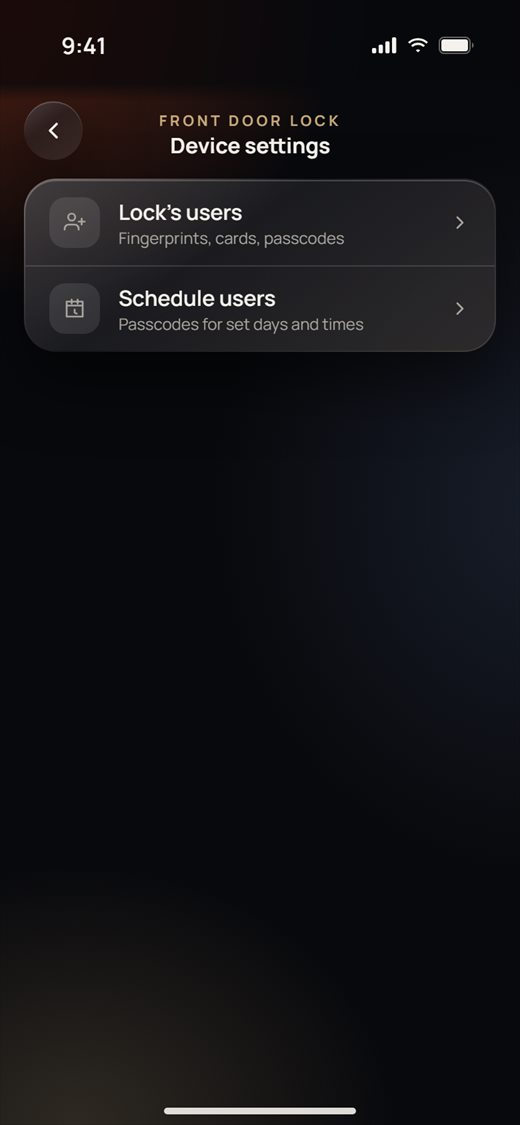
Door lock users and codes
On the lock, tap the settings button and then Device settings. You'll find two rows: Lock's users and Schedule users.
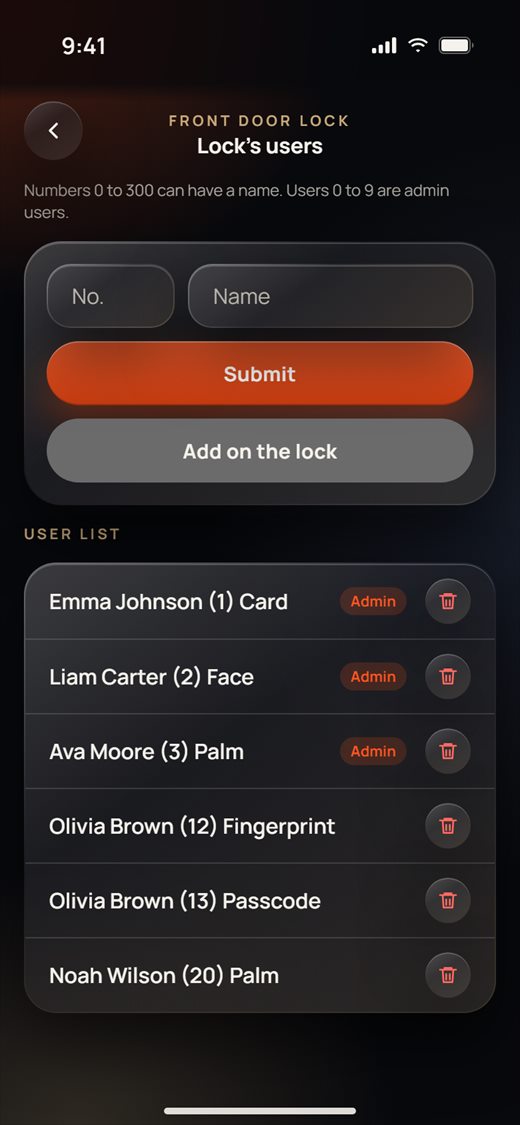
Lock's users
- The User list shows each user's name, number and how they open the door. Numbers 0 to 9 are Admin users.
- Name a user who is already on the lock: enter the number (0–300) and a name, then tap Submit.
- Add a new user on the lock (new lock series): tap Add on the lock, enter the person's name and choose Fingerprint, Card, Face, Palm or Passcode (up to 8 digits). Then tap Start.
- Do what the app shows at the lock within 60 seconds: place the finger several times, hold the card on the reader, look at the camera, or hold up your palm. The app confirms when the lock adds the user. If it takes longer, choose Keep waiting or Dismiss.
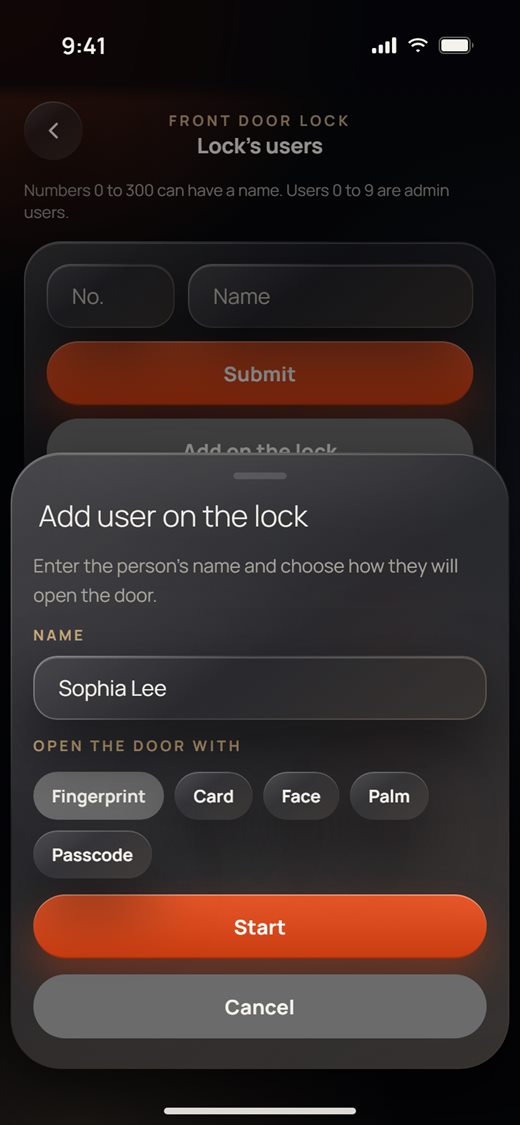
- To remove a user, tap the bin. On the new series you can remove the user from the lock and the list, remove all users with that name, or remove them from the list only.
Schedule users (time-limited codes)
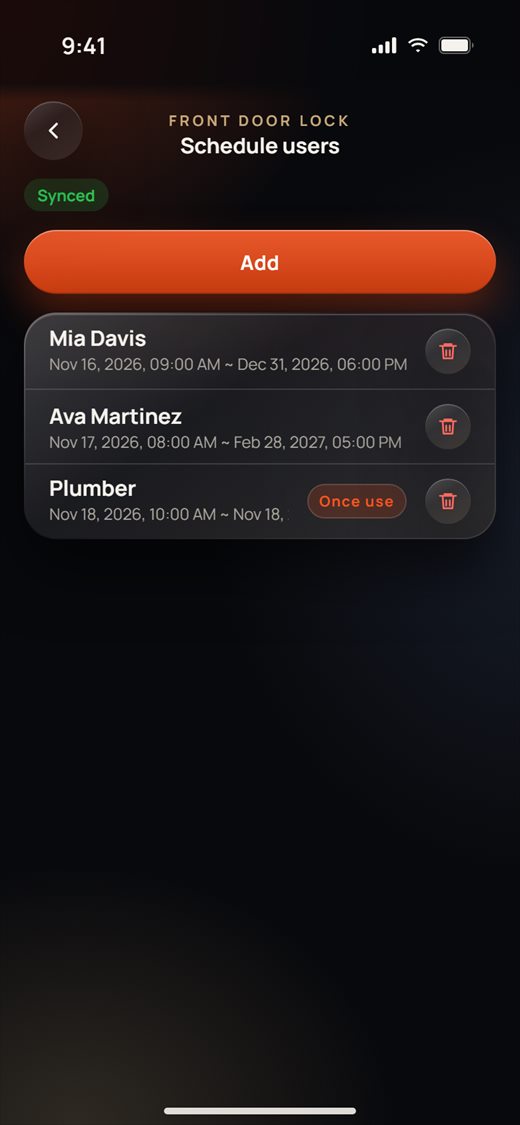
Schedule users only work for a lock that is in the owner's account in the cloud.
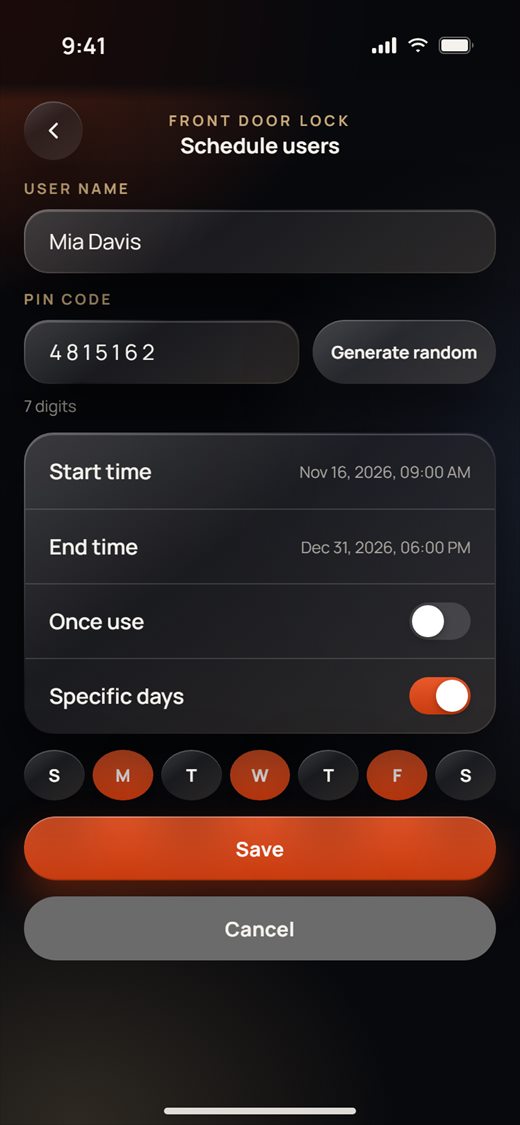
- Tap Add. Enter a User name and a Pin code (7 digits on the new series, 8 on the old one), or tap Generate random.
- Set the Start time and End time. Turn on Once use for a code that works only once, or Specific days to pick the weekdays it works.
- Tap Save. The codes are sent to the lock and the new code is copied, so you can paste it into a message. The badge at the top shows Synced, or Pending until the lock has the codes. You can have up to 20 schedule users.
Device schedules and device scenes
Schedules and device scenes are saved on the device itself, so they keep working when no phone is around.
Schedule
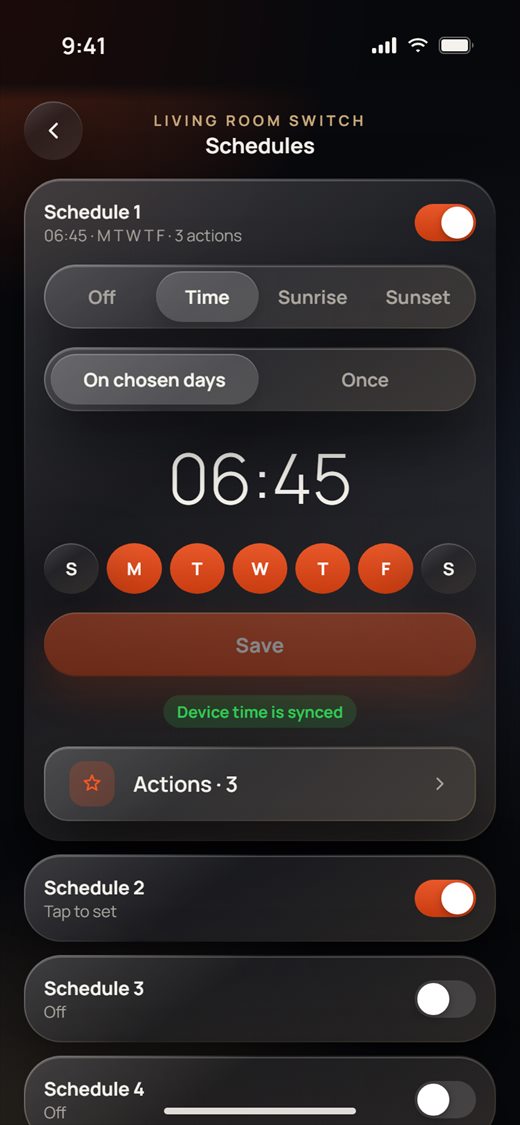
- On Settings, tap Schedule. Each device has a set of schedules (Schedule 1, Schedule 2 …). Use the switch to turn one on or off.
- Tap a schedule that is on to open it. Choose Time, Sunrise or Sunset, then On chosen days or Once. Set the time, pick the days, and tap Save. Device time is synced confirms the device clock is right.
- Tap Actions to choose what the schedule does: Check scenario items opens the actions in the scene editor (Send to the device writes them back), Add from existing scenario copies one of the home's scenes, and Delete scenario items clears them.
Device scenes
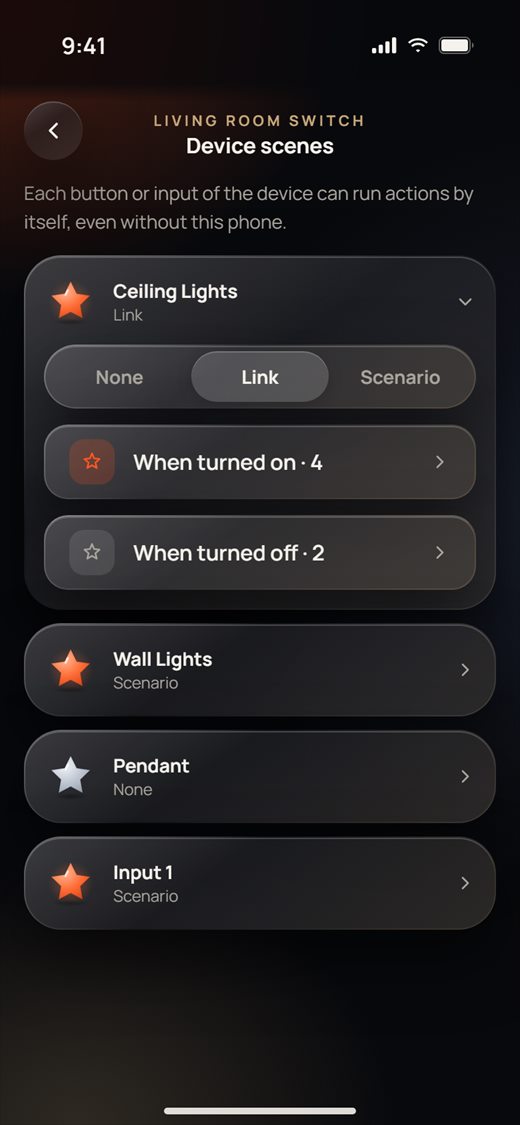
- On Settings, tap Device scenes. You'll see each gang or input of the device.
- Open one and choose None, Link or Scenario:
- Link: separate actions When turned on and When turned off.
- Scenario: one list of actions that runs when you press the button.
- Tap a row to edit its actions, in the same way as for schedules. The number after the row name is how many actions it has.
Touch / AiO panel pages
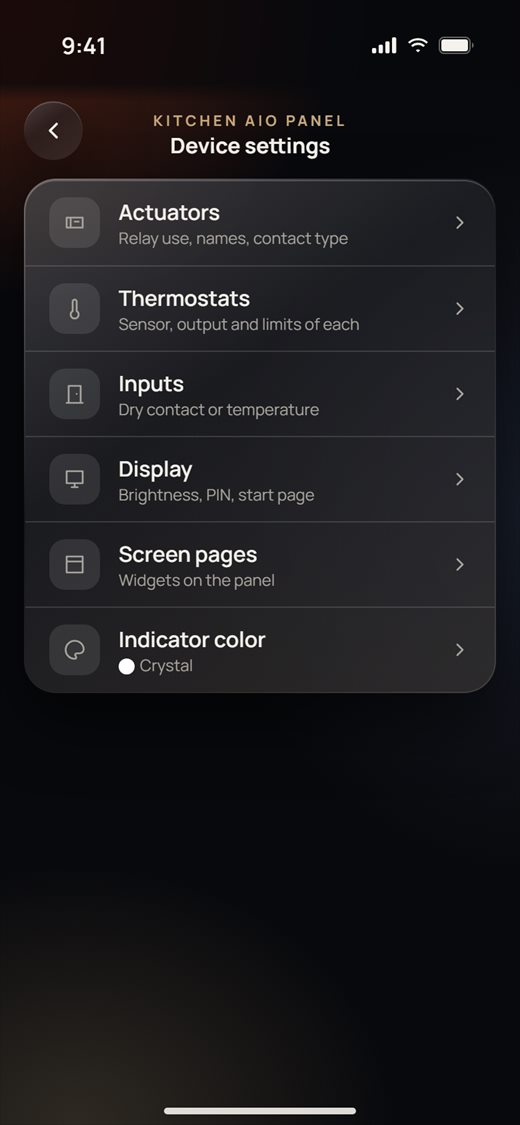
An AiO panel's Device settings is a menu: Actuators, Thermostats, Inputs, Display, Screen pages and Indicator color. Only the owner sees all of them.
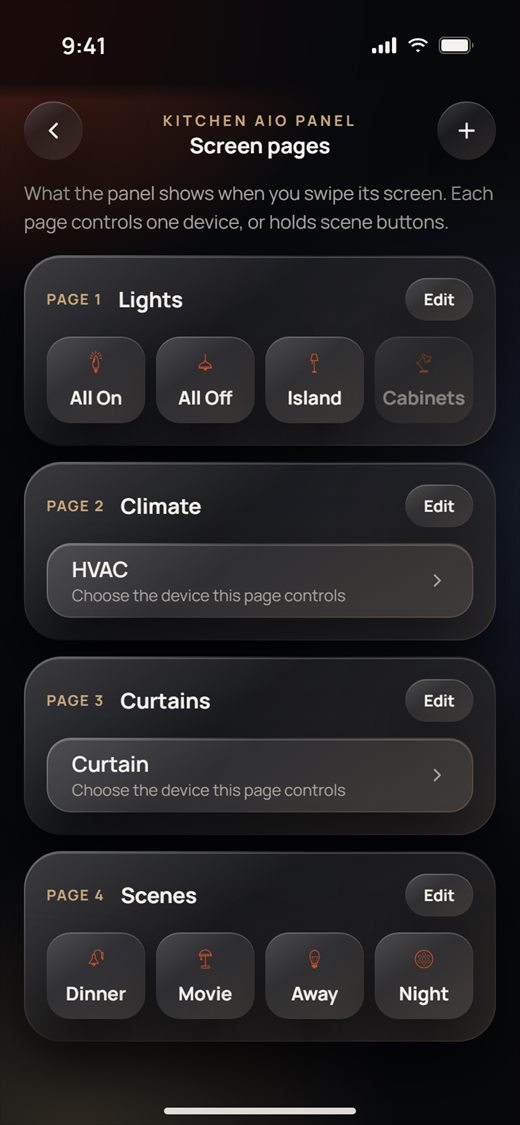
- Tap Screen pages to choose what the panel shows when someone swipes its screen. Each page either controls one device (HVAC, Curtain, dimmer, RGB, music) or holds scene buttons.
- Tap Edit on a page to change its name and type, or to delete it. Tap + to add a page.
- On a scene-button page, tap a button to set whether it's Shown on the panel, its name, its icon, and what it runs: One device or a Scenario. On a one-device page, tap Choose the device this page controls.
- When you're done, tap Show the changes on the panel. The panel restarts and then shows the new pages. If you leave without doing this, the app asks whether to restart the panel now.
Firmware updates
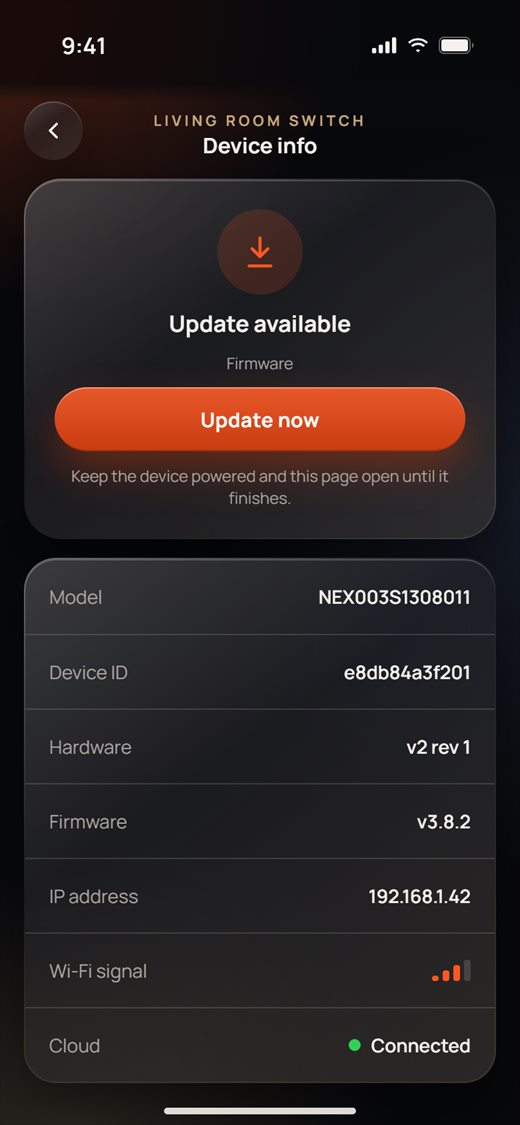
- On Settings, tap Device info & update. The app looks for the device on the network and then shows its model, device ID, hardware, firmware, IP address, Wi-Fi signal and cloud connection.
- Tap Check for update. If Update available appears, tap Update now and confirm.
- Keep the device powered and the page open until the progress bar finishes. The app says when the device is updated. There is no update for this device means the device is already up to date.
- Devices with a second chip show Vendor MCU information, with its own Check for update.
Y-Way and Apple Home
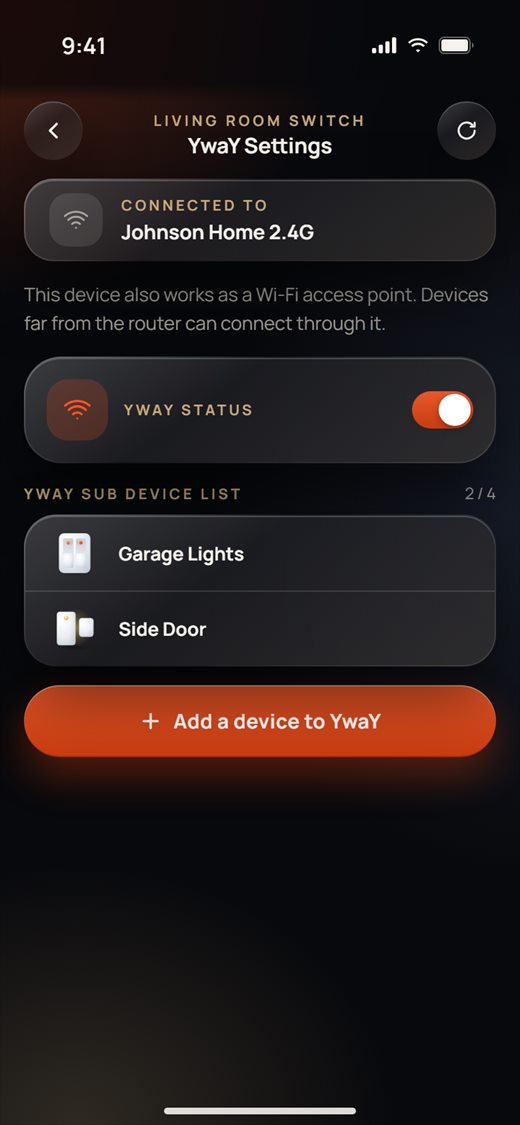
Y-Way turns a device into a small Wi-Fi access point. Use it for devices that are too far from the router.
- On Settings, tap Y-Way. Connected to shows the network the device itself uses.
- Turn on YwaY status. The list shows the devices that connect through it (up to 4).
- Tap Add a device to YwaY. The normal add flow opens, but the new device joins this device's network and goes into this device's room. No password is needed.
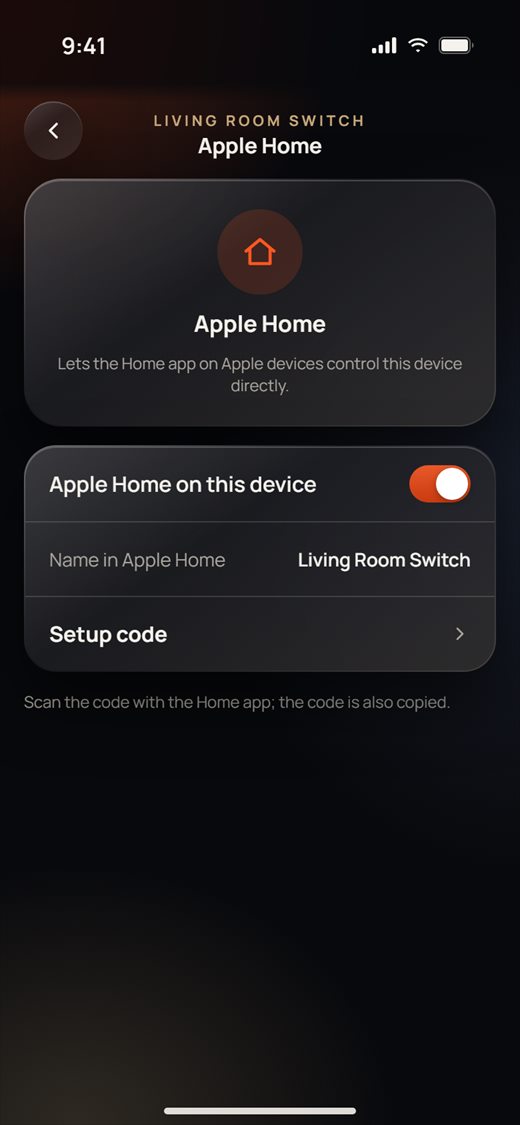
Apple Home (switches, dimmers, curtain switches and relays): on Settings, tap Apple Home and turn on Apple Home on this device. Tap Setup code to show the code, then scan it with Apple's Home app. The code is also copied for you.
Handing over to the owner
- Best way: add everything while signed in with the owner's account. The owner then has full control, including all settings.
- If you used your own account: open each device's Settings › Sharing and share it with the owner's mobile number or email, or use a time-limited QR code. People you share with can control the device, but its settings stay with the account that added it (see Part 1 for sharing).
- Before you leave, check that every device has a clear name and room, that the panels show the right pages, and that the door lock users and codes are in place.
Troubleshooting
Device not found
- Check that the device is in pairing mode. Smart join needs a fast blink; hotspot mode needs a slow blink. If the blink pattern is wrong, switch the device off and on again and repeat its guide.
- Move the phone, the device and the router closer together.
- Check that the phone is on the 2.4 GHz network and the password is correct.
- Check that Bluetooth, Location and Local Network are allowed for NEXiiO in iPhone Settings.
- If one way fails, try the next: Bluetooth, then Smart join, then Hotspot (manual).
"Device not respond" / page doesn't open
- The device didn't answer in time. Check that it has power, then tap Try again.
- On settings pages, parts the device didn't answer are hidden. Open the page again when the device is online.
Wi-Fi issues
- Only 2.4 GHz networks are supported. Make sure the phone is on the router's 2.4 GHz network when you add devices.
- For devices far from the router, use Y-Way on a nearby device.
Offline vs cloud
- Online / Offline on Settings shows whether the device is answering right now.
- Cloud on Device info shows how well the device reaches the cloud (Connected, Fair, Weak, Not connected). At home, the app controls devices over the local network. Away from home, it goes through the cloud.
- A device added as "on this phone only" works at home and is sent to the account when the cloud answers.
- Schedule users and sharing need the cloud. A Pending badge turns Synced once the lock and the cloud have the codes.